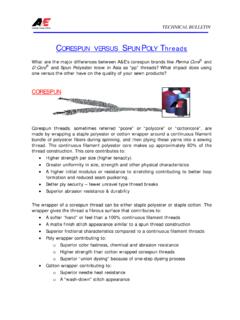
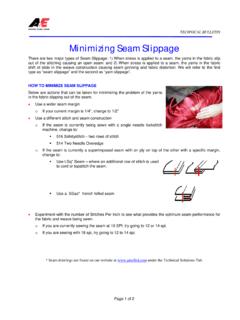
Transcription of Minimizing Seam Puckering 2-5-10
1 TECHNICAL BULLETIN 02/05/10 Page 1 Minimizing Seam Puckering Seam Puckering refers to the gathering of a seam during sewing, after sewing, or after laundering, causing an unacceptable seam appearance.
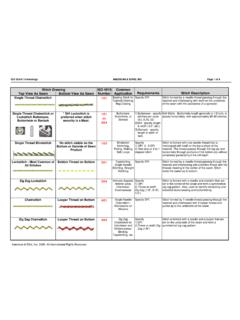
2 Seam Puckering is more common on woven fabrics than knits; and it is prominent on tightly woven fabrics. Puckering is usually caused by one or more of the following conditions: Yarn Displacement (structural jamming of fabric yarns). Tension Puckering (excessive thread tension and recovery). Machine Puckering (uneven ply feeding). Shrinkage (where seam components have differential shrinkage). Below is a rating system for seam Puckering from 1 to 5 with 5 being pucker-free. This AATCC seam smoothness analysis is used by many major manufacturers to rate their seam performance. Yarn Displacement or Structural Damage Seam Puckering is more prevalent on very tightly woven fabrics because the yarns are oriented in very tight layers that cannot shift easily to compensate for the thread as it is inserted into the seam.
3 This causes these tight yarns in the fabric to draw up giving a rippled appearance along the seam line. This is usually more of a problem when seams are sewn in the warp direction than in the weft (filling) or bias If possible, carefully clip the thread between adjacent needle penetrations along the seam and observe if the Puckering remains in the fabric or goes away. If the Puckering is still in the seam after the threads are clipped, then yarn displacement is the probable cause. AATCC Photographic seam Puckering replicas Single Needle Seams Double Needle Seams Rating 5 4 3 2 1 5 4 3 2 1 TECHNICAL BULLETIN 02/05/10
4 Page 2 Solutions to Puckering Caused by Yarn Displacement To minimize seam Puckering caused by yarn displacement or the structural jamming of the yarn in the fabric being sewn, the following corrective action should be used: Use the smallest thread size available that will maintain adequate seam strength and sewing performance. Threads specifically designed for Minimizing seam Puckering on light weight no-iron shirts and blouses include our T-16, T-18 & T-24 Perma Core Ultimate.
5 These threads are very strong for their size and have excellent frictional characteristics allowing them to be sewn with minimum machine thread tension. Use smallest needle size possible that will not cause excessive sewing problems. We also recommend using a needle with a longer needle point, if available which will have less resistance as it penetrates the seam. Use a needle plate with a small needle hole; and a presser foot with a small needle hole. Reduce the number of stitches per inch so there are fewer yarns displaced in the stitch line to cause seam Puckering .
6 When possible, cut the garment pieces so they can be sewn on the bias or in a direction that allows the different yarns in the construction of the fabric to be displaced. Thread Tension Puckering If a thread is sewn into the seam with excessive machine thread tension, the thread will try to recover or return to its original length. This will cause the seam to pucker immediately as the seam comes out from under the presser-foot. However, sometimes the sizing or resins in the fabric will initially maintain a flat seam but later in the day, the seam will appear puckered. This phenomenon also occurs after the garment is laundered and the sizing materials are removed causing the seam to pucker and the inspector to think that there was too much shrinkage in the thread.
7 Excessive thread tension during sewing will not only cause puckered seams but also cause other sewing problems including thread breakage and skipped stitches. Our Perma Core Ultimate threads are designed to be sewn with minimum thread tension. They also have a very high initial modulus or resistance to stretching under normal sewing tensions. This will help minimize or eliminate tension Puckering . Excessive Needle Tension Tex 16 Tex 18 Tex 24 5 rating 4 rating 3 rating TECHNICAL BULLETIN 02/05/10 Page 3
8 Identification Carefully clip the thread between adjacent needle penetrations along the seam and observe if the Puckering is reduced in the fabric. If it is, then excessive thread tension is the probable cause of the seam Puckering . Solutions to Tension Puckering Use a thread with a low elongation or high initial modulus to minimize stretching during sewing. Use a thread with good lubricity characteristics that will allow it to be sewn with minimum machine thread tension. Perma Core Ultimate is specifically designed to have these physical characteristics.
9 Use very light machine thread tensions. Begin by setting the bottom thread tension (bobbin or looper) as light as possible but still maintain the proper thread control. Next adjust the needle thread tension to a minimum level necessary to maintain a closed seam and a balanced stitch. This not only reduces the elongation of the thread in the seam, but also improves loop formation and sewability. Reducing the thread size will not only help to minimize structural jamming but can usually be sewn with lighter machine thread tension because a smaller thread requires less tension to pull it up into the seam and set the stitch.
10 We recommend using T-16 or T-18 on wrinkle-resistant or no-iron shirts and blouses. T-24 Perma Core Ultimate is ideal for tailored suits and trousers. If structural jamming does not appear to be a problem, increase the needle size or use a needle with a ball eye to open up a larger hole in the fabric so the stitch can be set with the lightest tension possible. Properly set the take-up spring so that the stitch can be set with minimum thread tension. Polish or replace all eyelets and thread guides that may be grooved to make sure they do not affect the frictional properties of the thread.