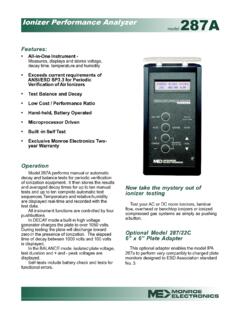
Transcription of Model 287a Ionizer Performance Analyzer - …
1 Operator s Manual Model 287a Ionizer Performance Analyzer P/N 0340172 287a -1/100 06222017 100 Housel Ave PO Box 535 Lyndonville NY 14098 585-765-2254 fax: 585-765-9330 CONTENTS Specifications .. Section 1 .. Page 1 Specifications .. Page 1 Accessories included .. Page 1 What this instrument does .. Page 1 General Section 2 .. Page 2 Operation Getting Started, a TutorialSection 3 .. Page 3 Confidence Check Three steps to get going .. Page 3 Further familiarization.
2 Page 4 Test results .. Page 5 The Set-up Menu .. Page 6 Maintenance .. Section 4 .. Page 7 Precautions .. Page 7 Cleaning .. Page 7 Battery .. Page 7 Calibration .. Page 7 Glossary .. Section 5 .. Page 8 References .. Section 6 .. Page 9 Warranty and Repair Information .. Back Cover Copyright 1999 Monroe Electronics, Inc. Printed in USA Specifications and procedures subject to change without notice. Section 1 SPECIFICATIONS: Charger: 1100 volts, selectable polarity Fieldmeter: Accuracy 5% of reading, 2% typical Zero Drift < 4V in 90s, 2V typical Trip points: Fixed 1000V and 100V Charge plate: x4 ( inches periphery) Capacitance 25pF Self-discharge <10% of full scale in 200s Display: 2x16 LCD, >5 updates per second Timer maximum, resolution Fieldmeter 1250V, 1V resolution Sensors: Humidity 5% typ.
3 From 10% to 90%RH @25 C Temperature 2 C typical Oper. temp.: 25 C, 10 C Battery: 9 volt NEDA #1604A or equivalent alkaline (>40 hour life or >1300 charge cycles). Longer life may be achieved by using 9-volt lithium. Dimensions: inches (206x102x48 mm) Weight: 1lb, 6 oz. ( kg) Accessories included: Carrying case Banana patch cord Alligator clip with boot Battery This manual and a manual supplement What this instrument does Model 287a IPA meets and far exceeds the basic requirements of ESD Association (Draft) Standard Practice for the Protection of Electrostatic Discharge Susceptible Items Periodic Verification of Air Ionizers.
4 Model 287a IPA performs manual or automatic decay and balance tests for periodic verification of ionization equipment and stores the results and averaged decay times for up to ten manual tests and up to ten complete automatic test sequences. Provides real-time measurement and display of temperature and relative humidity. Performs self-tests. Battery powered and portable, sets up in seconds. 1 Section 2 GENERAL INFORMATION The IPA 287a performs manual or automatic decay and balance tests for periodic verification of ionization equipment.
5 It then stores the results and averaged decay times for up to ten manual tests and up to ten complete automatic test sequences. Temperature and relative humidity are displayed real-time and recorded with the test data. All instrument functions are controlled by four pushbuttons. Display contrast can be adjusted via access hole in case back. In DECAY mode a built-in high voltage generator charges the plate to over 1050 volts. During the test the plate will discharge toward zero in the presence of ionization. The elapsed time of decay between 1000 volts and 100 volts is displayed.
6 USER NOTE For very fast decay times faster than one second ZERO errors may occur. In the BALANCE mode, isolated plate voltage, test duration Min and Max voltages are displayed. Self-tests include battery check and tests for functional errors. Memory is non-volatile. Setup and data are retained during battery replacement. The specifics of usage of the Model 287a for periodic verification of air ionizers are given in detail in ESD Association (Draft) Standard Practice for the Protection of Electrostatic Discharge Susceptible Items Periodic Verification of Air Ionizers.
7 2 Section 3 OPERATION Getting Started, a Tutorial Confidence Check Three steps to get going If you received this instrument directly from the factory, a battery was included but not installed, memory was cleared and default settings are effective. The following will familiarize you with your new Ionizer Performance Analyzer Model IPA 287a : 1) Install battery a) Remove the two crosspoint screws from the battery compartment cover. b) Carefully lift the cover off of the compartment. c) Insert the battery, refer to label for orientation.
8 D) Replace the cover. 2) Demonstrate basic functions. Pressing a single button and releasing within two seconds controls basic functions. a) Press and release ON-OFF . The display will briefly show information about the instrument and then the battery voltage. A low battery condition will present an error message. The main menu startup screen will show a blank voltage, memory usage status, relative humidity, present temperature and battery voltage. NOTE If the instrument has been used it may display the option of clearing the memory.
9 Do so by scrolling to Y with or key then press ENTER . b) Press and release AUTO . This will start the first automatic test sequence: i) The instrument performs an autozero. ii) The floating plate is charged to >+1050 volts. iii) The plate begins to discharge. If allowed to discharge to <+1000 volts the timer will start at +1000 volts. If discharge fails to reach +1000 volts, Decay failed message will be displayed. Same message will appear if the meter fails to decay to 100 volts within 200 second timer. Test will not be save and Automatic decay test will be aborted.
10 Iv) This test is the first automatic decay test. The first test in an automatic sequence is always positive. The test is labeled 11+ (Automatic Test Sequence 1, Test Number 1 [in a sequence of 6 tests], and the test voltage is + [positive]). Abort this test by pressing the AUTO button again ( CANCEL ). 3 c) Press and release + CHARGE . This will start a manual test where the test voltage is positive. (i) The instrument performs an autozero. (ii) The floating plate is charged to >+1050 volts. (iii) The plate begins to discharge.