Transcription of MODEL Vista, CA 92081 OWNER'S GUIDE 4304A
1 OWNER'S GUIDEMODEL 4304 ASince its inception, Directed has had one purpose, to provide consumers with the finest vehicle security and car stereo prod-ucts and accessories available. The recipient of nearly 100 patents and Innovations Awards in the field of advanced electronic Directed products are sold and ser-viced throughout North America and around the (800) 274-0200 for more information about our products and ser vic , CA is committed to delivering world-class quality products and services that excite and delight our Remote Start SystemQG4304A 2012-06 2012 Directed. All rights Congratulations on the purchase of your state-of-the-art keyless entry and remote start system. Reading this owner s GUIDE prior to using your system will help maximize the use of your system and its many features.
2 Please visit us online at: for the latest information. For any additional questions please contact your authorized Directed dealer or contact Directed at 1-800-753-0600 (US only). Additional support is also available at: What you getWelcome to the best generation of keyless entry with remote start. Your system contains everything you 2-way Responder LC remote control s 1-way Companion remote controls AC adapter for charging your remote controls Quick reference owner s GUIDE and Warranty cardWarranty CardOwner sGuideImportant information Government Regulations and Safety information Read the Government Regulations and Warning! Safety First sections of this manual prior to operating this ! Failure to heed this information can result in death, personal injury or property damage and may also result in the illegal use of the system beyond its intended purpose.
3 Your WarrantyYour Responder LC system comes with a warranty. Please make sure you receive the warranty registration card and proof of purchase from your dealer indicating the product was installed by an authorized Directed dealer. Please validate it online at or complete and return the warranty registration card. Replacement remote controlsIf additional remote controls are desired, please see your authorized dealer or visit us at to order. Part numbers are: 7351A for Responder LC 2-way remote control and 7142A for the companion remote control. ContentsGetting Started .. 4 Charging the remote control: .. 4 Keys to using this manual .. 5 Responder LC 6 Status Screen Icons .. 8 Using your System .. 10 Commands and Confirmations .. 10 Performing Commands .. 10 Responder LC Command table .. 11 Fault Condition Alerts .. 11 Basic Commands (Direct Access).
4 12 Lock .. 12 Unlock .. 13 AUX/Trunk .. 13 Remote Start .. 13 Advanced Commands: (Level 1) .. 14 Silent 14 AUX 1 .. 14 Runtime Reset .. 14 Temp Request .. 15 Advanced Commands: (Level 2) .. 16 Remote Valet .. 16 AUX 2 .. 16 Timer Start .. 16 Runtime Remaining .. 17 Advanced Commands: (Level 3) .. 18 AUX 3 .. 18 Smart Start .. 18 Advanced Commands: (Level 4) .. 19 AUX 4 .. 19 Defogger .. 19 Responder LC Configuration .. 20 Navigating menus and options .. 20 Button operation .. 20 Access menu items .. 20 Main Menu .. 21 Setup Remote menu: .. 21 Remote Start Info .. 22 Runtime Alert .. 23 Car 2 .. 23 Backlight .. 23 Temp Unit .. 23 Button 23 System Type .. 24 Clock Set .. 24 Review .. 24 Exit .. 24 Pair Remote:.. 24 Demo mode: .. 25 Power Off: .. 26 Exit: .. 26 System Features .. 27 Factory alarm trigger notification .. 27 Emergency Override .. 27 Remote Start Features.
5 28 Pit Stop Mode .. 28 Key 28 Remote Start Safe-lock .. 29 Disabling Remote Start .. 29 Advanced Start .. 29 Temperature Reporting .. 30 Remote Start Time-out Alert .. 31 Manual Transmission Start (MTS mode) .. 31 Turbo Timer Mode .. 32 Remote Start Error .. 33 Remote and System Operations .. 34 Passive Locking .. 34 Auto Re-locking .. 34 Valet Mode .. 35 Power Save .. 35 Rapid Resume .. 35 Automatic Remote Updates .. 35 Out of Range .. 36No Remote Output .. 36 Feature not Available .. 361-way Companion Remote Control .. 37 Accessing Commands .. 38 System Expansion Options .. 40 Battery Information (Responder LC ) .. 42 Low Battery .. 42 Battery Life .. 43 Battery Information (1-Way) .. 44 Battery Disposal .. 44 Glossary of Terms .. 45 Patent Information .. 46 Government Regulations .. 47 Warning! Safety First .. 49 Installation .. 49 Remote Start Capable.
6 49 Manual Transmission Vehicles .. 49 Interference .. 51 Upgrades and Batteries .. 51 Water/Heat Resistance .. 51 Limited lifetime consumer warranty .. 524 2012 Directed. All rights StartedYour Responder LC remote is powered by an internal rechargeable battery that can only be serviced by an authorized Directed dealer. Due to transit and storage time prior to your purchase, the battery charge may have depleted. To ensure proper operation, check the battery level and connect the battery charger if not fully charged. See Battery Information (Responder LC) on page 42 and Status Screen Icons on page 8 for more information about the the remote control:1. Plug the AC adapter into a 110V AC outlet. Insert the mini-USB connector into the mini-USB port located on the side of the remote control (see diagram under Responder LC 2-way).
7 The text field will display CHARGE to indicate the remote control is charging (The remote remains operational while charging and can command the system).2. Once fully charged the text field will display The remote control is then ready for use. Disconnect the mini-USB end from the remote control first and then the AC adapter from the AC outlet. NoteIf the battery is excessively depleted when the charger is connected, functionality may be delayed while it charges to the minimum voltage required to operate the display, after which normal charging 2012 Directed. All rights to using this manualSpecific actions (in bold type) and style conventions are used consis-tently throughout this manual, they are as follows: s Press: implies pushing in and releasing a Hold: is used after Press actions when a button needs to be held in position for an extended period of time, typically several LOCKED this style denotes the text which appears in the text field portion of the Display during operations described in the manual.
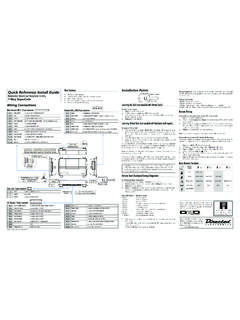
8 If the text string is too long for the text field, it then plays and loops sequentially word by Italicized words denote section/sub headings in this GUIDE and can be located through the table of An asterisk (*) when used after a word or phrase denotes that additional details can be found in related sections usually noted at the bottom of the page or end of the section. 6 2012 Directed. All rights LC 2-WayCommandButtonsDisplayFunction ButtonMini-USB PortInternalAntennaFeatureDescriptionInt ernal AntennaUsed for transmitting and receiving informationDisplayStatus screen - the upper portion of the display contains status icons for the System, Remote Start and Remote Control. Text field - the lower portion of display - shows the Clock, Runtime or Temperature during Remote Start, as well as Command confirmations, Page messages and programming menusCommand buttons (4)Used to perform locking, unlocking, auxiliary channel and remote start commandsFunction buttonUsed to access function levels for commands, configura-tion menus for programming, Car Selection, and to request PortThe battery charger plugs into this port.
9 7 2012 Directed. All rights CenterControl buttonStatus LED The Control Center, typically located on the upper part of the front windshield sends and receives commands or messages to and from your system. It consists of: s The In-vehicle system antenna, for 2 way communication. s The Status LED, as a visual indicator of the system s status. s The Control button, for placing the system into Valet Mode* and to perform the Emergency Override** operation.* See Remote and System Operations on page 34 for details.** See Alarm Features on page 27 for details. 8 2012 Directed. All rights Screen Icons1 ALLText FieldStatus ScreenIconsThe table below describes all the status screen StatusLocked: The system is : The system is Locked in Valet. Unlocked: The system is : The system is Unlocked in StartRemote start is active, the engine is mode is On; Remote Start is : When the icon is without an arrow head: Timer mode is enabled: Remote Start is Off+Smart Start is On; Remote Start is : When the icon is without an arrow head: Smart Start is On; Remote Start is Transmission Start mode is enabled, the engine can be startedDisplays the vehicle interior temperatureOn during Remote Start after performing the Defogger On command9 2012 Directed.
10 All rights during Trunk channel activationOn during the factory security full trigger output (see system features)On during Fault Report to indicate a Door is open when lockingOn when remote is set to command the system programmed as Car 1*On when remote is set to command the system programmed as Car 2*Remote Control StatusBars indicate battery level is Full, , , or EmptyOn while the remote control is transmitting a commandOn while the remote control is receiving a messageOn with Out of Range fault tone to indicate the remote failed to receive a command confirmationPager on: The remote will wake up to listen for messagesPager off: The remote will not wake up to listen for messagesThe remote will Vibrate when messages are receivedThe remote will emit Beeps and Tones when messages are receivedText fieldDisplays the Clock, Runtime, Temperature, message text and feature menus* This icon not present until the Car 2 is turned on in the Setup Re-mote configuration 2012 Directed.