Transcription of Monogram Wizard Plus
1 The large area below the lettering boxes is for entering names and is labeled as such. You can enter two lines of lettering in the names box, simply hit return to start the second line. At any time you wish to see what the letters you have entered look like on screen, click the Draw Now button next to the initial windows. Entering a Color Change - You can enter a color change on you Monogram design at the beginning of words or letters. To do this, simply enter a ^ (shift + 6) before the letter or word you wish to be a different color and a color change will be Wizard plus The Monogram Wizard plus is the follow up to needleheads ground breaking software The Monogram Wizard . While maintaining the ease of use offered by the Monogram Wizard , the Monogram Wizard plus has many expanded features making it extremely versatile and Features of the Monogram Wizard PlusLayers - This new feature allows designs to be built up in Layers , giving way for the use of multiple motifs , different fonts and lettering styles all in the same - The user can save their favorite styles to open later for use or Movement - In 3 letter Monogramming mode, letters can be moved individually to the user s tastePrinting - Designs created in the Monogram Wizard plus can be printed at full Lettering - A vertical monogramming style has been added which can be applied to booth 3 letter monograms and names.
2 Satin/Fill choice - Allows the user to choose whether the letters are satin or fill format - The Monogram Wizard plus will save in PES and SEW the Monogram Wizard PlusEntering Letters In the bottom left corner of the window, two places exist where you enter letters. The top place is to enter initials used in a Monogram . The second place is to enter letters used for names. The indicator button the right of each space lets you know which field is active. Notice that the boxes for the initials are labeled Letter 1, Letter 2, and Letter 3. These letters will correspond with the position numbers on the mono-gram styles buttons. In general, Letter 1 corresponds to the first initial, Letter 2 corresponds to the middle initial and Letter 3 corresponds to the last initial. Moving Individual Letters - Each letter in the 3 letter Monogram mode can be moved individually using the 4 directional buttons next to corresponding Letter Box.
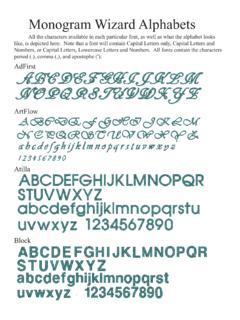
3 The amount of letter movement can be adjusted using the Movement Factor box in the Design Adjustments section of the working screen. (See the section called Moving Parts of a Design .)Font Selection On the left side of the window near the top is the font selection pull-down menu. The name in the window indicates the font that is currently being used on the screen. To change the font of the letters on the screen, all you need to do is click on the arrow to the right of the name. A drop-down menu will appear listing all the fonts that are available for you to use. To change fonts, simply select the new font you wish to 06/2004 Monogramming Style Selection In the upper left corner of the working window are the Monogram style selection buttons. Each style is graphically depicted on its corresponding button.
4 The numbers on each depiction correspond with the number of the initial boxes at the bottom of the window. Look at the example 1: Letters entered in the initial 2: Select the desired Monogram 3: The results. Notice how the numbers from the initials boxes correspond with the numbers on the style buttons. NOTE: Some fonts may not be applicable to the letters you have on the screen. For example, some fonts are Capital Letters only, and if you have a combination of upper and lower case letters on the screen, then a font with only Caps could not be used. If you try to use a font where it is not applicable, you will receive an error message informing you that the font you selected does not have characters on the screen. To see what characters are contained in each font, as well as what each font looks like, view the Font printout accessible from the Splash Screen which appears when the Wiz plus CD is inserted into the example, if the letters entered were:The result on the screen would be: The Monogramming Styles will only work on the Initials section and not the names section, with the exception of the three styles highlighted in the figure three styles that will work with the names section as well as the initials section.
5 The Natural Circle and Natural Diamond fonts in the Monogram Wizard plus do not require a Monogram Style to be selected as they are position dependent. Position dependant means that when the font is displayed on the screen, the letters will be in the 1,3,2 style automatically when the letters are entered. Also, these two fonts require that 3 letters are used for a Monogram . See the example a Motif Under the font selection drop down menu is the motif selection drop down menu. The pull-down menu on the left lists the motif packs that are available for you to use. The pull-down menu on the right lists the motifs that are available in the selected motif pack. To add a motif to your custom Monogram , select the pack you want to use from the left hand menu. Then select the number of the motif from the selected pack from the pull-down menu on the right.
6 To see what motifs are available to you, consult the motif file that came with your download by clicking on the button that says View motifs on the Wiz plus slash screen which appears when you insert the Parts of the Design Moving different parts of the on-screen design can be achieved using the controls in the Design Adjustment area of the working interface. The large arrow buttons are used to move the objects around. The box in the middle of the arrows contains the factor of movement and the small arrows are used to adjust this The factors of movement range from 1 to 5 with 1 being the least amount of movement and 5 being the most. To the right of the arrows, you select which part of the design you wish to move; the motif, the initials/first line of a name, or the second line of a name. Just above the place where you enter letters is another set of buttons labeled Lettering Styles.
7 The Lettering Styles are available to be used on either Monograms or Names (whereas most the monogramming styles are only available on initials). Each effect is graphically depicted on the buttons, along with arrows on the right side of each button. The arrows determine the amount of each effect that is inflicted on the letters. For example, the first six boxes represent curved type effects. You would increase or decrease the amount of curvature using the arrows on the right of each box. Only one lettering effect can be used at a time per EffectsNOTE: The movement factor in this section will also effect the movement of the individual letters in the initials section. The next control to the right is Grid Size. This controls the size of the squares that make up the on screen grid. Like lettering size, in English this value is in inches and in metric this value is in millimeters.
8 Continuing to the right the next control is Boldness. This control increases or decreases the width of all the satin stitches in the design. The value in the box is a percentage of the default satin stitches in a motif or font. Use the arrows to increase or decrease the percentage. Over 100 increases the boldness and under 100 decreases the boldness. The next control to the right is Lettering Width. This changes the overall width of the letters and again is a represented by a percentage. Use the arrows to increase the percentage up or down. Values over 100 increase the overall width of each letter and under 100 decreases the overall width of each letter. The first control on the bottom to the far left is labeled Kerning. Kerning is the space between letters in a word (or initials). If you want to move the letters closer to each other, click on the up arrow to tighten the kerning.
9 To make more space between letters, click on the down button and loosen the kerning. A positive On the left hand side underneath the motif selection area is a section called Style Control. The first control is Letter Size. Letter Size will refer to the size of the Upper Case letters of a font on the screen. Use the arrows to the right of the box to increase or decrease the size. In English this factor is in inches and in Metric this factor is in Parts of the Designvalue in this box indicates that kerning has been tightened and a negative value indicates the kerning has been loosened. The next control is labeled Density Percentage. The density on the letters and motifs are computed automatically depending on the size of the letters/motif. If after an initial sew out, or you know you want to bump the density up some before you start, simply click on the up button to increase the density.
10 The value in this box will be a percentage of the original density. The next control to the right is labeled Motif Size. Use these arrows to increase or decrease the size of the motif. The final control is labeled Motif Width. The motif width works in the same way that lettering width does in that is changes the overall width of the motif. The value in the box is again a percentage of the original motif width. The pull-down menu above these controls is used for recalling saved styles (see section below titled Saving Styles ).Building Designs Using Layers One of the powerful new features in the Monogram Wizard plus is the Layers feature. Using layers allows you to use more than one font style, motif, and/or lettering style on the same design. Layers can be thought of as having 5 working Monogram Wizard windows instead of 1.