Transcription of Montefiore Portal Quick Reference Guide
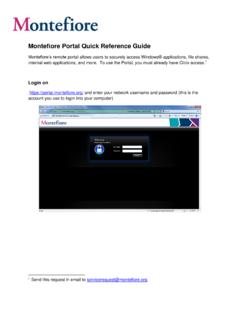
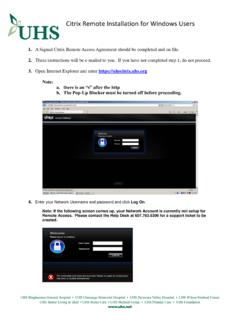
1 Montefiore Portal Quick Reference Guide Montefiore 's remote Portal allows users to securely access Windows applications, file shares, internal web applications, and more. To use the Portal , you must already have citrix Login on and enter your network username and password (this is the account you use to login into your computer). 1. Send this request in email to citrix online plug-in detection If the Portal detects that your computer is missing or has an older version of the citrix online plug-in, it will prompt you to download and install the plug-in. Check the box to accept the license agreement and click the download button. You will be prompted to save or run the file. Follow the instructions on screen to complete the installation of the plug-in. Alternatively, you can skip the installation by selecting Already Installed, Try Later and Log Off access Interface The access Page lists the available citrix published applications (based on what is provisioned for your username) along with Web Sites (the most commonly accessed internal Web sites such as the Intranet or Sharepoint) and the File Shares (H: Drive, I: Drive, etc).
2 Bookmarks You can create your own bookmarks to appear under Personal Web Sites or File Shares. These bookmarks can be links to either intranet or Internet Web sites or file shares in the internal network. To add a bookmark 1. Click Add. 2. In Name, type the name for the link. 3. In Address, type the Web address of the Web site or the network path to the internal Web 4. In Description, type a description for the link and click Add. To remove a bookmark 1. Click Remove. 2. Select the bookmark and click Remove3. 2. The Montefiore Portal differentiates automatically between Web addresses and network file paths based on the format in which they are entered, such as or \\server\sharename. When creating a link, you do not need to specify the resource type. 3. You can remove bookmarks that are listed under Personal Web Sites but not those under Web Sites. Using Email The email tab provides you with access to your email using GroupWise Web File Transfer This page allows you to log on to the internal network and access shared resources.
3 Click the File Transfer tab. There are several buttons on the top panel of the browser window that allow you to perform various tasks for storing and transferring files. Log on to the internal network or a specific computer on the network. Navigate to the previous folder. Refresh the contents of the active folder. Create a new folder. Download the selected file from the remote server Upload the selected file from the client device to a folder on the remote server. Delete the selected file from the remote computer Change the name of a file or folder. Disconnect from the remote server. Viewing Folders and Files in the Left Panel The servers, their directories, and the directory structure appears in a tree format in the left panel. Click the plus (+) icon to view folders. Connecting to Network Resources in the Right Panel The right panel displays the File Server window. Use this window to log on to a file server in the internal network. 1. In Address field, type the name of the file share.
4 2. In Login, type your user name. 3. In Password, type your password. 4. In Domain, type a valid domain name. (DM_MONTYNT) If the remote server is not assigned a specific domain, leave the field The right panel will display the subfolders and files. The location of the active folder appears in the Address field. 4. If you leave this field blank, you are logged on to the internal network and not to a specific server Adding the Portal as a trusted site to improve compatibility with Internet Explorer From Internet Explorer: Please click on Tools > Internet Options After small window will pop up Internet Options (you can also reach internet options from the windows control panel). Click on the Securtiy tab > Select Trusted Sites Zone > Click on Sites button In the trusted sites window add the address of (see screen shot below). For more information on Internet explorer zones rea