Transcription of Mould Enlargement “beagling” - Castpics
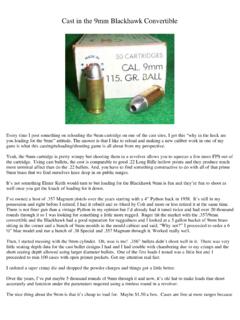
1 Mould Enlargement beagling This undersize 427098HP double cavity Mould started it .003 brass shim between the cavities takes it from .428 to .433 I suppose every caster is plagued with a Mould that cast bullets undersized for the intended application at leastonce in his lifetime. This fault, as I call it, occurs primarily with Lyman or Ideal moulds but moulds meeting RCBS specifications are sometimes smaller than we need. I have searched carefully for a specific Mould design many times,only to find that it casts small bullets when I finally obtain it. It s down right frustrating. Many designs suffer from this problem but it seems that certain moulds or designs are worse than others. Among these are the 457191, the 357446, the 429360, the 41032, the 427098 and the 429434. Then there are the trueold classics you obtain that were just cut small to begin with. I have a 358429 that drops bullets at.
2 358 X .355 andthat was just a manufacturer s problem but it is too old now for Lyman to do anything about it. Some moulds were designed with small noses to fit in black powder rifles. Some of the older moulds weredesigned with small driving bands so that they would fit in specific designer s guns. We seem to run into theseproblems often in casting bullets. All of these small-casting moulds sat in my Mould cabinet for years. Occasionally I d learn something and try themagain, all to no avail. The bullets produced were still too small. After retirement, I had more time to mess some withthese moulds and attempt to improve them. Three Failures, Then Success! I made three attempts at this before I got it right. First, I tried lapping the Mould cavities with valve grinding compound. This is a very messy and oftenunsuccessful project and you stand a chance to ruin a fine Mould , even though it may not be doing any good for you.
3 Second, I attempted to increase the diameter by drilling and tapping the open side of the pin alignment holesfor setscrews that could be adjusted to hold the blocks partially open. This method works, but the proper adjustment ishard to establish and maintain because changing block temperatures and vibrations from cutting the sprue caused theset screw adjustment to vary. Third, I took a 5/32 spring pin, cut 3/16 lengths off one end, and then drove them into the openings to holdthe blocks far enough apart to enlarge of the bullet. This method also works, but the correct adjustment is verydifficult to obtain due to the heat involved and the opening and closing of the Mould blocks. Success! About this time, I acquired a H&G #73 double cavity Mould from eBay. I didn t worry about handles becauseI already had several other 2 cavity H&G moulds . When the Mould arrived, my handles were too thick to fit the blockcuts.
4 I finally found that a set of Lyman 4 cavity handles would hold the blocks so that I could try the Mould . I fullyexpected a .358 diameter bullet, but instead they fell from the Mould at .361 . Close examination of the gap betweenthe Mould halves showed that there was a minute gap between the blocks. There was no gap when the blocks wereremoved from the Lyman handles, so the handles were holding the blocks apart the exact amount required to produce anice large bullet. I communicated this information to Orygun Mark and he drilled and tapped a set of handles to incorporate asingle .002 shim between a set of SC blocks and it worked for him. Now we were getting somewhere! I finally located a set of brass shim stock at ACE Hardware of .001, .002, .003 and .005 thickness. I cut andprepared a piece of .002 shim stock and prepared to shim a DC Mould by securing the shim stock behind the mouldhandle screw.
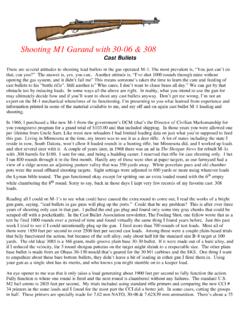
5 It wouldn t work because the alignment pins got in the way. So, it was back to the drawing board. beagle tapeManufacturer: Royal Tapes I had a roll of .002 aluminum tape with adhesive backing. This tape is used to seal air conditioning ducts. Itried covering the entire Mould face on a single cavity Mould but the adhesive closed the vent lines on a .22 Mould Iwas attempting to enlarge. Finally, I placed a large square of this tape below the cavity and small strips on either sideof the cavity and it worked. Success!!! Now, back to the double cavity moulds . The same method of using a large patch below the cavities and asmall strip along the outside of each cavity does well and stays in place because of the adhesive. Now, the Lyman427098, which previously ran .428 , produces bullets that fall between .432 and .433. I leaned several things during this experiment.
6 I had first anticipated venting to be a problem, but it is not. Thegaps between the tape strips provide sufficient venting. However, the shim must be directly between the Mould handles. If the tape shim is placed below or above, the blockswill tilt and close. The shim must be directly between the alignment pins for the same reason. For reasons unclear to me, bullets don t form wings at the side seams unless the Mould is very hot and a lotof lead pressure is used. Usually a .003 gap between the moulds can be tolerated without flashing between the mouldhalves. A small seam is usually present but is small enough so that the bullets are useable. Very little flashingbetween the Mould halves occurs using this method. They will flash due to heat and lead pressure when dipper poured,but no flashing occurs if you use a bottom pour pot and drop the melt to 1 into the sprue hole.
7 This seems due toreduced melt temperature and the reduced pressure of the melt going into the cavity. Even elliptical bullets are rounded during the sizing process, especially if sized in one of the newer taperedsizer dies. Accuracy is just as good as with completely round bullets. Even though these bullets may be slightly outof round, they still maintain balance when fired. If you are using only one thickness of tape in the Mould , it seems to work best when placed on the side of themould with the index pins. I haven t quite figured this one out yet, but that s the way it works. More uniform resultscan be obtained by applying tape to both halves of the Mould . The best method of taping can be obtained by usingstrips approximately 1/8 wide. If you want a bigger body, apply strips alongside the cavity and between the cavitiesin the case of a double cavity Mould alongside the area you wish to enlarge.
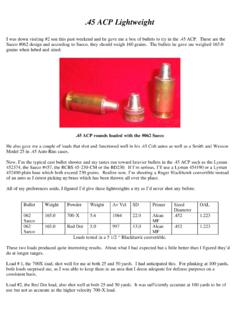
8 These strips should be positioned so thatthe two strips bear on each other. This separates the Mould halves a uniform amount. This method can also be used to enlarge the nose of the heavier .45 moulds designed for black powder to fulldiameter for use in smokeless rifles, and also provides a better fit to the bore. Simply place strips of tape on both sidesof the nose area where you want to increase the diameter. On SWC pistol bullets, the areas adjacent to the front driving bands can be taped with small squares to producea larger diameter front band. 358429 that was undersized in all dimensionsThis coverage by .002 brass stock brought even the front band to full diameter. If you re having problem with a loose gas check fit, a small square on either side of the cavity in the area of thegas check shank will increase the diameter and allow a tighter fit of the gas check to the bullet.
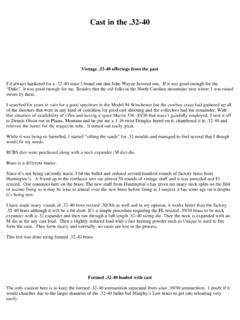
9 462560HP enlarges to .461 This Mould had a loose gas check also. Using the current taping method, I am obtaining an additional .003 in diameter without undue designdistortion. This has been very useful in the .38, .44, .375 for the 38/55, and in the BP 45 designs in the 45 on my experiments over the last year or so, there is still a lot to be learned about this process. As youcan see from the pictures, no two moulds behave alike. I started using the brass shim stock and then changed toaluminum tape as it was easier to work with. This method has allowed me to use many moulds that would normally beout of use because they produced bullets that were under the required a roll of tape at your local building supply or home repair center and give it a try. If at first you don tsucceed, try a different method. It will work and produce a useable bullet for you. The brightest point in this process isthat if you don t get what you want with tape, you can peel the tape off with a single edged razor blade, clean themould, and you are back to the original configuration with no damage to the proof is in the shooting.
10 Good beagling . John Goins/aka beagle