Transcription of N300 Wireless ADSL2+ Modem Router DGN2200 Installation …
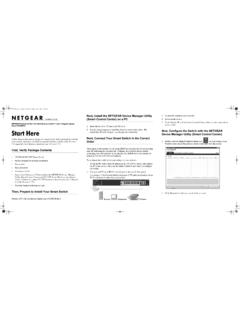
1 Installation guide 4 Step Cable Connection n300 Wireless adsl2 + Modem Router DGN2200 . Package Contents: Internet Tip: Use an ADSL microfilter Line 1 Power on/off 2. for every phone line in the house. Phone ADSL. If your Modem Router and telephone connect to the same phone line, n300 Wireless adsl2 + Modem Router DGN2200 . use an ADSL microfilter/splitter like the one shown here. Modem Router Resource CD. 3. ADSL Laptop or Desktop Line Phone Phone Computer Filter Splitter Filter/splitter (plug varies by country). Note: If your laptop does not have a CD drive, see "Manual Installation " 4. Telephone Cable Ethernet Cable Power Adapter on the back to complete your Router setup. Resource CD. Connect Wireless Devices to Your Router Manual Installation (Linux, Mac, or PC with No CD Drive) Preset Wireless Security Choose either the manual or WiFi Protected Setup (WPS) method to add Wireless 1. Follow Steps 1 - 3 to connect the DGN2200 Modem Router to your computer. This product has a preset unique Wifi Network Name (SSID) and WPA/WPA2- devices and other equipment to your Wireless network.
2 2. Check that the power LED is green, and if not, power on the Modem Router and PSK passphrase that are located on the label on the bottom of the product. The wait for the power LED light to turn green. default SSID and passphrase are uniquely generated for every device to protect Manual Method and maximize your Wireless security. Set up Internet Connectivity 1. Open the software that manages your Wireless connections on the Wireless NETGEAR recommends that you not change the WiFi Network Name (SSID) device (laptop computer, gaming device, iPhone) that you want to connect to 1. Type in the web browser address bar. Press Enter. and network key (password). If you change these settings during the Installation your Router . This tool scans for all Wireless networks in your area. process, the information on the bottom of the product does not apply. 2. Look for your network and select it. If you did not change the name of your 2. Type admin for the user name and password for the password.
3 Click OK. network during the setup process, look for the default WiFi Network Name 3. Select Setup Wizard in the top-left corner and make sure Yes is selected under (SSID) and select it. The default WiFi Network Name (SSID) is located on the Auto-Detect Connection Type. Click Next to complete the Setup Wizard. product label on the bottom of the Router . 4. Select Basic Settings to see your settings. 3. Enter the passphrase and click Connect. The default passphrase is located on the product label on the bottom of the Router . 4. Repeat steps 1 3 to add other Wireless devices. WPS Method WiFi Network Name (SSID) and Network Key (Password) If your Wireless device supports WPS (Push 'N' Connect), follow these steps: If you changed the default Wireless settings, record them here: 1. Press the WPS button on the Router . It looks similar to . 2. Within 2 minutes, press the WPS button on your Wireless device, or follow the WPS instructions that came with your Wireless device.
4 The device is now Wireless Network Name (SSID) _____ connected to your Router . Wireless Security Passphrase _____ 3. Repeat steps 1 - 2 to add other WPS Wireless devices. Note: WPS does not support WEP security. If you try to connect a WEP client to To retrieve your passphrase, type and log in with the your network using WPS, it will not work. Note: If your Internet Service Provider (ISP) requires you to log in, enter your ISP user name admin and your password (default is password). Select Wireless login information when prompted. The ISP login is not the same as the Router login. Settings to retrieve your passphrase. If you do not have your ISP login information, contact your ISP and record it here: For complete DoC please visit the NETGEAR EU Declarations of Conformity website at: . ISP user name: _____ ISP password: _____. This symbol was placed in accordance with the European Union Directive 2002/96 on the Waste 2010 by NETGEAR, Inc. All rights reserved. NETGEAR and the NETGEAR logo are registered trademarks of Electrical and Electronic Equipment (the WEEE Directive).
5 If disposed of within the European Union, NETGEAR, Inc. in the United States and/or other countries. Other brand and product names are trademarks or November 2010 this product should be treated and recycled in accordance with the laws of your jurisdiction registered trademarks of their respective holders. Information is subject to change without notice. implementing the WEEE Directive.