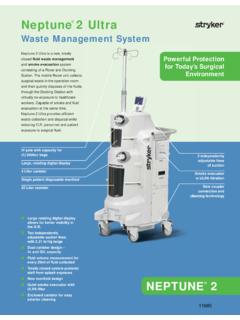
Transcription of Neptune 2 Waste Management System - …
1 Instructions For Use2008/040702-014-700 2 Waste Management SystemSite Preparation and Docking Station Installation 120 V Docking StationREF 0702-014-000230 V Docking StationREF 0702-015-000 Stryker and Neptune are trademarks and/or registered trademarks of the Stryker Rev-B Only trained and experienced health care professionals should use this equipment. Before using any System component, or any component compatible with this System , read and understand the instructions. Pay special attention to WARNING information. Become familiar with the System components prior to use. Upon initial receipt and before each use, operate the equipment and inspect each component for damage. DO NOT use any component if damage is apparent.
2 Take special precautions regarding electromagnetic compatibility (EMC) when using electrical equipment like this System . Install and place this System into service according to the EMC information contained in this manual. Portable and mobile RF communications equipment can affect the function of this System . DO NOT use this equipment in the presence of a mixture consisting of a flammable anesthetic and air or oxygen or nitrous oxide. Only trained and experienced health care professionals should install and maintain this equipment. The Bloodborne Pathogens Standard provided by the United States Occupational Safety and Health Association (US OSHA) requires all workers with exposure to potentially infectious materials wear the correct personal protection equipment and be offered immunization against hepatitis B.
3 As an additional precaution, these workers should receive tetanus immunization and boosters when required.* If you need more information or a complete list of accessory information, contact your Stryker sales representative or call Stryker Neptune customer service at 1-800-550-7836. Outside the US, contact your nearest Stryker :For Use WithThe Stryker Docking Station (docker) is for use with the Neptune 2 Waste Management System , specifically the Neptune 2 Rover (rover).Indications For UseThe Neptune Waste Management System is intended to be used in the operating room, pathology, surgical centers, and doctor s offices to collect and dispose of surgical fluid Waste as well as collect smoke generated from electrocautery or laser docker is a wall-mounted component of the Neptune 2 Waste Management System .
4 The rover interfaces with the docker to empty and rinse the rover s canister(s) of fluid Waste . A detergent dispenser is connected to the docker to release Stryker-approved detergent into the rover s canister System docker is installed in a utility closet or disposal area with access to electrical power, a water supply, and a fluid Waste drain. The health care facility is responsible for the preparation of the installation site and the availability of Safety*Important InformationThe words WARNING, CAUTION and NOTE have special meaning and should be :Disregarding WARNING information may compromise the safety of the patient and/or health care staff and may result in :Disregarding CAUTION information may compromise product reliability and may result in :NOTE information supplements and/or clarifies procedural information.
5 A triangle with an exclamation point alerts the health care professional to read and understand the accompanying instructions, especially the operating, maintenance, and safety Information*WARNING: Use only Stryker-approved components and detergent, unless otherwise specified. Using other components may result in increased electromagnetic emissions or decreased electromagnetic immunity of the System . DO NOT modify any component or REFN eptune Docking Detergent ..0700-001-026 Neptune Detergent Mounting Kit ..0700-005-026116860702-014-700 Rev-B2008 Cord Receptacle - Allows for the connection of facility power using the docker power Bracket - Using mounting hardware, the bracket allows for the permanent installation of the docker to a flat wall Outlet Port - Allows for the disposal of fluid Waste from the rover when the rover is connected to the Inlet Port - Allows detergent to enter the rover s fluid collection System to facilitate cleaning when the rover is connected to the Inlet Port - Allows fresh water to enter the rover when the rover is connected to the and USB Ports - These ports are located on the side panel (not visible in illustration)
6 And may be accessed by removing a cover. Allows for Stryker-approved software upgrades and Switch - The toggle switch allows for the application or removal of facility Communication Windows (two) - Allows infrared data transfer between the docker and rover. Data transfer is necessary during the docking (two) - Provides for the automatic physical alignment and connection of the rover to the (two) - Facilitates the alignment of the rover to the and Fluid Connectors - When the rover is connected to the docker, the rover receives power through a power connector from the docker. Two fluid connectors are also present. One connector allows fresh water to enter the rover. The other connector provides for the disposal of Waste water from the rover.
7 The fluid connectors are located under a spring-loaded 1 Docking Station Feature LocationsFeaturesABCDEFGHIJKNOTE: See the Specifications section for electrical power, water, and drainage requirements. See figures 1 and 2 to ensure the installation area meets utility and space Clearance20 inches [ cm]BFront Clearance48 inches [ cm]AAB Figure 2 Minimum Space Rev-BInstructionsSymbol DefinitionsPOWER ONPOWER OFFUNIVERSAL SERIAL BUS (USB) PORTETHERNET PORTPINCH POINT KEEP HANDS OUTWASTE OUTLET PORTDETERGENT INLET PORTWATER INLET PORTF igure 3 Docking Station Installation116860702-014-700 Rev-B2008 Place the docker against a wall with access to electrical power, water, and fluid Waste : To ensure the docker is mounted securely to the wall, align the mounting hardware with the wall Install the mounting screws through the mounting bracket of the docker and secure the docker to the.
8 The docker is equipped with an internal anti-siphon device. See Specifications section for details. If the docker anti-siphon device does not meet local code requirements, obtain and install an anti-siphon device that will meet the necessary requirements. Install the device near the dedicated water shutoff valve of the facility water supply. Ensure the plumbing configuration is NOT susceptible to water hammer Install the DockerWARNING: Follow the current local regulations governing biohazard Waste to safely handle and dispose of surgical fluid Connect the water inlet hose between the water inlet port of the docker and the facility water : ALWAYS have more than one person unpack and lift the docker off the shipping RecommendationsCAUTION.
9 DO NOT use glutaraldehyde or similar chemical cleaners on the Wipe the external surfaces of the docker with a soft cloth dampened with a non-abrasive, hospital Thoroughly wipe the infrared communication windows to ensure the rover and docker can communicate and function MaintenanceINTERVALACTIVITyAs requiredInspect the plumbing connections and hoses for leaks. Repair any plumbing to stop leakage as required. Replace leaking hoses as requiredCheck the level of the detergent in the dispensing bottle. Replace the bottle of detergent as : Ensure the pressure and temperature values of the facility water supply are within the required specified ranges. See Specifications section for Connect the Waste outlet hose between the Waste outlet port of the docker and the drain emptying into the facility Waste disposal : A properly connected Waste outlet hose will minimize the escape of noxious fumes and odors (see figure 3).
10 5. Connect the power cord between the electrical receptacle of the docker and the facility electrical power Press the power switch ON. Observe the power switch : Before docking the rover, always allow the docker to warm up for at least 60 seconds after applying initial power to the Open the facility water valve to allow water to flow to the docker. Inspect the water supply connections for any leaks. Repair any plumbing to stop leakage if Connect the detergent inlet tube to the detergent inlet port of the docking To connect the detergent, see the label instructions on the Stryker-approved detergent REF Replace the Detergent Bottle1. Remove the detergent inlet tube from the empty bottle.


![Caviwave Sonic Console TD[2] - mplusmedtech.com](/cache/preview/7/a/c/5/5/2/9/c/thumb-7ac5529cc9ea5df817c40eccb2a6fadf.jpg)