Transcription of Network Device Onboarding for Cisco DNA Center …
1 2019 Cisco and/or its affiliates. All rights reserved. Page 1 of 45 Network Device Onboarding for Cisco DNA Center Deployment Guide Prescriptive Deployment Guide June, 2020 2019 Cisco and/or its affiliates. All rights reserved. Page 2 of 45 Contents Introduction 3 5 Design .. 7 Process 1: Configure the site hierarchy within Cisco DNA Center .. 7 Process 2: Configure Network services and Device credentials for Network operation .. 9 Deploy .. 15 Process 3: Automate Onboarding of a Switch with Plug and Play (PnP) .. 15 Process 4: Simplified Return Material Authorization (RMA) 33 Operate .. 40 Appendix A Onboarding template example 41 Appendix B Hardware and software used for 43 Appendix C Glossary.
2 44 Feedback .. 45 2019 Cisco and/or its affiliates. All rights reserved. Page 3 of 45 Introduction Audience The audience for this document is Network administrators who wish to deploy a Catalyst 9000 series switch at a branch or campus using Cisco DNA Center . About The Solution Cisco DNA Center can help automate with built-in Plug-and-Play (PnP) functionality and allow switches, routers, and wireless access points to be on-boarded to the Network . An agent in the Device , call-home Cisco DNA Center and downloads the required software and Device configuration . About This Guide This guide will only focus on how to deploy a single non-fabric switch using Cisco DNA Center to help reduce the cost, remove complexity, and maximize productivity resulting in an overall savings in operational expenses.
3 You may apply this procedure to any Catalyst 9000 series switch but in this guide, we will only focus on Catalyst 9300 switch. Reader tip For more information on Cisco DNA Center supported devices please refer to the compatibility matrix information Use Cases Following are the two use cases covered within this guide: Automate day-zero Onboarding of a switch with Plug and Play (PnP). Simplified process for Return Material Authorization (RMA). 2019 Cisco and/or its affiliates. All rights reserved. Page 4 of 45 Implementation Flow This document contains four major sections: The Define section presents a high-level overview of the campus LAN which will be designed and deployed through Cisco DNA Center .
4 The Design section discusses the creation of the site hierarchy within Cisco DNA Center ; configuration of various Network services necessary for Network operations. The Deploy section discusses discovery of the switch in a campus LAN; Define Golden image for a Device in inventory, Create Onboarding Template, Create Network Profiles for Switching, Assign Network Profile to Site, Discover and manage Network devices and Return Material Authorization (RMA). The Operate section briefly discusses the known caveats of Device Onboarding using PnP and RMA. 2019 Cisco and/or its affiliates. All rights reserved. Page 5 of 45 Define Solution overview Cisco DNA Center can help with the non-fabric wired deployments in various different ways such as Network discovery, Network inventory, management of software revisions, Return Material Authorization, etc.
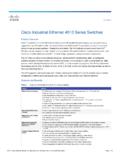
5 Reader tip This guide only covers day-zero Onboarding of a switch with Plug and Play (PnP) and Return Material Authorization (RMA). For software image management (SWIM) refer to Campus Software Image Management Using Cisco DNA Center Deployment Guide. Campus Topology highlighting Device Onboarding in Access layer. Cisco DNA Center is designed for intent-based networking (IBN). The solution breaks the process in to Day 0 and Day N. The solution provides a unified approach to provision enterprise networks comprised of Cisco routers, switches, and wireless devices with a near zero touch deployment experience. 2019 Cisco and/or its affiliates. All rights reserved. Page 6 of 45 When planning to provision any project, the PnP feature within Cisco DNA Center can help pre-provision and add devices to the project.
6 This includes entering Device information and setting up a bootstrap configuration , full configuration , and Cisco Device image for each Device to be installed. The bootstrap configuration enables the PnP Agent, specifies the Device interface to be used, and configures a static IP address for it. 2019 Cisco and/or its affiliates. All rights reserved. Page 7 of 45 Design Before you proceed you must make sure you already have Cisco DNA Center installed on your Network . Reader tip For more information on how to install Cisco DNA Center , refer to Software-Defined Access Management Infrastructure Prescriptive Deployment Guide. Cisco ISE is not required for the use cases covered in this guide.
7 Complete the following prerequisites before proceeding: Configure the site hierarchy within Cisco DNA Center Configure Network services (ex. DNS, DHCP, etc.) necessary for Network operation Process 1: Configure the site hierarchy within Cisco DNA Center Configuring the site hierarchy involves defining the Network sites for the deployment, and their hierarchical relationships. Network sites consist of areas, buildings, and floors. Their hierarchical relationship is important because child sites automatically inherit certain attributes from parent sites. However, these attributes may be overridden within the child site. The following are the procedures for configuring the site hierarchy for this design and deployment guide: Create an area.
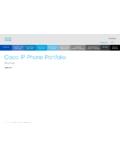
8 Create buildings within the area. Create floors within each building and import floor maps Create an area Step 1. Login to the Cisco DNA Center . (For example: ) Tech tip If SSL is not configured a warning indicating the connection is not secure will appear. For setup purpose you can continue by clicking on Advanced button and click the link to proceed to Cisco DNA Center webpage. Also, the credentials (userid and password) you enter must have SUPER-ADMIN-ROLE OR Network -ADMIN-ROLE privileges. Step 2. Navigate to Design > Network Hierarchy. Step 3. Click Add Site 2019 Cisco and/or its affiliates. All rights reserved. Page 8 of 45 Step 4. Select Add Area from drop-down menu.
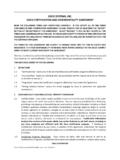
9 Step 5. In the Add Area pop-up window, type in the Area Name and select Parent. Tech tip For single area enter the Area Name as the City (example: San Jose) and leave Parent as Global. For multi-level areas create parent and child areas in the appropriate order. For example: Country > State > City (USA > California > San Jose). To import large number of sites, choose Import Sites as highlighted in the above screenshot. Step 6. Click the Add button to add the area. Create building within the area 2019 Cisco and/or its affiliates. All rights reserved. Page 9 of 45 Step 1. Under Network Hierarchy, click the Add Site again. Step 2. From the drop-down menu select Add Building.
10 Tech tip For Latitude and Longitude, enter an Address and select the suggested full address from the drop down and both the fields will be auto populated. Step 3. In the Add Building pop-up window, type in the Building Name (example: Building 4). Step 4. Select the Parent area. (example: San Jose | Global/USA/California/) Step 5. Enter the building address in the text field under Address. Step 6. Click the Add button to add the building. Tech tip Adding floor is required for setting up wireless Network . For more details refer to Catalyst 9800 Non-Fabric Deployment using Cisco DNA Center Guide. Process 2: Configure Network services and Device credentials for Network operation In the procedure below configure the following services that align to the site hierarchy in Cisco DNA Center : AAA 2019 Cisco and/or its affiliates.