Transcription of NI 6509 User Guide and Specifications - National …
1 user Guide AND Specifications . NI 6509. Fran ais Deutsch This document contains information about using the NI PCI-6509, NI PXI-6509, and NI PCIe-6509 data acquisition devices with the NI-DAQmx driver software. Note For information about using the NI USB-6509 device, refer to the NI USB-6509. user Guide and Specifications document. The NI 6509 is a 96-bit, high-drive digital input/output (DIO) device. The NI 6509 features 96 TTL/CMOS-compatible digital I/O lines, 24 mA. high-drive output, digital filtering, programmable power-up states, change detection, and a watchdog timer. Contents Configuration .. 3.
2 Programming Devices in Software .. 4. Functional 5. Safety Information .. 6. Electromagnetic Compatibility 8. Related 9. I/O 9. Pin Assignments .. 10. SH100-100-F 10. R1005050 Connector .. 12. Signal Descriptions .. 13. Digital I/O .. 14. Static DIO on NI 6509 Devices .. 14. I/O 14. I/O Pull-Up/Pull-Down Resistors (NI PCIe-6509 Only) .. 15. Signal Connections .. 16. Protecting Inductive Sinking and Sourcing Driving a Relay 24 mA ..17. Driving a Relay > 24 mA ..18. Driving an Power Connections ..19. +5 V Power Available at I/O Connector ..19. Disk Drive Power Connector (NI PCIe-6509 Only) ..19. When to Use the Disk Drive Power Disk Drive Power Connector Installation.
3 20. Industrial DIO Features ..20. Digital Filtering ..20. Digital Filtering Programmable Power-Up Change Detection ..22. Change Detection Watchdog Accessories ..24. Power Digital Digital Logic Levels (NI PCI/PXI-6509) ..26. Input Output Signals (Vcc = 5 V)..26. Digital Logic Levels (NI PCIe-6509)..27. Input Output Signals ..27. Physical Environmental ..28. Operating Environment ..28. Storage Shock and Vibration (NI PXI-6509 Only) ..29. Electromagnetic CE Online Product Environmental Management ..31. Where to Go for Support ..32. NI 6509 user Guide and Specifications 2 Configuration The NI PCI/PXI/PCIe-6509 devices are fully compliant with the PCI Local Bus specification Revision , the PXI Hardware specification Revision , and the PCI Express Electromechanical specification Revision , respectively.
4 The PCI/PXI/PCIe system automatically allocates all device resources, including the base address and interrupt level. The device base address is mapped into PCI memory space. It is not necessary to perform configuration steps after the system powers up. Before installing the NI 6509 device, you must install the software you plan to use with the device. Refer to the software documentation for configuration instructions. After you install the software and the NI 6509 device, the device appears under the Devices and Interfaces branch of the Measurement &. Automation Explorer (MAX) configuration tree. If the NI 6509 does not appear in MAX, use the following troubleshooting guidelines: Verify that you are using the correct version of the NI-DAQmx driver software (version or later for the NI PCI/PXI-6509 and version or later for the NI PCIe-6509).
5 To download the most recent National instruments drivers, visit the NI Web site at and select Download Software Drivers and Updates. Press <F5> to refresh the MAX window, or close and reopen MAX. Restart the computer. Power off and unplug the computer or chassis, and install the device in a different slot. Refer to the DAQ Getting Started guides for installation instructions and safety guidelines. (NI PCI-6509 only) You must install the NI PCI-6509 into a slot that provides V. Check that the V LED (reference designator DS1 located on the visible edge of the underside of the installed device) is lit. If not, check that the PC motherboard provides V.
6 To the PCI bus. National instruments Corporation 3 NI 6509 user Guide and Specifications Programming Devices in Software NI measurement devices are packaged with the NI-DAQmx driver software, an extensive library of functions and VIs you can call from your application software, such as LabVIEW or LabWindows /CVI , to program all the features of your NI measurement devices. NI-DAQmx provides an application programming interface (API), which is a library of VIs, functions, classes, attributes, and properties for creating applications for your device. NI-DAQmx also includes a collection of programming examples to help you get started developing an application.
7 You can modify example code and save it in an application. You can use examples to develop a new application or add example code to an existing application. Refer to the DAQ Getting Started guides for more information about NI-DAQmx. The NI PCI/PXI-6509 uses NI-DAQmx or later, whereas the NI PCIe-6509 requires NI-DAQmx or later. To locate LabVIEW and LabWindows/CVI examples, open the NI Example Finder: In LabVIEW, select Help Find Examples. In LabWindows/CVI, select Help NI Example Finder. Measurement Studio, Visual Basic, and ANSI C examples are in the following directories: NI-DAQmx examples for Measurement Studio-supported languages are in the following directories: MeasurementStudio\VCNET\Examples\NIDaq MeasurementStudio\DotNET\Examples\NIDaq NI-DAQmx examples for ANSI C are in the NI-DAQ\Examples\.
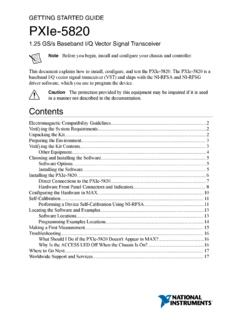
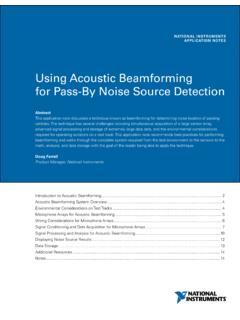
8 DAQmx ANSI C Dev directory For additional examples, refer to the NI Developer Zone at NI 6509 user Guide and Specifications 4 Functional Overview Figure 1 shows the key functional components of the NI PCI/PXI-6509. Flash 24 mA DIO Memory Transceivers 10 MHz Port 0 Clock Port 1. Port 2. Industrial Digital Port 3 I/O Control FPGA. PCI/PXI/CompactPCI Bus Port 4. Programmable I/O Connector Port 5 Power-Up States DIO Lines 96 DIO 96 DIO Data/Control PCI Bus Watchdog Timer Data/Control Interface Digital Filtering Port 6 Change Detection Port 7. Port 8. Port 9. Port 10. Configuration Port 11 Control Figure 1.
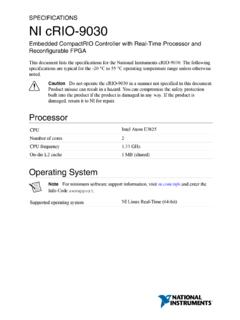
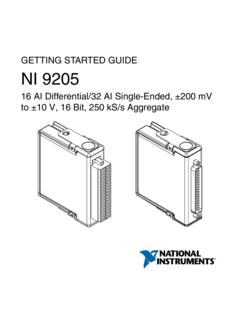
9 NI PCI/PXI-6509 Block Diagram Figure 2 shows the key functional components of the NI PCIe-6509. NI ASIC. NI ASIC Programmable Power-Up States DIO Lines 48 DIO 48 DIO Watchdog Timer Digital I/O. Digital Filtering PCI Express Bus Change Detection I/O Connector 100 MHz Data/Control Clock NI ASIC. NI ASIC Programmable Power-Up States DIO Lines 48 DIO 48 DIO Watchdog Timer Digital I/O. Data/Control Digital Filtering Change Detection EEPROM. Figure 2. NI PCIe-6509 Block Diagram National instruments Corporation 5 NI 6509 user Guide and Specifications Safety Information This section contains important safety information that you must follow when installing and using National instruments DIO devices.
10 Do not operate the device in a manner not specified in this document. Misuse of the DIO device can result in a hazard. You can compromise the safety protection built into the DIO device if it is damaged in any way. If the DIO device is damaged, return it to NI for repair. Do not substitute parts or modify the DIO device except as described in this document. Use the DIO device only with the chassis, modules, accessories, and cables specified in the installation instructions. You must have all covers and filler panels installed during operation of the DIO device. Do not operate the DIO device in an explosive atmosphere or where there may be flammable gases or fumes.