Transcription of NI-DAQmx for NI WLS/ENET-9163 Getting Started Guide ...
1 Getting Started Guide . NI-DAQ mx for NI WLS/ENET-9163 . NI WLS/ENET-9000 Series Devices Fran ais Deutsch This Guide describes how to install and configure the NI-DAQmx software and NI WLS/ENET-9000 Series data acquisition (DAQ) device (comprised of an NI WLS/ENET-9163 carrier and NI C Series I/O module). This Guide also describes how to verify that the device is working properly. Refer to the NI WLS/ENET-9163 User Guide and Specifications and your C Series I/O module user Guide for information about how to use your NI WLS/ENET-9000 Series device. You must be an Administrator to install NI software and devices on your computer.
2 Check for documentation updates at Pinouts and User Guides All NI-DAQmx devices have a PDF user Guide that contains pinouts. Go to and search for your NI C Series I/O module. Step 1. Install the Application Software and NI-DAQmx Before installing your DAQ device, you must install the software you plan to use with the device. Complete the following steps. 1. Install the NI application software, LabVIEW, LabWindows /CVI , Measurement Studio, or LabVIEW SignalExpress, as described in the installation instructions that accompany your software. Note Back up any applications before upgrading software or modifying the application.
3 2. Install the NI-DAQmx driver software before installing new devices so Windows can detect them. Insert the disk, and complete the instructions, including rebooting the computer. For troubleshooting instructions, use the Hardware Installation/Configuration Troubleshooter at support/install. Step 2. Unpack and Set Up the Device The NI C Series I/O module and the NI WLS/ENET-9163 carrier are packaged separately. Remove the packaging and inspect the devices. Contact NI if the components appear damaged. Do not install a damaged device. Caution The devices are static sensitive. Always properly ground yourself and the equipment when handling or connecting to the devices.
4 Complete the following steps while referring to Figure 1 to install the C Series I/O module into the NI WLS/ENET-9163 carrier. Note Before installing the device, you must install the software, as described in Step 1. Install the Application Software and NI-DAQmx . NI-DAQmx for NI WLS/ENET-9163 Getting Started Guide 2 Note Refer to the NI WLS/ENET-9163 User Guide and Specifications for information about mounting and grounding the NI WLS/ENET-9163 . carrier. 1. Make sure no cables/signals are connected to the C Series I/O module or the NI WLS/ENET-9163 carrier. Remove any protective covers from the C Series I/O module connector.
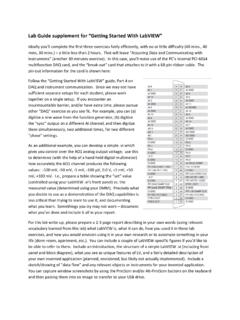
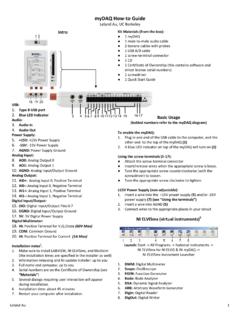
5 2. Align the C Series I/O module with the NI WLS/ENET-9163 carrier. 3. Squeeze the latches and insert the C Series I/O module into the NI WLS/ENET-9163 carrier. 1. IN. NA STR. TIO UM. NA EN. L TS. W K. N. LI. LS. VE. TI. AC. S. K. TU. TA. S LIN. S. R. E. WL E. W. O. TIV. P. AC US. STAT R. WE. PO. PR1. D er GN T 3 Carri RESE -916. 2 PR0. WLSC Se 80. ries D. C GN. 0. V 10/10. 0V. T 9-3 X. INPUW MA K/ACT. LIN. 1 C Series I/O Module 2 NI WLS/ENET-9163 Carrier Figure 1. C Series I/O Module Installation National Instruments Corporation 3 NI-DAQmx for NI WLS/ENET-9163 Getting Started Guide 4. Press firmly on the connector side of the C Series I/O module until the latches lock the module into the NI WLS/ENET-9163 carrier, as shown in Figure 2.
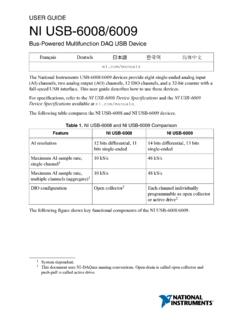
6 IN A. ST TIO. N. R N. U A. M L. EN. TS. WL K. LIN. S. E. TIV. AC. US. AT. LINK. ST. R. WE. WLSIVE. PO. ACT US. STATER. P0W. PR1. 163 Car GND ET rier RES. S-9 ies WL C Ser PR0 NI .11g 802. C GND. 00. V 10/1. V. T 9-30. INPUW MAX /ACT. LINK. Figure 2. Locking Module into Place 5. (NI WLS-9163 Carrier Only) Attach the supplied antenna as shown in Figure 3. V. C. R. INP WE. UT PO US. 9-30 AT. W MA V GN ST E. X D. PR1 ACTIV. LIN. LI LS. K/A. W. NK. CT. WL. GN PR AC S LIN. TIV K. STAT. 10/100 D 0 RESE E. PO US. T WE. NI R. WLS. 1g -9. C Se16. rie3. s Ca rrier Figure 3. NI WLS-9163 Carrier Antenna Assembly NI-DAQmx for NI WLS/ENET-9163 Getting Started Guide 4 6.
7 Use a standard Category 5 Ethernet cable to connect the NI WLS/ENET-9000. Series device to an Ethernet Connect one end to the RJ-45 Ethernet port on the device, and the other end to an Ethernet hub or directly to your computer. Refer to the NI WLS/ENET-9163 User Guide and Specifications for information about the Ethernet cable. 7. Power the device using the included power adapter or other 9 30 VDC power source. The POWER and STATUS LEDs light. The POWER LED will light as long as power is being supplied to the NI WLS/ENET-9000 Series device. Refer to the NI WLS/ENET-9163 User Guide and Specifications for information about the LEDs on the NI WLS/ENET-9163 chassis.
8 Step 3. Discover the Device To discover the device, complete the following steps. 1. Launch Measurement & Automation Explorer (MAX). 2. Expand Devices and Interfaces, right-click Network Devices, and select Find Network NI-DAQmx Devices. 1 You can either use a standard Category 5 Ethernet cable or an Ethernet crossover cable to connect the NI WLS/ENET-9000 Series device directly to your computer. National Instruments Corporation 5 NI-DAQmx for NI WLS/ENET-9163 Getting Started Guide If you plugged your device into an Ethernet port on your local subnet or directly into your computer, the device should appear in the list of available devices.
9 3. Put a checkmark next to your device in the Available Devices window and click Add Selected Devices to add the device to MAX. The device will be listed under Network Devices in the configuration tree. If your device does not appear in Available Devices, wait until the POWER LED. on the device is green and the STATUS LED turns off, then click Refresh List. If the device does not appear, try the following: If you connected your device directly to your computer, ensure your network card is configured to obtain an IP address automatically, then click Refresh List. NI-DAQmx for NI WLS/ENET-9163 Getting Started Guide 6 If you plugged your device into an Ethernet port that is not on your subnet, try using its hostname.
10 If your DHCP server is set up to automatically register hostnames, the device registers the hostname as WLS-<serial number> or ENET-<serial number>. Enter the hostname into the Add Device Manually field, and click the + button. If you know the device IP address, such as , enter it into the Add Device Manually field, and click the + button. For additional troubleshooting resources for the NI WLS/ENET-9163 , refer to the KnowledgeBase document, Troubleshooting Resources for the NI WLS/ENET-9163 , by going to and entering the info code 9163. If your device still does not appear, contact your system administrator to confirm that the network is working and that a firewall is not interfering with discovery.