Transcription of OPERATION and MAINTENANCE - M1CarbinesInc.com
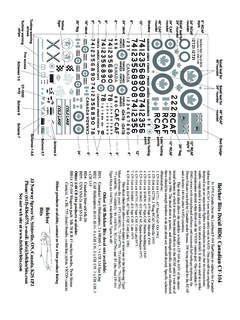
1 OPERATION and MAINTENANCE of the Loosen band ~ctew.:.-P. Depress band retainer Q. Slide band-R-forward until it c1ears upper and lower stock halves. Lift barrel/action assem bly up by muzzle until action can be removed from under the rear ac tion retainer-S. Draw recoil spring guide slightly to reqr until it is disengaged from operating slide, and then pull to right and forward and withdraw guide and spring from weil in receiver. Remove trigger housing retaining pin (if pin sticks, use operating spring guide as a punch). Slide trigger housing group for ward off receiver. Pull operating slide slowly to rear un til forward face of operating slide stop is in line with rear face of bolt opeJ"l ing in top of receiver. This places guide lug on operating slide handle in line with notch in guideway. Pull slide handle up and to right until guide lug is free of retaining groove.
2 Move operating slide slightly forward to align left guide lug on heavy forward part of operating slide opposite relief cut (arrow) in retaining guideway on barrel. Then rotate operating slide counter-c1ockwise to free guide lugs from retaining guideway, and remove slide. Grasp operating lug of bolt and draw bolt to rear until its face is just back of receiver locking shoulders. Rotate bolt counter-c1ockwise to disengage it from left guideway in receiver. Then rotate bolt c1ockwise, and lift it up and right to ~ remove from receiver. This is the last step in field stripping. CLEANING -The carbine bore can be cleaned only from the muzzle. Before c1eaning bore, remove magazine, and pull operating slide to rear and lock in this position by depressing operating slide stop. Then inspect chamber to make sure that it is not loaded. Use c1eaning rod, which is available from arms deal ers, and guide rod with thumb and finger to prevent damaging rifling at muz zle.
3 Inspect bore with aid of a bore reflector, small mirror or piece of white cloth or paper placed in breech opening at an angle to reflect light. With bore reflector or mirror bore can be inspected from both ends. Carbine cartridges have noncorrosive primers and therefore it is not necessary ta use water in c1eaning the bore. However, nitro-solvent or bore cleaner should be used to dissolve powder fouling. Dry bore with clean patches after use of nitro-solvent or bore cleaner, and oil bore with patch soaked in preservative oil. Be sure to remove grease or any obstructions from bore prior to firing. LOADING-Press cartridge down with thumb until caught under magazine lips. Repeat until full. Turn safety - H -down to SAFE (green exposed) Push magazine up into receiver until a click in dicates the magazine lock has snapped into place. Pull operating slide handle -J -back and re lease it -thereby chambering first cartridge.
4 It is a good habit to strike handle with heel of hand to make certain bolt is firmly seated and locked. Turn safety back to FIRE (red exposed). UNLOADING-Turn safety down to SAFE (green exposed). Press magazine lock -K in. Slide magazine down and out. Pull operating slide back to eject remaining cartridge. Operating slide may be re tained in the open position by depressing the slide lock button-L-Located on top of handle -so it engages the indent on receiver. To allow slide to return forward simply apply rearward pres sure on handle. Slide lock button -which is spring loaded -will automaticafly disengage itself. Magazine is unloaded by SIGHTING-sliding cartridges forward Front sight is of the fixed blade out, one at a time. Rear sight is of the "peep" or aper ture type and is adjustable as fO'I lows: Aperture-M-si ides forward and rearward according to distance 10 target, and snaps into indents cor responding to 100, 200, 250, and 300 yards.
5 Ramp-N-moves left and right, by turning knob-O-to correct for windage., or lead on moving target. Each click corresponds to 1" at 100 yds. (2" at 200 yds., SPECIFICATIONS Weight of carbine MI Weight of bullet (aprx) 111 '9r. with zine 1 -round maga (unloaded) . Muz:tle velocily Pressure in chamber 1,900-2,000 f. p. 5. per Weight of Carbine MI square inch ma.",imum with zine 15-roun (loaded) maga (aprx) Maximum range 40,000Ib. 2,000 yd. Magazine capacity 15 rd. Eftedive range 300 yd. Weight. of Length ofbarrel in. magazine (unloaded) Sight radius at 100 in. Weight of 15-rou'l1d frigger pull 41h-7 Ibs. magazine (loaded) Sights, Front blade proteded by wings; rear Over-all length of car peep sight adjustrlble for windage and bine MI in. elevation. Over-all length of car bine MI wHh bayonet atlached in. 'J\'pe of fire: Single shof only. Pressing the trigger fires the cartridge, eieds the empty Weight of 100 cartridges WeJght of I ball cart ridge 193 gr.)
6 Case, loads in a new cartridge and leaves the weapon cocked and ready for next pull of trIgger. OPERATION The carbine is gas-operated and has a short stroke action. As soon as bullet A is forward of gas port B in barrel, gas from the burning powder expands throlJgh gas port into gas cylinder C and thrl:lsts the piston 0 rearward. The piston strikes the G!perating slide E, starting it into motion, and the piston is stopped after about 3/16" of travel by the piston nut F. As the operating slide starts to the rear, the recoil spring G begins to be compressed. The operating slide moves rearward about 5/16" before its cam contacts operating lug of bolt. This allows operating slide to. gain speed to overcome inertia of the locked bolt, and also gives time for bullet to c1ear muzzle, allowing pressure in barrel to be reduced to outside pressure before bolt begins to unlock.
7 As eperating slide continues to the rear, it compresses the recoil spring and cams the bolt counterclockwise to unlocked position. Extraction and ejection of fired' cartridge case, withdrawl of firing pin to safe position inside bolt, and cocking of hammer occurs as bolt moves .rear ward. When operating slide and bol1 move forward, pushed by. fhe compressed recoil spring, the bolt strips top round from magazine and shoves it into chamber. When bolt reaches forward position; cam in operating slide rotates bolt c10ckwise so locking I-ugs on .either side of bolt head engage locking shoulders in receiver. PARTS LIST WITH PRICES SERVICE-Butt Plate Screw Butt Plate Stock Slide Lock Slide Slide Lock Spring" Rear Action Retainer Bolt Rear Action Retainer Receiver Recoil Spring Extractor Firing Pin Bolt (stripped) Bolt Assembly Extractor Spring Extractor Spring Plunger Ejector Spring Ejector Rear Sight Gas Piston Nut Gas Pision Hand Guard Barrel Recoil Spring Guide Barre,l Band Retainer Barrel Band Deluxe Barrel Band Front Sight Front Sight Key Front Sight Pin Trieger Guard Pin.
8 Sear Hammer Hammer Spring Glide Trigger Housing Trigger Housing Assembly Magazine Lock Retaining Spring Magazine Lock Retaining Sp'ring Plunger Magazine Spring M~qazine Lock Spdtlg Plunger Magazine Lock Trigger Pin Safety Hammer Pin Action' Retainer Nut 1S Shot Magazine Trigger Sear Spring Hammer Spring Tri~ger Spring. Canvas Scabbard ' Sling & Oiler 5 Shot Magazine 30 Shot Magazine Nickle or Gold Plate 5 Shot Magazine 15 Shot Magazine 30 Shot Magazine Side B~se and Screws 4X Scope Scope Mount & Rings .12 Every MI Carbine is p~oof-tested, and function-fired in order to prove it is in perfect condition and conforms fully to our specification~ and standards before .20 If lhere is any question with regJd to the performance of the gun, please write to our Service Department, describing all circumstances and cPnditions .50 If you should return your MI Carbtne for repair or if you order component parts, please comply with the ing suggestions for prompt I 1.
9 Please erlClose remitf{ 2. Gurns shipped to the facfory should be sent prepaid. We will not accept collect shipments..12 3. If no work is required onthe stock, the complete barrel, receiver and mechanism may be sent alone..25 4. Always give serial numbe~ and model of firearm. Give detailed information covering difficulty or .75 desired. Give name 'Of shilllper, if other than Be sure to order by name and number.. SPEGIFICATIONS SUBJECT TO CHANGE AT OUR DISCRETION WITHOUT NOTICE. Please: Check Chamber and Magazine Before Shipping .20 .12 .20 .12 .12 .12 .12 .12 .12 .12 .40 .50 ~. * Return to Factory for service * * Not shewn in Illustration ices Subject to Change without Notice d 2Sc postage, under $ over SCOPE MOUNTING INSTRUCTIONS Your new UNJVERSAL GUN has been drilled and tapped for a scope mount The base mount and screws are ellclosed in the box with your gun.}
10 Follow the simple direc~ions to insure best results. NOTE: Although base mount and screws are enclosed, Scopes are not enclosed with all models . Remove llctlon from stock as in Fig 1., and plastic insert used 10 protect screw holes lind inletted area will slip out. as in Fig. 2. Fasten base ( 1 ) to receiver with four screws (2) extremely tight, as in 3. Gunsmiths ohen apply one of the many two-part Epoxy metal bonding cements (avai lable al variety stores) to the screws and under the base for greater security. Tighten each of the four base cap screws a linie al a time until all are very tight so there can be no slippage. The rifle is then ready for sighting in. Figure 2 Fasten the mount (6) in position on the base. Place the gun in a vice or some fixed position with the bore or regular sights precisely aligned on a target about 40 feet distant. To boresight rifles, 'look through the barrel by means of a small piece of mirror held at an angle in the breech.