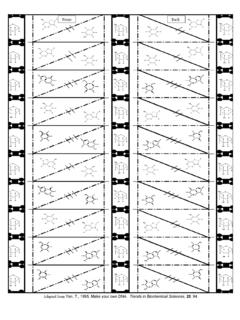
Transcription of Origami DNA model
1 Origami DNA model Mountain fold Solid lines are mountains and are to be folded away from you with the peak pointing towards you. 2. Fold all solid lines going lengthwise down the page into "mountain folds". Dashed lines are valleys and are to be folded towards you with the peak pointed away from you. Valley fold 3. Fold all dashed lines going lengthwise down the page into "valley folds". Mountain folds along solid lines. Valley folds along dashed lines. Making your DNA model Folds for your DNA model 1 1. Cut the white border off the top, bottom, and sides of the template. At this point, the paper should look like this: 4. Bring the two sides of the model together, similar to an I beam. 5. Look for the words front and back at the top of your model . Hold the model with the front side facing you. 6. Fold the two sides of the DNA model so that the front side is flat. 7. Crease each solid, horizontal line into a mountain fold (away from you).
2 8. Flip the model to the back side. Crease each solid diagonal line into a mountain fold (away from you). Your model should look like this. This side should be facing you. 2 9. Fold ALL of the creases together in the directions of the folds made in steps 6 and 7. Your model will fold up like an accordion. While you are folding, pinch the middle of the model to keep it together to make a cyllindrical shape. Fold ALL of the creases together like an accordion. (The dotted lines in the diagrams below may help) Continue to fold, pinching these folds together in the center as you go. When you are done folding, the model should resemble the diagram above. You should be able to hold your model in one hand. 3 2nd Fold 1st Fold 10. Release the model . You should be able to see the shape of a DOUBLE HELIX. 11. Straighten out the sides of the DNA model (the DNA backbones ) to make them perpendicular to the creases in the middle (as in step 3).
3 Take care not to uncurl the spiral shape. *Fix your DNA model so that all the creases are neat. This will reinforce the spiral shape. The DNA backbone 4 The nitrogenous bases of DNA The purines Thymine The pyrimidines Adenine Cytosine Guanine The DNA molecule The DNA molecule is made of six parts: The phosphate-sugar backbone: Four bases: A sugar, called deoxyribose A phosphate group Adenine Thymine Guanine Cytosine 5