Transcription of ORIGINAL INSTRUCTIONS © copyright 2014 BG Products, Inc.
1 ORIGINAL INSTRUCTIONS copyright 2014 BG Products, Inc. Wichita, Kansas 67213 INSTRUCTIONS copyright 2014 BG Products, Inc. Wichita, Kansas 67213 transmissionfluid pressure gauge (N)Used transmissionfluid pressure gauge (U)V2 Manual fill valve and capV3 Vent valveSight glassV1 Control leverService hosesH1 and H2 Hose holderV4 Drain valveORIGINAL INSTRUCTIONS copyright 2014 BG Products, Inc. Wichita, Kansas 67213 INSTRUCTIONS copyright 2014 BG Products, Inc. Wichita, Kansas 67213 RequirementsThe following INSTRUCTIONS must be read and understood before attempting to set up or use the BG PF5 Power Flush and Fluid Exchange System. 1. Carefully read the BG PF5 Reference Manual before assembling and using any part of the system.
2 2. Before handling any BG product, read its Safety Data Sheet. 3. Wear safety goggles to protect your eyes. 4. Wear Nitrile, Neoprene or PVC gloves to protect your hands. 5. Wear a long-sleeved shirt. 6. A combination of mechanical and local ventilation should be used to prevent operator exposure to noxious fumes. 7. Keep all hoses and tools away from moving engine parts. 8. Check all lines and fittings for cracks and leaks before and after service. 9. Use EXTREME CAUTION when removing transmission lines and/or adaptors before and after the service. Transmission fluid may be under pressure and will likely be very hot. Be very careful in handling connections because they will also be very hot. 10. Dispose of used transmission fluid in accordance with federal, state, and local regulations. 11. The BG PF5 is designed to be used only with BG products described in this manual.
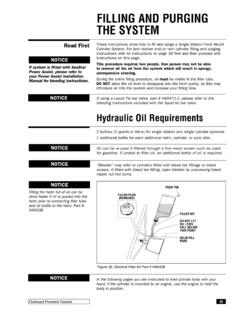
3 The use of any other chemicals or fluids other than transmission fluid, mineral-or synthetic-based, with this system will void all warranties and could create hazardous conditions. 12. Do not spray solvents on sight glass. Sight glass should be cleaned using mild detergents INSTRUCTIONS copyright 2014 BG Products, Inc. Wichita, Kansas 67213 Setup and Charging ( filling ) 1. Unpack system and check for shipping damage and missing parts and components. Place adap-tors in drawer. 2. Connect service hoses (H1 and H2) to the ports on the side of the BG PF5. Remove plug from V4 Drain valve on the side of the BG PF5 and install barbed fitting as shown in the drawing at right. This V4 Drain valve is used to remove transmission fluid from the transmission, when necessary, to make room for cleaner and conditioner. 3. For initial charging ( filling ) of the apparatus: A.
4 Turn the V1 Control lever to Bypass/Recharge (O). Attach adaptor #20, or any open-end adaptor, to the end of either service hose (H1 or H2). The adaptor opens the valve in the quick coupling to allow used fluid to flow out. B. Attach recharge adaptor #19 to the Recharge (R) port on the side of the BG PF5. Be sure the V3 Vent valve is turned to Close (O). Apply air pres-sure to the adaptor until the New transmission fluid pressure gauge (N) reads approximately 50 PSI and the Used transmission fluid pressure gauge (U) reads 0. Remove air supply and turn the V1 Control lever to Pressure Release (PR) until New transmission fluid pressure gauge (N) reads 0. This procedure will move the rubber bladder into position for initial filling . Be sure the clear hose is connected to the V3 Vent valve. Place the loose end of the hose into the bottle provided.
5 Turn the V3 Vent valve to Open ( I ). C. Remove Manual Fill cap from the Manual Fill tube and install the included funnel. Slowly turn the V2 Manual Fill valve to Fill ( I ) there may be a small amount of air pressure or vacuum in the tank. Pour approximately 3 to 7 gallons (11 to 27 Liters) of the appropriate Transmission fluid into the funnel, depending on the capacity of the tank being used. Keep filling until a full stream of fluid is visible at the V3 Vent valve on the side of the BG PF5. This procedure insures that the system is full and all trapped air has been removed. Allow fluid to drain from the V3 Vent valve until it is just below the V2 Manual Fill valve on Manual Fill tube. D. Turn the V3 Vent valve to Close (O) and the V2 Manual Fill valve to Close (O). Either cap the funnel or remove it and replace Manual Fill cap. This cap is not a pressure seal and should only be finger tight.
6 E. Remove the #19 recharge adaptor. Remove the #20 open-end adaptor from the service hose (H1 or H2).The BG PF5 Power Flush and Fluid Exchange System is now ready for INSTRUCTIONS copyright 2014 BG Products, Inc. Wichita, Kansas 67213 InstructionsIMPORTANT! BG Transmission Service is a maintenance service, not a repair service! A thor-ough inspection of the transmission, including lines and coolers, should be performed and all repairs made before performing this service. Check the vent on top of the transmission to be sure it is open and functioning. Inspect seal areas and gaskets and replace any that are leaking or badly deteriorated. If the pan gasket needs replacing, it is recommended that the transmis-sion filter be replaced as well. The filter should be changed anytime the pan is removed. Check hoses, metal lines and connections to be sure all are in good repair.
7 1. Start vehicle engine and run until normal operating temperature is reached. 2. Check transmission fluid level. If it is more than 1 quart (946 mL) low, add fluid, but leave room for 11 ounces (325 mL) of BG Quick Clean for Transmissions, PN 106. DO NOT overfill transmission. 3. Add the contents of one 11 oz. (325 mL) can of BG Quick Clean for Transmissions, PN 106 in transmission fluid dipstick port. (For installing cleaner and conditioner in transmissions with-out dipsticks, see Transmissions Without Dipsticks. ) The vehicle should then be driven for 15 minutes. If it cannot be driven, it should be placed on a lift so that the vehicle s wheels are above the floor. With the engine running, shift the transmission through all the gears so the valve body in the transmission is actuated to ensure BG Quick Clean gets to all parts. During this procedure, make sure the brake is fully applied and drive wheels have stopped turning between gear changes to prevent damage to transmission or differential assemblies.
8 After adding BG Quick Clean, vehicle should not be run more than 30 minutes before performing the transmission fluid transfusion. Note: If the vehicle cannot be driven or placed on a lift, chock the wheels, apply brakes (including parking brake) and carefully shift transmission through the gears several times with engine running at idle speed. Vehicle is now ready for the transmission fluid exchange. 4. Shut off engine and locate a junction in either of the two transmission lines that will allow you to install the appropriate adaptor to each end of the junction (see Possible Points of Connection in this manual). Only one line needs to be disconnected. Separate the line at the junction and attach adaptor. Use pinch off clamps on rubber lines to prevent transmission fluid loss while connections are being made. NOTE: Some vehicles also use the radiator to help cool the engine oil.
9 Be sure the lines you are working with actually go to the transmission and not the engine! 5. Turn the V3 Vent valve on the side of the BG PF5 to Open ( I ), to be certain that there is no pressure in the machine. Turn the V3 Vent valve to Close (O) before attempting to use. 6. Connect BG PF5 service hoses (H1 and H2) to adaptors. Either hose can be attached to either adaptor the BG PF5 will self-align to the flow INSTRUCTIONS copyright 2014 BG Products, Inc. Wichita, Kansas 67213 7. Turn V1 Control lever to Bypass/Recharge (O), and start the vehicle s engine. Check for leaks. 8. With engine running, turn V1 Control lever to Process/Purge ( I ). The transmission s own pump will begin the exchange immediately by pumping its used transmission fluid into the col-lapsed compartment of the tank. This instantly exerts pressure on the diaphragm which forces new transmission fluid out through the service hose (H1 or H2) and into the transmission at the same rate of flow and pressure that used transmission fluid is being pumped into the tank via the other service hose (H1 or H2).
10 This means that the level of fluid in the transmission and components remains the same at all times during the exchange. The fluid level in the transmission does not require monitoring. For best results, the operator should be inside the vehicle shifting the transmission through its gears as in step #3 to ensure that all cleaner and used transmission fluid is purged from the valve body. As the transmission continues to pump used transmission fluid into the tank, the diaphragm is collapsed against the other side. A preset bypass regulator will open after a pressure differen-tial exists between the new and ued transmission fluid lines. This will route the incoming fluid around the tank and into the new transmission fluid line going to the transmission. Note: A few transmission pumps produce 0 pressure at idle and the engine RPM must be increased until the Used transmission fluid gauge (U) shows at least 10 PSI.