Transcription of OWNERS MANUAL MANUEL DU PROPRIÉTAIRE MANUAL DEL …
1 OWNERS MANUAL MANUEL DU PROPRI TAIRE MANUAL DEL USUARIO. Fire-Safe Safes Coffres-forts Fire-Safe Cajas fuertes Fire-Safe . TABLE OF CONTENTS TABLE DES MATI RES NDICE. Combination lock .. 1 Verrou Cerradura de combinaci 5. Electronic lock .. 1 Verrou 3 Cerradura electr nica .. 5. First class customer 2 Service client le de toute premi re classe .. 4 Servicio a Clientes de Primera Clase .. 6. Testing .. 2 IMPORTANT IMPORTANT IMPORTANTE . DO NOT RETURN SAFE TO THE STORE! NE RETOURNEZ PAS LE COFFRE FORT NO VUELVA LA CAJA FUERTE. LA MAGASIN! A LA TIENDA. If you experience any problems Si vous rencontrez des probl mes Si llega a tener alg n problema or challenges with your safe, please ou des difficult s avec votre coffre-fort, o dificultad con su caja fuerte, favor contact us.
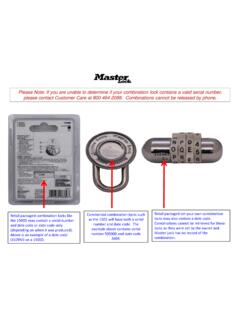
2 Many issues can be veuillez nous contacter. De nombreux de contactarnos. Muchos asuntos resolved quickly without the probl mes peuvent tre r solus se pueden resolver r pidamente product being returned. rapidement sans avoir retourner sin tener que hacer una devoluci n le produit. del producto.. Model No. Mod le N . Modelo No. Serial No.. N de s rie No. de serie . Dial Combination (Not All Models). Combinaison du cadran (pas tous les mod les). Combinaci n del disco (No todos los modelos).. Key No. (Not All Models). Cl N (pas tous les mod les). Llave No. (No todos los modelos).. Factory Code (Not All Models). Code d'usine (pas tous les mod les). C digo de f brica (No todos los modelos). 2008 513023. Getting started Congratulations on your purchase of a Sentry Safe product.
3 SentrySafe is the world's leader in fire/water-resistant and security storage. This guide describes how to easily set up your safe. Gain entry with the combination lock 1 Opening your safe for the first time (keep door open during setup): The handle should be all of the way UP, in the horizontal position before attempting to dial out safe. Testing your combination: Your safe's combination is printed on the front of this owner's MANUAL . You will have a 3-number or 4-number combination depending upon the model purchased. 3-NUMBER COMBINATION (Cannot be changed) 2. To close and lock You can relock the safe in two ways. With the door C. Turn the dial to the right. Stop the THIRD time 1. To unlock and open closed, depress the key lock (if equipped) with your you reach the second number of your combination.
4 Before dialing your combination, simply insert the key finger, or spin the combination dial one full turn. (if equipped) in the lock and turn until the plunger For greatest security, do both. (Make sure the door D. Turn the dial to the left. Stop the SECOND time pops out. Remove key. handle is in the horizontal position.) you reach the combination's third number. NOTE: The safe will lock if key lock cylinder is pressed 4-NUMBER COMBINATION E. Turn the dial to the right. Stop the FIRST time in with or without key. you reach the last number of your combination. 1. To unlock and open A. Start the dial at zero. Before dialing your combination, simply insert the key 2. To close and lock B. Turn the dial to the left. Make sure ZERO (if equipped) in the lock and turn until the plunger pops You can relock the safe in two ways.
5 With the door passes the pointer at least THREE times. Then stop out. Remove key. closed, depress the key lock (if equipped) with your at the first number of your combination. NOTE: The safe will lock if key lock cylinder is pressed finger, or spin the combination dial one full turn. in with or without key. For greatest security, do both. (Make sure the door C. Turn the dial to the right. Stop the SECOND handle is in the horizontal position.). time you reach the second number of your A. Start the dial at zero. combination. Note: Changing the combination voids your warranty. B. Turn the dial to the left. Make sure ZERO To reinstate your Limited 1-Year Warranty, (valid purchase D. Turn the dial to the left. Stop the FIRST passes the pointer at least FOUR times.)
6 Then stop dated receipt required) you must contact Sentry Customer time the pointer reaches the third number of your at the first number of your combination. Service to document your new combination. If Sentry is not combination. notified of the combination change during the Warranty period, locksmith service fees will NOT be covered. (For Dial safe models manufactured after 2011, use the following instructions to open your safe). 3-NUMBER COMBINATION (Cannot be changed) 2. To close and lock You can relock the safe in two ways. With the door C. Turn the dial to the right. Stop the THIRD time 1. To unlock and open closed, depress the key lock (if equipped) with your you reach the second number of your combination. Before dialing your combination, simply insert the key finger, or spin the combination dial one full turn.
7 (if equipped) in the lock and turn until the plunger For greatest security, do both. (Make sure the door D. Turn the dial to the left. Stop the SECOND time pops out. Remove key. handle is in the horizontal position.) you reach the combination's third number. NOTE: The safe will lock if key lock cylinder is pressed 4-NUMBER COMBINATION E. Turn the dial to the right. Stop the FIRST time in with or without key. you reach the last number of your combination. 1. To unlock and open A. Start the dial at zero. Before dialing your combination, simply insert the key 2. To close and lock B. Turn the dial to the right. Make sure ZERO (if equipped) in the lock and turn until the plunger pops You can relock the safe in two ways. With the door passes the pointer at least THREE times.
8 Then stop out. Remove key. closed, depress the key lock (if equipped) with your at the first number of your combination. NOTE: The safe will lock if key lock cylinder is pressed finger, or spin the combination dial one full turn. in with or without key. For greatest security, do both. (Make sure the door C. Turn the dial to the left. Stop the SECOND handle is in the horizontal position.). time you reach the second number of your A. Start the dial at zero. combination. Note: Changing the combination voids your warranty. B. Turn the dial to the left. Make sure ZERO To reinstate your Limited 1-Year Warranty, (valid purchase D. Turn the dial to the right. Stop the FIRST passes the pointer at least FOUR times. Then stop dated receipt required) you must contact Sentry Customer time the pointer reaches the third number of your at the first number of your combination.
9 Service to document your new combination. If Sentry is not combination. notified of the combination change during the Warranty period, locksmith service fees will NOT be covered. 1. 2 Gain entry with the basic electronic lock To lock safe: Programming user pin Close the door and return the handle to the horizontal NOTE: One (1) user pin is allowed. 1 2 3 position. For greatest security, depress the key lock (if equipped) with your finger. To add: 4 5 6. 1. Press the Prog key 2 times. 7 8 9 NOTE: If your unit is equipped with a water-resistant 0 gasket additional pressure to the left corner of the door 2. Enter your 5-digit user code. may be required before the handle can be returned to the 3. Enter the 5-digit user pin of your choice.
10 horizontal position. To delete: Access codes 1. Press the Prog key 2 times. There are 3 possible ways to unlock and access the safe: 2. Enter your 5-digit user code. 1. Factory code 3. Enter 0, 0, 0, 0, 0. The handle should be all of the way UP, in the (Found on the front cover of this guide.) You can always horizontal position before attempting to open safe. open the safe by entering the pre-set 5-digit factory code. NOTE: If your safe does not appear to be working, please This code cannot be deleted. check batteries before calling Sentry Customer Care. Opening your safe for the first time (keep door open during setup): 2. User code Signals 1. Insert a paper clip or pen point into If you prefer to employ your own code, you can program Your electronic-lock safe communicates by means of several 1 2 3.


![CHAPTER 7A [SFM] MATERIALS AND CONSTRUCTION …](/cache/preview/c/2/9/8/1/6/8/c/thumb-c298168c48650f700893e26320545ad4.jpg)