Transcription of P G - Fry Reglet
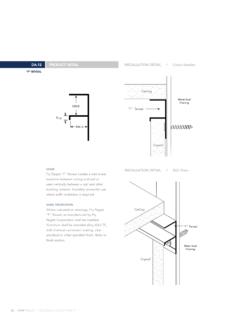
1 Drywall Plaster Installation Guide ATTACHMENTS FACTORY FABRICATED INTERSECTIONS. Factory fabricated intersections are available to connect horizontal and TAPEABLE FLANGE SHAPES: vertical joints of moldings of the same or different types. Intersections are available in T , L , and + shapes. The mitered joints are welded and the 1. The moldings are installed after the gypsum board is installed. The 6 legs are measured from the center point of the reveal. Corner pieces can installer can either provide space for the moldings at the time of be manufactured for both inside and outside conditions.
2 Custom leg lengths 2. The framer should provide backing so that moldings may be attached are available. with #6 drywall screws 16 for horizontal applications. 3. Prior to taping, the attachment flanges should be cleaned using a non- abrasive cleaner and soft rag. When veneer plaster is specified, the flanges must be treated with a bonding agent. 4. Make sure the tape does not overlap the edge of the reveal and an 8 . wide trowel is used to apply the final skim coat. "L" INTERSECTION "T" INTERSECTION.
3 5. Fiberglass self-adhesive drywall tape will cut taping time and help to avoid possible cracking. NON-TAPEABLE FLANGE SHAPES: "+" INTERSECTION. 1. These types are installed prior to drywall installation and generally do not require taping or spackling. Outside Corner Inside Corner END CAP. ADDING SNAP-INS. RIGHT WAY DRM with tape End Cap Flange 1. When the reveal FRAMING without Flanges TAPE &. molding is used with SPACKLE. the Snap-In, use the WALL. COVERING. base molding with SNAP-IN REVEAL W/.
4 1/2 ground when REVEAL SHEATH. MOLDING End Cap installing 1/2 drywall, with Flanges and base molding with 5/8 ground when installing 5/8 CORRECT. CUTTING AND FIELD PAINTINGS. INSTALLATION. drywall. (See Right MOLDING INSTALLED 1. Materials can be cut with a chop saw, using a 96 tooth blade for non- FLUSH TO FRAMING. Way ) ferrous metal. 2. Make sure base 2. Use a lubricant (WD-40 or grease stick) on the blade prior to cutting. Do WRONG WAY. is supported to not use an abrasive cut-off wheel. ensure that the base FRAMING 3.
5 Be sure to clean lubricant off trim. TAPE &. does not become SPACKLE. deformed when WALL. If field painting of clear anodized moldings is the only alternative, the COVERING. applying Snap-In. following steps must be taken to improve the bonding of the paint to the 3. NEVER use 1/2 base SNAP-IN REVEAL W/. REVEAL SHEATH metal surface: MOLDING. with 5/8 drywall when adding Snap-In. NO GAP Clean and treat material with an acid etch solution ( mild MUST BE. (See Wrong Way ) FLUSH concentration of muriatic acid), rinse thoroughly and dry.
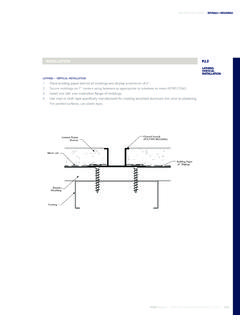
6 INCORRECT. INSTALLATION Use a primer recommended by the manufacturer of the paint to be used. MOLDING NOT. INSTALLED FLUSH Apply coating following manufacturer specifications. TO FRAMING. However, Fry Reglet cannot accept responsibility for performance of field applied coatings over anodized finishes. JUNE 2017 PAGE 1. Drywall Plaster Installation Guide LATHING-VERTICAL INSTALLATION INSTALLATION - 2 PIECE PLASTER EXPANSION JOINT. 1. Place building paper behind all moldings and shiplap a minimum of 6.
7 1. Place building paper behind all moldings and shiplap a minimum of 6 . 2. Secure moldings on 7 centers 2. Prior to attachment, place sealant in the movement groove along the CHANNEL SCREED. using fasteners as appropriate (PCS-TYPE MOLDING) back of the molding. CEMENT PLASTER. to substrate to meet ASTM METAL LATH (STUCCO) Note: If installation is horizontal, place movement flange on top and lap C1063. additional building paper over top flange. (See #3 of Lathing - Horizontal 3. Install wire lath over installation Installation).
8 Flange of moldings. 3. Leave alignment clips in place while 4. Use vinyl or cloth tape fastening moldings to framing or THIS FLANGE UP. specifically manufactured for studs. FRAMING SEALANT. masking anodized aluminum BUILDING PAPER EXTERIOR 4. Secure moldings on 16 centers (6" SHIPLAP) SHEATHING. trim prior to plastering. For using fasteners as appropriate to painted surfaces, use plastic tape. substrate. 5. Place building paper and wire lath LATHING-HORIZONTAL INSTALLATION over upper movement installation flange on horizontal installation, ALIGNMENT CLIP.
9 1. Place building paper behind all moldings and shiplap a minimum of 6". and shiplap a minimum of 6 .(See 2. Secure moldings on 16 EXTERIOR Horizontal Installation). SHEATHING. centers using fasteners as BUILDING PAPER 6. Install wire lath over bottom (6" SHIPLAP). appropriate to substrate. METAL LATH installation flange of moldings. 3. Place building paper over CEMENT PLASTER 7. Use vinyl or cloth tape specifically manufactured for masking anodized (STUCCO). upper flange of reveal, aluminum trim prior to plastering.
10 For painted surfaces, use plastic tape. extending upward and under CHANNEL SCREED. (PCS-TYPE MOLDING). the above building paper overlap. FRAMING. 4. Place wire lath over upper METAL LATH. installation flange on BUILDING PAPER. SEALANT + CONNECTOR CLIPS. horizontal installation. 5. Install wire lath over bottom 1. The use of sealant at all butt joints installation flange of moldings. and Fry Reglet Connector Clips is PLASTER. CHANNEL. 6. Use vinyl or cloth tape specifically manufactured for masking aluminum recommended.