Transcription of PhoenixBIOS 4
1 Phoenix Technologies Ltd., 411 E. Plumeria, San Jose, CA 95134 Phoenix Technologies Ltd. PhoenixBIOS Revision 6 User's Manual Page ii Phoenix Technologies Ltd. Copyright PhoenixBIOS User's Manual 22 June 2000 2000 Phoenix Technologies Ltd. All Rights Reserved. Disclaimer The programs are provided "as is" without warranty of any kind either expressed or implied, including but not limited to the implied warranties of merchantability and fitness for a particular purpose. This publication could contain technical inaccuracies or typographical errors. Changes are periodically made to the information herein; these changes will be incorporated in new editions of this publication.
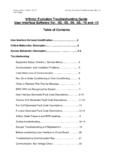
2 Phoenix Technologies Ltd. is without obligation to notify any person of such revisions or changes. Purpose of Document This guide explains how to configure your PC and optimize its performance using the Setup program. It also explains how to use the BIOS function calls in writing computer programs. UM Phoenix Technologies, Ltd. Page iii Contents About This Manual .. 1 Chapter 1 The Setup Guide .. 2 The Main Menu .. 2 The Menu Bar .. 3 The Legend Bar .. 3 The Field Help Window .. 4 The General Help Window .. 4 Main Menu Selections .. 4 Master and Slave Sub-Menus .. 5 Memory Cache .. 7 Memory 8 Boot Sequence .. 9 Keyboard Features .. 10 Boot 11 The Advanced 12 Advanced Chipset Control (No PCI).
3 13 Advanced Chipset Control Menu (PCI BIOS) .. 14 PCI Devices Menu .. 15 I/O Device Configuration 16 The Security 18 The Power 19 The Exit 21 Saving 21 Exit Discarding Changes .. 21 Load Setup Defaults .. 21 Discard Changes .. 22 Save Changes .. 22 PhoenixBIOS Messages .. 23 Chapter 2 Boot Utilities .. 26 Phoenix QuietBoot .. 26 Press <ESC> .. 26 Press <F2> .. 26 POST Error .. 26 Keyboard Input Request .. 27 Phoenix MultiBoot .. 27 The Boot First Menu .. 27 Chapter 3 Phoenix Phlash .. 28 28 Create the Crisis Recovery 28 Updating the Crisis Recovery Diskette .. 29 Executing Phoenix Phlash .. 29 Crisis Recovery 30 Chapter 4 Programmer's Guide .. 31 What is a ROM BIOS?.
4 31 ROM BIOS Functions .. 32 Initialize and Configure the computer .. 32 BIOS Services .. 32 System Hardware 32 Fixed Disk Tables .. 33 PhoenixBIOS Function Keys .. 34 POST Errors and Beep Codes .. 34 Recoverable POST 34 Terminal POST Errors .. 34 Test Points and Beep Codes .. 34 PhoenixBIOS Services .. 39 Contents PhoenixBIOS User's Manual Page iv Phoenix Technologies Ltd. BIOS32 Service 39 Interrupt 10h Video Services .. 41 Interrupt 11h Return System Information .. 43 Interrupt 12h Return Memory 43 Interrupt 13h Diskette Services .. 43 Interrupt 13h Fixed Disk 46 Interrupt 13h Extended Fixed Disk Services .. 49 Interrupt 13h Bootable CD-ROM Services .. 50 Interrupt 14h Serial Services.
5 51 Interrupt 15h System Services .. 53 Interrupt 15h APM 56 Interrupt 15h Big Memory Services .. 59 Interrupt 15h PS/2 Mouse Services .. 60 Interrupt 15h EISA Services .. 61 Interrupt 16h Keyboard Services .. 63 Interrupt 17h Parallel Printer Services .. 64 Interrupt 17h EPP Services .. 64 Interrupt 1Ah Time of Day 68 Interrupt 1Ah General PCI Services .. 68 PnP Run-Time Services .. 70 SMBIOS Services .. 74 MultiBoot III Run-Time Services .. 76 BIOS Data Area .. 77 Extended BIOS Data 79 Interrupt Vectors .. 80 Index .. 81 Phoenix Technologies, Ltd. Page 1 About This Manual This manual is divided into the following chapters: Chapter 1 - The Setup Guide This chapter describes a typical menu-driven Phoenix Setup program, which allows you to specify changes in the computer hardware ( add a new diskette drive) and optimize system performance.
6 Setup maximizes your control over your system's features and performance. This Setup Guide is only an example. The Setup menus on your computer may be quite different. Consult the Setup manual supplied with your computer. Chapter 2 - PhoenixBIOS Utilities This chapter describes two new programs that give you more control over the boot process: Phoenix QuietBoot Phoenix MultiBoot Chapter 3 - Phoenix Phlash This chapter describes how to use the Phoenix Phlash utility for upgrading your BIOS without having to replace the BIOS ROM chip. Chapter 4 - Programmer's Guide This chapter gives programmers and expert PC users a detailed description of PhoenixBIOS . It contains the following sections: Overview Hardware Requirements Fixed Disk Tables Function Keys POST Errors and Beep Codes BIOS Services BIOS Data Area Interrupt Vector Table Phoenix Technologies, Ltd.
7 Page 2 1 The Setup Guide With the PhoenixBIOS Setup program, you can modify BIOS settings and control the special features of your computer. The Setup program uses a number of menus for making changes and turning the special features on or off. Note: The menus shown here are from a typical system. The actual menus displayed on your screen may be quite different and depend on the hardware and features installed in your computer. For more accurate information about your BIOS Setup program, consult your system manual or contact the manufacturer. The Main Menu To start the PhoenixBIOS Setup utility: Turn on or reboot your system. PhoenixBIOS displays this message: Press <F2> to enter SETUP 2.
8 Pressing <F2> displays the Main Menu, which looks like this: PhoenixBIOS Setup Utility Main Advanced Security Power Boot Exit Item Specific Help System Time [16:19:20] System Date: [03/02/1994] Legacy Diskette A: [ MB 3 ] Legacy Diskette B [Not Installed] Primary Master 6449 MB Secondary Slave None Secondary Master CD-ROM Secondary Slave None Numlock: [Disabled] Memory Cache [Enabled] System Shadow [Enabled] Video Shadow [Enabled] System Memory 640 kB Extended Memory 31744 kB <Tab>, <Shift-Tab>, or <Enter> selects field F1 Help Select Item -/+ Change Values F9 Setup Defaults ESC Exit Select Menu Enter Select Sub-Menu F10 Save and Exit See p.
9 4 for a description of the fields on this menu. PhoenixBIOS User's Manual The Setup Guide Phoenix Technologies Ltd. Page 3 The Menu Bar The Menu Bar at the top of the window lists these selections: Main Use this menu for basic system configuration. Advanced Use this menu to set the Advanced Features available on your system's chipset. Security Use this menu to set User and Supervisor Passwords and the Backup and Virus-Check reminders. Power Use this menu to configure Power-Management features. Exit Exits the current menu. Use the left and right arrow keys to make a selection. See the section below, "Exiting Setup," for a description on exiting the Main Menu. The Legend Bar Use the keys listed in the legend bar on the bottom to make your selections or exit the current menu.
10 The chart on the following page describes the legend keys and their alternates: Key Function <F1> or <Alt-H> General Help window (See below). <Esc> Exit this menu. arrow keys Select a different menu. or arrow keys Move cursor up and down. <Tab> or <Shift-Tab> Cycle cursor up and down. <Home> or <End> Move cursor to top or bottom of window. <PgUp> or <PgDn> Move cursor to next or previous page. <F5> or <-> Select the Previous Value for the field. <F6> or <+> or <Space> Select the Next Value for the field. <F9> Load the Default Configuration values for this menu. <F10> Save and exit.