Transcription of PickYourOwnChristmasTree
1 All images and textCopyright Benivia, LLC2007 All rights you can find a Christmas tree and winter eventslike sleigh rides, hayrides and wagon rides near you!!Click on the printer icon that looks like this:(at the top left, to the right of save a copy ) to print! many other canning directions and recipesHow toMake HomemadeGingerbread House-Easily!A home-made gingerbread house seems like a dauntingtask, but in reality, it's quite easy!Especially withthese step-by-step instructions, with photographs toillustrate each 've also made all the templatesfor you; you just print them out and cut them along thelines! Finally, with the openings for the doors andwindows, you can even put a small light inside, so yourgingerbreadhouse lights up!It's really quite easy-my 2 1/2year old helped and had a greattime!
2 The photo at left shows the results of our first attempt!The keys to success are all the ingredients before you the recommended time for the icing "glue" to that the goal is to make a storybook fantasy house and have 't get too perfectionist about the architecture! images and textCopyright Benivia, LLC2007 All rights 1-Gather the Ingredients and pattern (see step 1) for the front, back and side walls, roof and chimney.(click here for a pdf file thatyou can print to use for the templates-NOdrawing or required-just cut on the lines!) dougho1 and 1/2 cups (12 fl oz )(usually, that's1 bottle) of unsulphured molasseso1 and 1/2 cup (3 sticks) butter ormargarineo8 cups all-purpose flouro2 tablespoonsdouble-acting baking powdero1/2 teaspoon salto1 teaspoon baking sodao4 teaspoons ground gingero4 teaspoons ground cinnamono1tablespoon allspiceo1 and 1/2 cups brown sugar (dark or light)o2 large glue-o4 egg whiteso1 teaspoons cream of tartaro4 cups of confectioner's sugar (also called icing sugar or powdered sugar) foil or better yet, silicon baking or , all-purpose, white or whole , more silicon banking mats OR waxed duty mixer (optional-you can mix by hand)
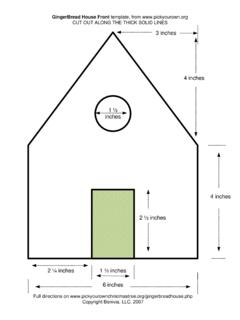
3 Pin, I like the non-stick silicon 11" by 17" cookie tray, heavy cardboard and/or plywood to use as a images and textCopyright Benivia, LLC2007 All rights quart-sized bottles (like fullspaghetti sauce jars) or unopened soda cans tohold the walls and roof in place while the icing bags and tips (OR a gallon sized Ziploc plastic bag (quart will do, also) : M&M's, gumdrops, lifesavers, colored sprinkles, 2-Print and Cut Out the StencilsI've seen some miserable directions for making the patterns/stencils, socomplicated, they looked like a college geometry exam!So,instead of giving youmeasurements, a ruler, a protractor and instructing you on making right trianglessuperimpose on 've already made the templates for you, put them in aprintable pdf file!)
4 All you need to do isclick here (which will open a new window) then print the file that comes close that page and you willreturn here!If your printer can handle stiff or heavyweight paper, so much the better; use that,but plain paper will do, too. Just print the templates, then cut them out along theheavy solid lines, including the doors and windows. Notice that you really need onlyone of each roof pieces and the side (since the two long sides and two roof pieces areeach identical), and you will reuse them!Thepdf file includes templatesforRoof: 2 rectangles, 7 inches by inchesSide walls: 2 rectangles, 4" "Front and Back:see the : (optional) 1" : If you don't have a printer-or it is not working,don't look at the templates on your computer,and with a manilafolder, a magic marker and a ruler, youshould be able to make them-I included all of the dimensions on the templates!
5 Images and textCopyright Benivia, LLC2007 All rights the doughStep 3-Get the dough ingredients readyNo, don't run off to you job and try to earn more; we're actually making dough, justlike the funny man making the , so you're not old enough to rememberthat !Here's what you'll need: 1 and 1/2 cups (12 fl oz )(usually, that's 1 bottle) of unsulphured molasses 1 and 1/2 cup (3 sticks) butter or margarine 8 cups all-purpose flour 2 teaspoon double-acting baking powder 1/2 teaspoon salt 1 teaspoon baking soda 4 teaspoons ground ginger 4 teaspoons ground cinnamon 12tablespoon allspice 1 and 1/2 cups brown sugar (dark or light) 2 large eggsStep 4-Turnthe oven onNow's a good time to get your oven pre-heating to350 F (175 C)Step 4-Melt the butterMelt the butter in the microwave or stovetop until justbarely might also warm the molasses so it pours and mixesmore easily (remember the expression "slow images and textCopyright Benivia, LLC2007 All rights ).
6 You can heat it in the microwave (with the lid removed) for 45 seconds,or let it sit in a pot of very warm, almost hot, water for 30 5-Mix the butter and molassesPour the melted butter and molasses into your mixing bowl (alarge one!)Step 6-add the eggs and brown sugarNow add the eggs, and next the brown sugar! Note how Iswitched from a whisk to a heavy beater on the 7-Mix the dry ingredientsIn another large bowl mix the 8 cups all-purpose flour 2 teaspoon double-acting baking powder 1/2 teaspoon salt 1 teaspoon baking soda 4 teaspoons ground ginger 4 teaspoons ground cinnamon 12 images and textCopyright Benivia, LLC2007 All rights 8-Add the flour to the wet ingredientsIf you have a mixer with a dough hook, it is time to put that , you'll need to (knead,too) do this by hand!
7 Done mixingBack into the bowl and knead it into a smooth 9-Chill!The dough, that time for you to relax, yet. Put the dough ina ziploc bag or other container and refrigerate at least 30minutes. Most directions say that you can even leave it till thenext day, and I'm sure you can, but that's not 10-Prepare the platform or baseNow is a good time to prepare a base to build the house justcut the side of a cardboard box to fit inside a baking pan orcookie sheet with a lip around it. I've heard some people use apiece of plywood, and that's great if you have one lying images and textCopyright Benivia, LLC2007 All rights , I covered the cardboard in a sheet of heavy aluminum the shiny side down, so it wouldn't be TOO reflective (forphotos).
8 Step 11-Roll out some doughOn a siliconbaking mat, waxed paper or a floured surface, roll outa small amount of the dough (about the size of a tennis ball) untilit is about 1/4 inch thick. Don't get carried away trying tomeasure it, gingerbread is pretty tough stuff, so it can be as thin as 1/8 in someplaces or as thick as 1/2 inch, but 1/4 inch (1/2 cm for those of you in othercountries) is 12-Match a template cutout to the rolled doughTry to match one one or more of the cut outpatterns to the size of the rolled dough. Itdoesn't need to be an exact fit, you will reusethe don't worry about makingthe rolled out dough any precise shape(rectangle, circle-just as long as it isbigger than one or moretemplates, that will place one of the paper pattern pieces on the dough and usinga dull knife (like a table knife) cut around the 13-Cutting out doors and windowsCut out the windows and doors andjust lift out the extra the trimming to roll again for the , here is why I like using the silicon can just lift the mats with the images and textCopyright Benivia, LLC2007 All rights on it, and lay it on the cookie lay the cookie sheetover it then turn it over-if you need toreuse the cookie sheet for the next 's a tip on windows.)
9 You can fill the empty window holes with crushed life-saversto form stained glass windows!It will melt in the oven and fuse to make "glass"panes!Step 14-Making the chimneyMaking the Chimney-The chimney pieces are no different fromthe others, just smaller!You don't need to make a chimney, but itadds a nice touch. I will admit that they are a pain in the neck toget to stay glued inplace until the glue about 15-Pop them into the ovenNow pop the tray into the oven and let it cook for 12 to 15minutes, until it puffs up a little bit and just starts to becomegolden and slightly one tray is baling, you can cut outthe next remove the cooked batch and let cool!Another tip about the cooked dough:It's easy to trim it when it is fresh from theoven, still warm and soft, so you can trim some defects even after images and textCopyright Benivia, LLC2007 All rights , it's still pretty easy to trim it with a sharp pair of kitchen shears or afirm, sharp knife that won't bend under use a pizza roller or sharpknife to mark lines on the sections just after they are baked, to make shinglesand other designs.
10 And you can do it before baking, but they won't be as the IcingThe icing is your mortar and glue, as well as decoration and trim!Ingredients: 4 egg whites-If you use pasteurized eggs whites, like those in thecarton at right, then the icing will be safe to eat (otherwise, the uncooked eggsmay contain salmonella!) 1/2 teaspoon cream of tartar 4 cups of confectioner's sugar (also called icingsugar orpowdered sugar)Step 16-Beat the egg whitesIn a large bowl (I like standingelectric mixer, like aKitchenAid)beat the egg whites until they begin to foam. Add the cream oftartar and beat until the whites are stiff but not beat in the icing sugar, beating for about 5 minutes untilit reaches spreading consistency. Keep it covered andrefrigerated until images and textCopyright Benivia, LLC2007 All rights you have a pastry bag, use that, but it's easy to take a large (1gallon) ziploc bag.
