Transcription of PLEASE call the storm door Solution Center at 1-800-933-3626,
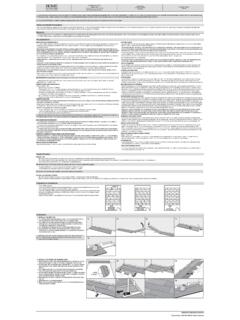
1 Installation Guide E. for Andersen 1-1/2 Self-Storing storm Doors with Balanced Retractable Insect Screen PLEASE Do Not Return Product to Store! PLEASE call the storm door Solution Center at 1-800-933-3626, with any questions regarding installation, lost part replacement, or anything else related to your storm door purchase. Read this entire guide before you begin your installation. If your abilities do not match the requirements of this installation, contact an experienced contractor. PARTS OVERVIEW. Your installation kit should contain the following parts.
2 However, in some door models, not all of the B. K. parts will be used. C. A Door Frame Assembly: A. F. B Rain Cap C Latch Rail D Hinge Rail G. E Sweep F Handle Clip G Spacer Clips (2). D. H Bottom Spacer H. I Rain Cap Extender F L. J Ventilating Window K Screw Covers (3) I J. G. L Retractable Screen Not Shown K. M Handle Set Kit N Installation Kit O Window Handle Kit H. E. Figure 1. Andersen storm Door Division is a wholly owned subsidiary of Andersen Corporation. Andersen Andersen SDD, PO Box 853. storm Door Division manufactures and supports the limited warranties for Andersen and Des Moines, IA 50306-0853.
3 EMCO storm doors. Andersen and EMCO and all other marks where denoted are trade- Rev 1-2017 16041 Print in Color marks of Andersen Corporation. 2017 Andersen Corporation. All rights reserved. p/n 624617. 1. SAFETY FIRST: PLEASE read and follow all Cautions and Warnings in this guide. WARNING WARNING. Entry door hardware and handle may Metal fasteners and other hardware components may corrode when exposed to preservative treated and fire-retardant treated lumber. become hot when exposed to sunlight. Obtain and use the appropriate size stainless steel fasteners and hardware as called out by the installation guide to fasten unit to any rough opening made from pressure treated and fire-retardant treated lumber.
4 Failure to use the appropriate materials for the installation may cause a failure resulting in injury, property or product damage. WARNING. Improper use of hand or power tools could WARNING WARNING. result in injury and/or product damage. Follow equipment manufacturer's instructions for safe Windows and doors can be heavy. Use safe lifting techniques The insect screen is intended for reasonable insect control and operation. Always wear safety glasses. and a reasonable number of people with enough strength to lift, not the retention of objects or persons within the interior.
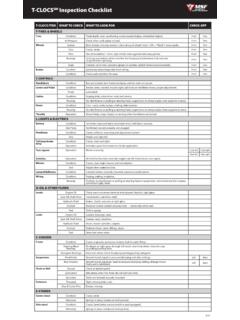
5 The carry, and install window and door products to avoid injury and/ insect screen material will not stop a person from falling through or property damage. the door. RECOMMENDED TOOLS Tape Measure Drill Safety Glasses Screwdriver Metal File Gloves ! ! ! ! 1 VERIFY mounting REQUIREMENTS. Verify that the exterior brick mold, trim board or casing is firmly attached to the opening. The storm door H. will sag over time if the mounting surface is not sufficiently fastened to the entryway. To install the storm door, you must verify that the opening width, height and mounting surface are sufficient.
6 W1. 5/8 1/2 . 3/4 . 1. Measure the width at the top, middle, and bottom of the opening (Figure 2). Measure from the inside min of the brick mold or exterior trim. Refer to Table 1. 2. Measure the height at the Center of the opening. Measure from the inside of the brick mold or exterior 1/2 . 5/8 1/2 . trim, down to the top of the bottom sill. Refer to Table 1. 5/8 2 1/2 . Nominal storm Opening Sizes min Table 1: 1 . Use this table to Door Sizes ** W 1 - 3 (width). 1 1/2 . * H (height). 2 . 1 min determine if your 36 x 80 35 7/8 TO 36 3/8 Figure 3.
7 5/8 W2. storm door will fit into 34 x 80 33 7/8 TO 34 3/8 80 TO 80 7/8 . 1/2 . the opening: 32 x 80 31 7/8 TO 32 3/8 . 1 1/2 . 30 x 80 29 7/8 TO 30 3/8 . 1 1/2 2 . W3. 3. Make sure that the brick mold or exterior trim meets the mounting surface requirements to install the rain cap, hinge rail and latch rail (Figure 3). You must have a minimum of: Figure 2. * 1 1/2 . i 1 mounting surface depth. INTERIOR VIEW. 3/4 mounting surface front. * VISTA INTERIOR = VIEW. 2 1/2 handle clearance VUE DE L'INT RIEUR. X. * For opening widths up to 1 wider, PLEASE call our Solution Center at 1-800-933-3626 to purchase a special kit to accommodate your situation.
8 EXTERIOR VIEW. VISTA EXTERIOR = VIEW. ** Nominal storm doors sizes are listed. The actual storm door frame width and height will be less. Example: A nominal size of 36 x 80 may have an actual storm door frame size of 35 1/8 x 79 1/8 . VUE DE L'EXT RIEUR. 2. 1/2 SMS Pan Painted INSTALLATION 1/2 . N SMS FlatheadTools needed: PREPARATION. 2 1/2 Self-Drill Pan 1/2 x3. 1/2 Self-Drill Pan Painted X. a 3/4 Machine Flathead b i VIEW 2 1/2 . VIEW. 7/8 Machine Pan Painted 1 SMS Pan 1 SMS Pan Painted Figure 6. 40 1/2 . 1 Machine Pan Painted TO DOOR SILL.
9 HASTA EL BATIENTE DE LA PUERTA. Figure 4 Figure 5 JUSQU'AU SEUIL DE LA PORTE. 1-1/2 Machine Flathead In this step, you will confirm that your storm door hinges on the correct side. 1. Most homeowners prefer to have the storm 1. Left Handed (Figure 4): From the exterior, a left handed storm door will have the handle on door handle on the same side as the entry door the left side of the storm door. See pages 4-9 for installation instructions. handle. In shallow door openings, this can cause 2. Right Handed (Figure 5): From the exterior, a right handed storm door will have the handle the two handles to interfere.
10 Check for potential #10. on the right side of the storm door. See pages 10-15 for installation instructions. interference using the rough measurements. If you 3. The top interior is where the top cover plate is located (Figure 6). anticipate that there will be interference, purchase a storm door that is hinged on the opposite side of your entry door. See page 2, Figure 3 for detailed 1-1/2 Machine Flathead hardware depth requirements. c GRASP HERE. X. VIEW. 2 SMS Pan Painted #12. SPANISH G. FRENCH. 5/8 SMS Pan Painted H. Ensure all clips are properly attached.