Transcription of Poppy Modern - Andover Fabrics
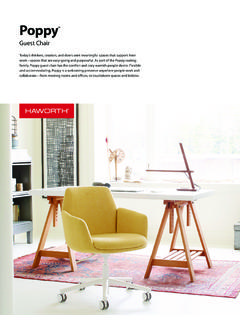
1 Makower uk 12/28/12 Poppy ModernQuilt designed by Jane DixonQuilt size: 90" x 90" Fabrics byJane DixonPoppy Modern QuiltIntroducing Andover Fabrics new collection: Poppy Modern by Jane DixonQuilt designed by Jane DixonPage 2 of 5 Free Pattern Download Available at 12/28/12 Quilt finishes 90" x 90"Cutting DirectionsNote: Read assembly directions before cutting patches. All strip and circle appliqu measurements are nished sizes. Add 4" all around if you are using traditional appliqu . Fabric H panels are cut sizes and include 4" seam allowances. A fat 4 is an 18" x 20"-22" cut. Strips and panels are cut a little extra long for insurance. Fabric A Cut (1) circle with a 20" nished diameter Cut (3) circles with an 18" nished diameterFabric B Cut (1) circle with a 15" nished diameterFabric C Cut (3) strips 6" x 31" Cut (3) strips 4" x 31" Cut (1) circle with an 18" nished diameterFabric D Cut (9) strips 3" x 31" (read step 1 rst) Cut (3) strips 5" x 31" Cut (1) circle with an 18" nished diameterFabric E Cut (2) circles with an 18" nished diameter Cut (1) square 12" x 12" ( nished size)Fabric F Cut (1) circle with an 18" nished diameter Cut (1) circle with a 15" nished diameter Cut (1) circle with an 11" nished diameterFabric G Cut (1) circle with a 15" nished diameter Cut (1) circle with an 11" nished diameterFabric H Cut right panel 40" x 91" Cut center panel 26" x 91" Cut left panel 26" x 91" Cut (5) strips 22" x 76" for binding, cut lengthwiseBacking Cut (3)
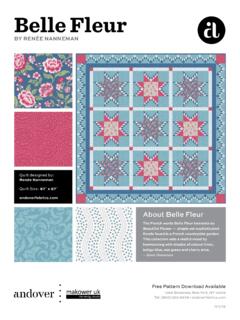
2 Panels 33" x 98", pieced to t quilt top with overlap on all sides e Fabrics are the focus here. Be up-to-the-minute with this contemporary queen/king topper that presents these unusual prints at their very best. Two colorways give you a chance to make a quilt that is either black and white and red all over or the coolest lime green. Fabric Requirements Yardage Green Red*Fabric A circles 14 yards 6068-G 6068-RFabric B circle Fat 4 yard 6069-GC 6069-RFabric C circle, strips 12 yards 6071-G 6071-GRFabric D circle, strips 2 yards 6071-GK 6071-GKFabric E circles, square 1 yard 6072-RC 6072-RCFabric F circles 1 yard 6074-G 6074-RFabric G circles 2 yard 6075-RK 6075-RK**Fabric H background 8 yards A-S-L A-S-L*Backing 82 yards 6068-G 6068-R**includes bindingPage 3 of 5 Free Pattern Download Available at 12/28/12 Poppy Modern QuiltMaking and Assembling the Quilt1.
3 Before cutting the strips and circles, decide whether you are going to fuse the patches and nish the raw edges with a satin or blind stitch, or turn under the edges and stitch patches in place. If you plan to turn under edges, you must add turn-under allowances around the patches. In that case, cut Fabric C and D strips 62", 52", 42", and 32" wide. 2. To draw the circles, use a bar compass or tie a string around a pencil near the lead. Place the pencil in the center of paper that is large enough, and draw a circle around the pencil, holding the string perpendicular. If fusing, draw the 14 circles and 1 square on the wrong side of lightweight fusible web. Fuse to the appropriate Fabrics and cut patches on drawn lines. If using traditional appliqu , draw a pattern for the square and each size circle needed, and use them to cut out the fabric patches. Set To make the Fabric C appliqu strip that is 6" on one end and 2" on the other end, join 3 strips 6" x 31" end to end.
4 Press the seams open. Mark a dot at the center at one end of the pieced strip. From the center, mark 1" on either side of the center dot. is is half the width of the narrow measurement. If fusing, press 6"-wide strips of fusible web to the back side of the strip. Lay out the strip on a long at surface (a ping pong table is perfect). Using a 10 foot or longer metal measuring tape, align the tape with a corner at one end of the strip. Have a second person on the other end hold the metal tape at the o -center mark. Draw a chalk line or pencil line along the metal ruler. Align the ruler with the other corner and the second o -center mark. Draw a line along the edge of the ruler (Diagram 1). Cut along the drawn lines. Referring to the Quilt Assembly for measurements, repeat these steps on all 6 Fabric C and Fabric D strips. 4. Referring to the Background Assembly Diagram, join 3 Fabric H panels in the order shown.
5 Press seam allowances open. 5. We suggest that you work on a ping pong table or other large surface. Referring to the Quilt Assembly, measure from the top left corner of the background and mark with a pin at each measurement along the top edge. Repeat along the bottom edge. Place the rst Fabric D strip so the center of it aligns with the 8" pin at the top. Smooth the strip the length of the background, aligning the center of the strip with the bottom pin. Place a heat-proof cloth under the quilt and fuse the strip in place, shifting the heat cloth as needed, or pin the strip in place. Arrange and fuse or pin all strips to the background, positioning the wider or narrower end of each strip as shown on the diagram. Shift strips as needed to cover the sewn seams of the background. Finish the edges with a machine blind hem stitch or other method. 6. Position and fuse or pin the circles and the square in place.
6 Feel free to shift the circles any way you wish. Keep all circles at least 2" from the raw edge of the quilt. Finish the edges as you did the Trim the top and bottom edges of the quilt evenly and the Quilt8. Layer the quilt with batting and backing and baste. Quilt in the ditch around the appliqu patches. Quilt around the printed motifs in the circles. Quilt the background with overall loops and circles. Bind to nish the quilt. Background Assembly26" x 91"HHH26" x 91"40" x 91"Diagram 16"2"6" x 31"Page 4 of 5 Free Pattern Download Available at 12/28/12 Poppy Modern QuiltQuilt Assembly11" diameter15" diameter1"1"1"5"2"6"3"3"3"1"4"2"45"80"2" 25"8"628"45"80"50"25"62"18" diameter18" diameter18" diameter20" diameter15" diameter15" diameter11" diameter18" diameter18" diameter18" diameter12" square18" diameter18" diameterHHFHEHGHAHAHBHCHD*Indicates fabric used in quilt pattern.
7 Fabrics shown are 25% of actual size. Free Pattern Download Available at 12/28/126068-R6075-RK*6069-R6071-R6074-R 6070-R6072-R6073-RPoppy Modernby Jane Dixon1384 BroadwayNew York, NY 10018(800) *Blend with: Andover Solid6068-G*6069-G6071-G*6074-G*6070-G60 72-G6073-G6068-C6075-GC6069-GC*6071-GK*6 074-GC6070-RK6072-RC*6073-RK