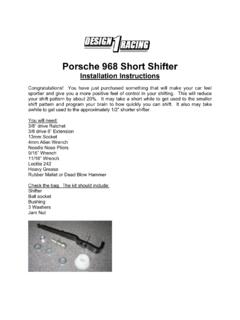
Transcription of PORSCHE 968 FIREWALL BRACE - RS BARN
1 PORSCHE 968 FIREWALL BRACEI nstallation InstructionsInstalled Properly, this BRACE will help prevent the FIREWALL from cracking. We cannotguarantee that it will absolutely prevent it, as we cannot vouch for the pre-existingcondition or ongoing conditions to which the car was and is subjected, but it will the Instructions carefully. Each step is there for a reason. Do not skip ahead orassume anything. Doing so will complicate the process, and frustrate you. It is a fairlystraight forward process, but the installation is a LOT easier if you do it one step at atime as indicated. (For the purposes of the photos, the brackets shown in theinstructions are not powder coated.)We apologize in advance for the extremely tight space in which you must work, and forhow difficult it will be to get your hands and tools into the areas needed. Take your timeand be will need:12 mm Socket3/8 Drive Ratchet, Swivel, and 12 Long Extension12 mm Wrench3/8 Drive Needle Type Torque Wrench (must accurately measure 18 ft/lbs)Drill Motor and 3/8 Diameter Drill Bit1/8 Flat ScrewdriverBox Knife and/or Tin SnipsSharpieFileLoctite 242 (not included)Small Hose Clamp (not included)Check the bag in which everything came.
2 You should have:1 - FIREWALL Bracket (the short one)1 - Tower Bracket (the long one)3 - 5/16-18 x 1 bolts3 - 5/16-18 locknuts6 - 5/16 flat washers1 Template (stapled to these instructions)Step 1 Using the 1/8 Flat Screwdriver, work loose and un-do the Zip Ties shown in Figure 1,which are retaining your hoses and wires. Push hoses and wires out of the way as bestyou can to reveal the Clutch Master 2Un-do the vacuum hose shown in Figure 1. Lay this aside out of the way as shown. Ifyou have the factory hose clamp, you will need to replace it, as it will likely be destroyedin the process, and re-clamping it does not insure a good 3 Using the Ratchet, 12 extension, Swivel and 12mm Socket, remove the left most(driver s side) nut on the Clutch Master cylinder (see Figure 2). Set aside. Again weapologize for the cramped 4 Using the nut you just removed, apply a drop of Loctite 242 on the threads and installFirewall Bracket as shown in Figure 2.
3 Do not use any washers. Leave hand tight 2 Step 5 Remove the 4 nuts at the left (driver s side) Strut Tower. If you have a Design 1 RacingStrut Tower BRACE , remove the driver s side Bracket there as 6 Using the Template included, mark and drill a 3/8 hole in the Strut Tower Bracket asshown in Figure 33/8 HOLENOTE: If you have a KLA Strut Tower BRACE , you will have to mark and drill the hole inyour bracket after first pre-assembling the FIREWALL Bracket to determine the hole slocation. The template included will NOT work for the KLA unit. The bracket will alsonot be as strong as the Design 1 Racing bracket. You will also need to add spacersbetween the new bracket and the KLA bracket (not included). We make no warrantieson anything if you use this in conjunction with the KLA 7 Assemble 5/16 bolt and washer and THEN place Strut Tower Bracket back in positionand start nuts as shown in Figure 4.
4 Hand 4 Step 8 Place vacuum hose back in place, making sure it is underneath the new bracket. Donot connect 9 Assemble Tower Bracket as shown in Figure 5, placing it BENEATH the FirewallBracket. Hand tighten all 5 Step 10In a Criss-Cross pattern re-torque Strut Tower nuts to 18 ft/lbs. The studs strip veryeasily. DO NOT OVER-TORQUE!!!Step 11 Torque Clutch Master nut to 18 ft/lbs. DO NOT OVER-TORQUE!!!Step 12 Tighten all 5/16 hardware to approximately 20 13Re-attach Zip Ties, and using the new small hose clamp, re-connect vacuum hose, andreassemble Strut Tower BRACE (for torque and adjustment information, follow theinstructions for the Strut Tower BRACE ).Step 14If you have the plastic engine bay trim piece, trim as shown in Figure 6 to removeinterference with bracket. File to suit for HEREFIGURE 6 Step 15 Reinstall plastic cover, and you re done. Congratulations!!