Transcription of PowerMic III Set-up and Use: Windows and Mac Instructions
1 866-778-0524 PowerMic III Set-up and Use: Windows and Mac Instructions To purchase the PowerMic III from Speech Recognition Solutions please use the following link: Overview: The Dictaphone PowerMic III handheld microphone is a high quality microphone which works extremely well with speech recognition software. In addition to being very accurate, the microphone element in the PowerMic III is somewhat buried in the housing and, as a result, this turns out to be a very noise rejecting microphone. In addition, when used with the following versions of Dragon there is a high level of integration between the PowerMic III and the software: Dragon 10 Medical Dragon Medical Practice Edition (DMPE) and DMPE2 Dragon Medical 360: Network Edition Dragon Medical 360: Direct (cloud-based) Unfortunately, the PowerMic , as supplied by Nuance, does not on its own integrate particularly well with non-medical versions of Dragon and with Mac computers.
2 There are, however, some simple work-arounds to allow the PowerMic to works in these situations and they are described in detail below. Drivers and button integration: the microphone does not come with any drivers. All needed drivers will be installed automatically when using the PowerMic III with appropriate software. The exception is Dragon Medical 360: Direct, with which it will work without drivers when run locally, but if run over Citrix you will need to obtain Citrix PowerMic III drivers from your IT administrator. For more information, please refer to the chart at the end of this guide. PowerMic III Set-up and Use with Dragon Medical When used with any of the medical versions of Dragon from version and onward, a high level of integration takes place between Dragon and the PowerMic III so much so that there is even a dedicated tab on the Dragon Options window for programming of the buttons on the PowerMic III (see graphic at right).
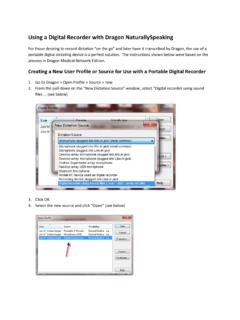
3 Key Point: When using the PowerMic III with any medical versions of Dragon it is necessary to formally select the PowerMic III as the sound source for a user profile in order to have the added tab on the options menu for advanced programming of the buttons on the PowerMic III. If you don t see the tab on your medical version of Dragon, it means the PowerMic wasn t properly added. Adding the PowerMic III to Dragon Medical Selecting the PowerMic III as the sound source can be done using one of two methods: 1. Preferred Method: From within an existing user, change the dictation source by going to Profile > Add dictation source to current user profile. You will be presented with a window from which you can choose PowerMic III Microphone as your new source. You can thereafter choose whether to perform training or not. Selecting a short training is ideal but not absolutely necessary.
4 [Note: in older versions of Dragon Medical a new source is added using a slightly different method. Navigate to Profile > Open User Profile and then selecting Source > New on the right of the Open User screen. From there select the PowerMic III as the sound source and follow subsequent Instructions .] 2. Alternative Method: Create a new user (Profile > Manage User Profiles > New) and select the PowerMic III Microphone as the dictation source. Train the new user as usual. This method takes a lot more time and creates a profile without the commands and personalized vocabulary in your old profile. Programming PowerMic Buttons (Dragon medical versions only) Assigning functions in appropriate medical versions of Dragon is the same as programming keyboard hotkeys. Program buttons in Dragon 10 Medical as follows: 1. Open the PowerMic III tab in the options menu by clicking on Tools > Options > PowerMic III tab.
5 You will see the Options tab shown above. 2. On your PowerMic III microphone, push on the button you want to program. You will notice that the corresponding button on the PowerMic III picture will turn green and the associated drop down menu to the right will be highlighted 3. From the drop down menu, select the function you want to assign to the selected button. 4. If you want to program a button to cause a command to be initiated, go the User Commands selection on the drop-down. This will then reveal the last 5 commands you used and any of these can be selected. If necessary, therefore, in advance of programming a button, be sure to use any commands you plan to assign to a PowerMic III button. 5. If you plan to program a button to advance sequentially through variable fields in a document, make the appropriate selection from the navigation category of the drop-down menu (see image at right).
6 PowerMic Set-up with Non-Medical Versions of Dragon As mentioned above, full programmability of the buttons on PowerMic III is allowed only with the medical versions of Dragon. For all other versions, the microphone and speaker will work, as will the pointer stick and left and right click buttons. But nothing more. Fortunately, there is an option to allow programming of the PowerMic III for non-medical versions of Dragon and for other Windows applications the use of Octopus USB Controller (OUC). Octopus USB Controller is a third-party software utility that allows you to assign functionality to the buttons or levers on any USB Human Interface Device, including the PowerMic III. Among the functions you can program are the following: Insert boilerplate text (text of your choosing) Initiate any of a series of Windows activities, such as moving forward and backward through open applications, opening the Task Manager, and other common Windows functions/activities Open any application, document, web-page, or folder Emulate any key or key-combination For Dragon users, initiate any Dragon Hotkey or command (including user created commands) Combine an unlimited number of the above functions into a single "script" initiated with a single button, key or lever push A fully functioning version of OUC is available for free download and can be used 5 times before purchasing an activation code.
7 For more information on Octopus USB controller, please visit the product page on our site at: NOTE: DRAGON MEDICAL AND Windows USERS NEED NOT READ ANYTHING BELOW HERE. ** PowerMic III Set-up and Use for Mac Users Mac Limitations Although Dragon Dictate shares the same speech engine as its Windows -based cousin (Dragon NaturallySpeaking) and provides high levels of accuracy when dictating, it lacks some of the functionality seen in the Windows version. As relates to the PowerMic III, limitations include: 1. The inability to program any of the keys on the PowerMic III microphone to control the microphone with Dragon Dictate 2. The inability to use any microphone ( PowerMic III and others) in a push -to-talk manner. 3. The lack of drivers and functionality to allow programming of additional functions to the PowerMic III buttons Prerequisites for the Mac User Thankfully, there is a simple way to get around these limitations, although it requires purchase of two (relatively inexpensive) third-party applications.
8 One application allows programming of PowerMic keys in a Mac environment (including emulation of keystrokes.) The other allows keystrokes to control the default Mac microphone in a push -to-talk manner. Here s what you need: 1. USB Overdrive: this is a software utility that detects the buttons on most USB devices, including the PowerMic and allows you to program a variety of functions to a button depression. This application is shareware and can be used for free, but you will be forced to live through a short count-down every time you launch it. We suggest you buy it for $20 and support the programmer. It can be seen and downloaded from . Once downloaded and installed, USB Overdrive will show up as a system utility and is accessed through the Finder at Applications > Utilities. If the only thing you want is to control Dragon Dictate with a PowerMic in a push -on/ push -off method, USB Overdrive is all you need.
9 You will see that USB overdrive allows programming of lots of functions to the keys on a PowerMic . 2. push to Talk: this is a very inexpensive ($.99) application that is available from the Mac App Store and which will allow you to assign any key combination to control the assigned system default microphone in a push to talk method. To be clear, push to Talk does not interact with Dragon or any other program but, rather, controls the default microphone at the system level, activating it while a key or key combination is depressed and inactivating it when the key or key-combination is released. If the default microphone is the PowerMic , then it can be controlled in a push to talk method. Find push to Talk by searching on the Mac App Store. Once installed, push to Talk is seen as a small microphone icon on the top of your screen. It provides a visual indication of whether your microphone is active or not and by clicking on the icon you can open its simple menu.
10 You ll need push to talk if you want to control the Dragon Dictate microphone in a push -to-talk manner. Overview of the Setup for a Mac: We recommend a strategy using the general flow shown in the figure above and programming USB Overdrive and push to Talk as follows: 1. Program one key on the PowerMic to issue the key combination needed by Dragon Dictate to control the microphone in an on/off method (press once to turn on and again to turn off) we like to assign this to the transcribe key, but any key will work. 2. Program one key on the PowerMic to issue the key or key combination used by push to talk to operate the default microphone input ( PowerMic III) in a push -to-talk manner. Practically speaking you will use the first button to turn on the microphone, and then use the second button to actually activate the microphone input in a push -to-talk method.