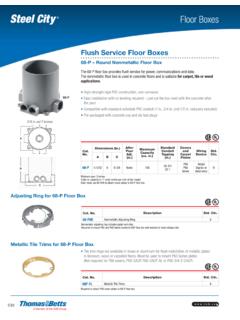
Transcription of Pre-Engineered Walk-In Coolers and Freezers …
1 Pre-Engineered Walk-In Coolers and Freezers installation manual Part One: The Bally Walk-In 1. Preparation for Installing the Walk-In_____ 3. 2. Operation of the Bally Speed-Lok_____ 3. Part Two: installation 1. Positioning_____ 4. 2. Walk-Ins with Screeds_____ 4. 3. Installing Less-Floor Walk-Ins_____ 4. 4. Door installation _____ 5. 5. Installing With-Floor Walk-Ins_____ 5. 6. Vertical and Ceiling Panel Installation_____ 5. 7. Installing Multi-Compartment Walk-Ins_____ 6. Part Three: Other Important Information 1. Preventing Vapor Leaks_____ 6. 2. Partition Wall Caulking _____ 7. 3. Air Gap Circulation Recommendation _____ 7. 4. Making holes for Refrigeration Tubing and Electrical Lines_____ 7. 5. Making Electrical Connections to Entrance Doors and Vapor-proof Lights_____ 7. Part Four: Completing the Bally installation Completing installation of the Walk-In_____ 9. 1-800-24 BALLY | UPDATED: 4/2017 Instruction manual IM-268-11 2017 Bally Refrigerated boxes , Inc.
2 1. Miscellaneous Box #1 with the orange sticker contains all the information you will need. Before attempting to install the Bally Walk-In , review these instructions and any others supplied with the shipment. For future reference, make sure there is a record of the original order number and a list of all se- rial numbers for the Walk-In and refrigeration systems. A plan view showing the proper layout of panels is enclosed with other documents as well as this manual . Make sure you are using the As-Built drawings as opposed to any previously supplied Proposal drawings. Before placing any panel into position, check the plan view for location. 1. installation Preparation A. When the building is delivered, make sure you have the right equipment and manpower on hand to unload the truck. A fork- lift or high jack can be helpful if the shipment includes heavy steel or refrigeration equipment. The carrier typically imposes time constraints on unloading your box, and in all situations one person is not enough.
3 B. As you are unloading look for any freight damage; all products left our factory in perfect condition. Once the Bill of Landing was signed by the carrier, safe delivery became their responsibility and the equipment became your property. Check the packing list and make sure that all component parts are accounted for. Before signing the Bill of Landing, inspect all items. If any damage is noted or the number of pieces received does not agree with the invoice, do not accept shipment without notation by the carrier's agent on the Freight Bill. If damage or shortage is discovered when unpacking leave material and request an inspection by the carrier. Keep all documents and information so you can file you claim properly with the carrier. The Bill of Landing, Freight Bill, and the original invoice, are needed to file a claim, and must be filed within one week of the date of shipment. C. Use extreme caution when unpacking to prevent damage to panels and other equipment.
4 Pay close attention to hardware affixed to the door and door-frame. Do not lift the door by its Hardware or the Light Base. Do not drop panels or slide over unfinished surfaces. Keep panels dry and out of direct sunlight. D. The protective plastic coating on the panels may be removed before or after the installation depending on the timing of construction schedules. The protective plastic on the bottom of the floor panels must be removed prior to setting the floors in place. In all cases, ALL plastic must be removed before the final completion of the installation . This includes all unexposed areas and all surfaces under membrane roofs. E. The most important requirement for installation of this Walk-In is to have a level floor. If the floor is level the process will be very smooth. Otherwise, it's impossible to make sure that the panels will align correctly and be plumb and level. Use a laser level or transit to identify the high spots on the floor.
5 Whenever Walk-Ins are to be installed where concrete is curing or tile is being set, it is important to provide adequate ventilation. Concrete and tile grout release hydrogen while curing, which can damage the panel finishes, especially any type of Aluminum finish. Bally identifies panels with barcode labels that specify: a. Panel type: FLR- Floor CLG- Ceiling V- Vertical VC- Vertical corner BKR- Breaker b. Panel dimensions c. Panel finishes Listed Exterior/Interior d. Bally Part# and Serial#. For immediate service, call Bally's Parts and Service Hotline toll-free: 1-800-344-9302. UPDATED: 4/2017 Instruction manual IM-268-11 2017 Bally Refrigerated boxes , Inc. 2. 2. Operation of the Bally Speed-Lok: A. Before attempting to erect panels, familiarize yourself with the operation of the locks Figures 2, 3, and 4. On Bally panels, locks will always be on the left turning in clockwise rotation.
6 If for any reason you have to unlock a panel, refer to Section B below. Figure 1. B. Replacing broken or stripped locks 1. The panel contained the lock must be slid away from adjacent panels in order to obtain adequate working space. First check for any obstructions (dirt, foam, etc.) once you have unlocked a panel reset the cam stop by turning the lock fully back to its original position. If the hook is broken or stripped replacements can be found in Miscellaneous Parts Box#1. 2. Position the lock wrench on the hex rod and turn clock-wise until the locking arm protrudes. 3. Place your hand near the bend in the wrench and use a lift-up motion. This will produce a clamping action on the hex rod. While doing this, pull forward until the rod is free of the panel. The locking arm will then drop free. See Figure 2. 4. Hold the new locking arm in position. Make sure the hook of the arm faces in the proper direction.
7 See Figure 3. 5. Insert the new hex rod into the lock hole. Care must be taken to insert the notched end of the rod. The end to be inserted has a notch located 1 from the end. This notch acts as a stop so the rod will not be inserted too far. 6. Align the hex rod with the hex hold of the locking arm; gently tap it until the notch stops against the locking arm. 7. Replace and refasten the panel in its original position. Figure 2 Figure 3. Always refer to your Plan View when installing your Bally Walk-In Cooler or freezer . UPDATED: 4/2017 Instruction manual IM-268-11 2017 Bally Refrigerated boxes , Inc. 3. Part Two: installation Figure 4. 1. Positioning Walk-Ins erected near existing building walls must be posi- tioned with minimum 2 clearance to allow for air circulation and prevent possible condensation on the exterior surface of the Walk-In . It is important to check that the building's walls are square and plumb, if they are not this will have to be taken into account when erecting the sidewalls.
8 If re- frigeration and coil drain tubing is to be run between Walk- In and building wall allow space for installation . Check for overhead objects that will intrude the Walk-Ins height. De- pending on temperature and humidity, air circulation may be needed to equalize the air temperature and the panel surface temperature above the dew point; this is usually re- Figure 5. quired in a dead air space and high humidity environment. 2. Walk-Ins with Screeds If any part of your Walk-In employs screeds, lock the screeds to the bottoms of the panels before placing any vertical panels. Vinyl floor screeds are anchored to concrete in less- floor Walk-Ins via drive pins with sleeve anchors provided by Bally. Drill into the concrete or other surface with a masonry bit. When using vinyl screeds, shim to make sure panels are level inside the screed. If the Walk-In is being installed on quarry tile, floor holes may be drilled to hit tile seams.
9 Check all dimensions before proceeding. 3. Assembly of Less-Floor Walk-Ins A. After you have checked that the building floor is level, use a transient or builders level to find the highest point on the perimeter. Position the first 12 x 12 corner to be level with the high point. Begin at corner and align pan- els at the top. See Figure 4. B. Position a vertical panel to the right and left of the corner panel (as per Plan View) and flush with the perimeter line. Once properly aligned, fully engage all vertical-to-vertical locks. See Figure 5. C. Level panels to the perimeter high point and check for plumb with a 48 spirit level. (Panels over 10' high use a plumb bob.). See Figure 7. D. As each panel is installed, check to make sure it's plumb and level. If the panel is not plumb, shim to adjust for plumb. Making the same check down the panel's leading edge shows whether it's level along the top or not.
10 If not adjust accordingly. E. Continue installing vertical panels in the same manner, periodically checking to make sure that panels remain plumb and level. See Figure 6 (staggered locking sequence). F. When enough vertical panels are set to accept the installation of the first ceiling and end panel, begin assembly of the ceiling panels. See Section 6 for method of installing remaining vertical and ceiling panels. G. With installation complete, caulk the bases of the vertical panels where they meet the concrete floor. Figure 7. Figure 6. Always check to make sure that each new panel is level and plumb. UPDATED: 4/2017 Instruction manual IM-268-11 2017 Bally Refrigerated boxes , Inc. 4. 4. Door installation Figure 8. A. When erecting a door panel for an installation on a concrete floor and without Bally floor panels, it is necessary to provide a cutout in the concrete floor for all freezer applications so that the heater channel may be inserted to prevent icing.
![INDEX [www.ballyrefboxes.com]](/cache/preview/3/2/a/a/7/f/f/4/thumb-32aa7ff45cca59bcf1b3f12bf9df3096.jpg)