Transcription of PROCEDURE FOR SUBCUTANEOUS INSERTION, …
1 WRHA Palliative Care Program A8024 409 Tach Avenue Winnipeg, Manitoba R2H 2A6 Canada Programme soins palliatifs, ORSW A8024 409 avenue Tach Winnipeg, Manitoba R2H 2A6 Canada PROCEDURE for SUBCUTANEOUS insertion , Removal, Medication Administration and Fluid Administration for Community Palliative Care Patients February 2010 1 PROCEDURE FOR SUBCUTANEOUS insertion , REMOVAL, MEDICATION ADMINISTRATION AND FLUID ADMINISTRATION FOR COMMUNITY PALLIATIVE CARE PATIENTS Approved: February 2010 Date for review.
2 February 2010 WRHA Palliative Care Program A8024 409 Tach Avenue Winnipeg, Manitoba R2H 2A6 Canada Programme soins palliatifs, ORSW A8024 409 avenue Tach Winnipeg, Manitoba R2H 2A6 Canada PROCEDURE for SUBCUTANEOUS insertion , Removal, Medication Administration and Fluid Administration for Community Palliative Care Patients February 2010 2 PROCEDURE FOR SUBCUTANEOUS insertion , REMOVAL, MEDICATION ADMINISTRATION AND FLUID ADMINISTRATION FOR PALLIATIVE CARE PATIENTS IN THE COMMUNITY PART I: Establishing a SUBCUTANEOUS Site PART II: Intermittent SUBCUTANEOUS Medication Administration PART III: Continuous SUBCUTANEOUS Administration of Medications or Fluids PART IV: Discontinuation of a Continuous SUBCUTANEOUS Administration of Medications or Fluids PART V: Removal of a SUBCUTANEOUS Device PART VI.
3 Special Note Regarding Pediatric Patients and Insuflon Catheters PURPOSE To provide an evidence-based, standard approach to establishing a SUBCUTANEOUS (SQ) route for medication administration and/ or fluid replacement in non-emergent situations in the home (when other routes of administration are contraindicated or unavailable). PREAMBLE For many palliative patients, continued use of the oral route for medication administration will not be possible at some point during the course of illness. Medication administration will require use of another route.
4 Intramuscular routes of administration are not appropriate as they are painful and may be unreliable in terms of absorption. The SQ route is the preferred route of administration for palliative care patients, for the following reasons: 1. Complications of use of this route (including redness, tenderness or inflammation at the insertion site, leaking needles and catheter malfunction) are rarely reported (Letizia, Shenk & Jones, 2000). 2. A small-gauge needle is only required at the time the SQ site is established, reducing the risk of needle-stick injuries, particularly with intermittent administration of SQ medications (Dawkins, Britton, Johnson, Higgins & Dean, 2000).
5 3. Infusions can be started and stopped with little risk to the patient of thrombosis or major bleeding (Steiner & Bruera, 1998). 4. The SQ route is relatively easy to manage in the home setting (Steiner & Bruera, 1998). 5. Infusions can be safely administered by gravity, thereby avoiding the need for infusion pumps (Steiner & Bruera, 1998). WRHA Palliative Care Program A8024 409 Tach Avenue Winnipeg, Manitoba R2H 2A6 Canada Programme soins palliatifs, ORSW A8024 409 avenue Tach Winnipeg, Manitoba R2H 2A6 Canada PROCEDURE for SUBCUTANEOUS insertion , Removal, Medication Administration and Fluid Administration for Community Palliative Care Patients February 2010 3 INDICATIONS Common indications for use of the SQ route of administration of medication and/ or fluids include: 1.
6 Circumstances that preclude or compromise oral administration that may include: a) Dysphagia/ difficulty swallowing due to neuromuscular weakness or mechanical obstruction b) Decreased level of consciousness/ coma c) Intestinal obstruction d) Persistent nausea and/ or vomiting 2. Symptom control requiring rapid and reliable medication administration and absorption. 3. Circumstances of poor or variable compliance that may include: a) Dementia b) Delirium c) Individual personalities/ traits (Letizia, Shenk & Jones, 2000; Mitten, 2001) PROCEDURE PART I: Establishing A SUBCUTANEOUS Site: A physician s order is required prior to establishing a SQ route and prior to administering medication/ fluids via the SQ line.
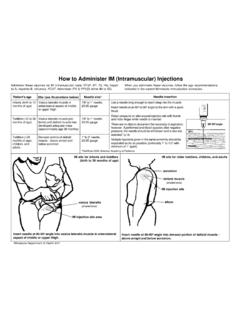
7 The SQ site must be changed every 7 days or sooner, if necessary. When changing SQ sites should be rotated. If two sites are being used, then two separate locations should be used. 1. Obtain necessary equipment and supplies including: a. 1 - BD Saf-T-Intima Safety System 24 gauge winged SQ infusion device b. 2 appropriate transparent moisture-responsive dressings c. 1 Interlink syringe cannula d. 1 - Interlink needle-less injection cap/ end cap e. Pre-filled syringe of Sodium Chloride (Normal Saline) for injection f.
8 1-Chlorhexidine 2% with alcohol swabstick g. Clean, disposable gloves h. Sharps Disposal Container i. SQ LINE Identification Label 2. Wash hands thoroughly for 30 seconds. 3. Explain PROCEDURE and expected outcomes to patient. 4. Select an appropriate SQ insertion site (see Appendix B): WRHA Palliative Care Program A8024 409 Tach Avenue Winnipeg, Manitoba R2H 2A6 Canada Programme soins palliatifs, ORSW A8024 409 avenue Tach Winnipeg, Manitoba R2H 2A6 Canada PROCEDURE for SUBCUTANEOUS insertion , Removal, Medication Administration and Fluid Administration for Community Palliative Care Patients February 2010 4 Preferred injection sites include.
9 Upper arms Abdomen Anterior aspect of thighs Above scapula Subclavicular chest wall Site should be: - easily accessible - free of lesions - away from large vessels, joints and bones - away from edematous tissue that may alter medication/ fluid absorption 5. Don clean gloves. 6. Attach Interlink syringe cannula to syringe prefilled with saline. [Note: This syringe will be reserved to later flush the tubing. Priming the SQ infusion device prior to insertion is not required] 7. Holding the catheter as illustrated, rotate the safety barrel as shown to loosen needle inside catheter.
10 8. Cleanse selected insertion site with the first side of the chlorhexidine 2% with alcohol swabstick in a right to left manner (see diagram 1) for 15 seconds. Flip chlorhexidine 2% with alcohol swabstick over and cleanse the insertion site for 15 seconds in an up and down manner (see diagram 2). Allow the cleansed area of skin to dry for one minute before proceeding. 1. 2. 9. Remove protective shield from needle. 10.