Transcription of Programming - Bricx Command Center
1 Programming LEGO NXT Robots using NXC. (beta 30 or higher). (Version , June 7, 2007). by Daniele Benedettelli with revisions by John Hansen Preface As happened for good old Mindstorms RIS, CyberMaster, and Spybotics, to unleash the full power of Mindstorms NXT brick, you need a Programming environment that is more handy than NXT-G, the National Instruments Labview-like graphical language that comes with NXT retail set. NXC is a Programming language, invented by John Hansen, which was especially designed for the Lego robots. If you have never written a program before, don't worry.
2 NXC is really easy to use and this tutorial will lead you on your first steps towards it. To make writing programs even easier, there is the Bricx Command Center (BricxCC). This utility helps you to write your programs, to download them to the robot, to start and stop them, browse NXT flash memory, convert sound files for use with the brick, and much more. BricxCC works almost like a text processor, but with some extras. This tutorial will use BricxCC (version or higher) as integrated development environment (IDE). You can download it for free from the web at the address BricxCC runs on Windows PCs (95, 98, ME, NT, 2K, XP, Vista).
3 The NXC language can also be used on other platforms. You can download it from the web page Most of this tutorial should also apply to other platforms, except that you loose some of the tools included in BricxCC and the color-coding. The tutorial has been updated to work with beta 30 of NXC and higher versions. Some of the sample programs will not compile with versions older than beta 30. As side note, my webpage is full of Lego Mindstorms RCX and NXT related content, including a PC tool to communicate with NXT: Acknowledgements Many thanks go to John Hansen, whose work is priceless!
4 -2- Contents Preface _____ 2. Acknowledgements _____ 2. Contents _____ 3. I. Writing your first program _____ 5. Building a robot _____ 5. Starting Bricx Command Center _____ 5. Writing the program _____ 6. Running the program _____ 7. errors in your program _____ 8. Changing the speed _____ 8. Summary _____ 9. II. A more interesting program _____ 10. Making turns _____ 10. Repeating commands _____ 10. Adding comments _____ 11. Summary _____ 12. III. Using variables_____ 13. Moving in a spiral _____ 13. Random numbers _____ 14.
5 Summary _____ 15. IV. Control structures_____ 16. The if statement_____ 16. The do statement _____ 17. Summary _____ 17. V. Sensors _____ 18. Waiting for a sensor _____ 18. Acting on a touch sensor _____ 19. Light sensor_____ 19. Sound sensor _____ 20. Ultrasonic sensor_____ 21. Summary _____ 22. VI. Tasks and subroutines _____ 23. Tasks _____ 23. Subroutines _____ 24. Defining macros _____ 25. Summary _____ 26. VII. Making music _____ 28. Playing sound files _____ 28. Playing music _____ 28. Summary _____ 30. VIII. More about motors _____ 31.
6 Stopping gently _____ 31. Advanced commands _____ 31. PID control _____ 33. Summary _____ 34. IX. More about sensors _____ 35. Sensor mode and type _____ 35. The rotation sensor _____ 36. Putting multiple sensors on one input _____ 37. Summary _____ 38. X. Parallel tasks _____ 39. A wrong program _____ 39. Critical sections and mutex variables _____ 39. Using semaphores _____ 40. Summary _____ 41. -3- XI. Communication between robots _____ 42. Master Slave messaging _____ 42. Sending numbers with acknowledgement_____ 43. Direct commands _____ 45.
7 Summary _____ 45. XII. More commands _____ 46. Timers _____ 46. Dot matrix display_____ 46. File system _____ 47. Summary _____ 50. XIII. Final remarks _____ 51. -4- I. Writing your first program In this chapter I will show you how to write an extremely simple program. We are going to program a robot to move forwards for 4 seconds, then backwards for another 4 seconds, and then stop. Not very spectacular but it will introduce you to the basic idea of Programming . And it will show you how easy this is. But before we can write a program, we first need a robot.
8 Building a robot The robot we will use throughout this tutorial is Tribot, the first rover you have been instructed to build once got NXT set out of the box. The only difference is that you must connect right motor to port A, left motor to port C. and the grabber motor to port B. Make sure to have correctly installed Mindstorms NXT Fantom Drivers that come with your set. Starting Bricx Command Center We write our programs using Bricx Command Center . Start it by double clicking on the icon BricxCC. (I assume you already installed BricxCC.)
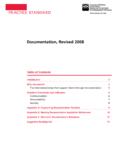
9 If not, download it from the web site (see the preface), and install it in any directory you like. The program will ask you where to locate the robot. Switch the robot on and press OK. The program will (most likely) automatically find the robot. Now the user interface appears as shown below (without the text tab). -5- The interface looks like a standard text editor, with the usual menu, and buttons to open and save files, print files, edit files, etc. But there are also some special menus for compiling and downloading programs to the robot and for getting information from the robot.
10 You can ignore these for the moment. We are going to write a new program. So press the New File button to create a new, empty window. Writing the program Now type in the following program: task main(). {. OnFwd(OUT_A, 75);. OnFwd(OUT_C, 75);. Wait(4000);. OnRev(OUT_AC, 75);. Wait(4000);. Off(OUT_AC);. }. It might look a bit complicated at first, so let us analyze it. Programs in NXC consist of tasks. Our program has just one task, named main. Each program needs to have a task called main which is the one that will be executed by the robot.