Transcription of Project 2013 Quick Reference - CustomGuide
1 Microsoft Project 2013 Quick Reference Card Project 2013 Screen Common Views To Display a View: Select the View tab and choose from the Task Views available. Gantt Chart: Default view. Displays a list of tasks with bar chart information. Task Usage: Displays a list of tasks showing assigned resources under each task. Network Diagram: Displays a sequence or logic diagram that shows the Project s tasks and dependencies. Calendar: Displays tasks and durations in a monthly calendar. Other Views: Provides additional views: Task Form: Detailed information ofthe select task. Task Sheet: List of all the tasks andselected details.
2 Timeline: An expanded view of Shortcuts Save Project File Ctrl + S Close Current Project Ctrl + W Open Existing Project Ctrl + O Print/Print Preview Ctrl + P Task or Resource Shift + F2 Information Assign Resources Alt + F10 Copy Ctrl + C Cut Ctrl + X Paste Ctrl + V Help F1 Go To Selected Ctrl + Shift Task + F5 Link Selected Task Ctrl + F2 Unlink Selected Ctrl + Shift Task + F2 Create a Hyperlink Ctrl + K Zoom In Ctrl+ / Zoom Out Ctrl + Shift + * Undo Ctrl + Z Redo Ctrl + Y Bold Ctrl + B Italics Ctrl + I Underline Ctrl + U Project 2013 Fundamentals To Create a New Project .
3 Click the File tab,click the New tab and click the Blank Projectoption. Or press Ctrl + N. To Use a Template: Click the File tab, clickthe New tab. Select a template from the menu andclick OK. To View Information About the Project :Select the Project tab and click ProjectInformation in the Properties group. Set the Working Time Calendar: Select theProject tab and click Change Working Timein the Properties group. Select the date(s) you wantto change and select a new calendar, or enter thenew working hours in the Start and Finishboxes. To Use Spell check: Select the Project taband click Spelling in the Proofing group.
4 To Use Undo and Redo: Click the Undobutton and Redo button on the Quick Accesstoolbar. To Adjust the Timescale: Select the Viewtab and choose from the options in theTimescale list arrow in the Zoom group. To Adjust the Zoom Level: Select the Viewtab and click the Zoom button to either zoom in orzoom out. Alternatively, click the Entire Projectbutton to zoom to a level where the whole Project isvisible. To Save a Project File: Click the Savebutton on the Quick Access toolbar or click File taband select Save or Save As if you wish tochange the file name or location. To Set a Baseline Plan: Click the Projecttab, click the Set Baseline drop list arrow in theSchedule group and choose Set Baseline.
5 Clickthe Set Baseline Plan option, choose thebaseline number, save the plan for the entire projector selected tasks, and click OK. To Set an Interim Plan: Click the Projecttab, click the Set Baseline drop list arrow in theSchedule group and choose Set the baseline details and click OK. Click theSet Interim plan option, choose where to copyfrom and where they should be copied into, savethe plan for the entire Project or selected tasks, andclick OK. To Show or Hide the Planning Wizard:Click the File tab and click Options. Click theAdvanced tab and either select or deselect theAdvice from Planning Wizard checkbox.
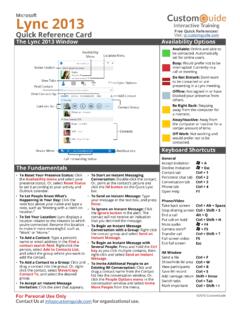
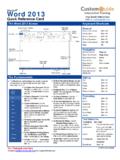
6 To View a Task sUsage: Select the task andclick the View tab. Click the Task Usage buttonin the Task Views group. To Get Help: Press F1 to open the Project Helptask pane, type your question, and click theSearch button. Status Bar Time line File Tab Quick Access ToolbarMinimize Ribbon Title Bar VerticalScrollBarHorizontalScrollBarGant t Chart Gantt Spreadsheet CloseButtonPane dividerRibbon Free Quick References!Visit: 2016 CustomGuide For personal Use Only Contact Us at for organizational and Manage the Project Working with Resources and Costs There are six basic steps to follow when planning a Project : (1) Define a Project (2) Plan Project activities (3) Plan for and gather resources (4) Plan Project costs (5) Plan for quality and risks (6) Plan security and communication.
7 The Resource Tab To Enter Resource Availability: Click the Information button in the Properties group. Enter the Available To and Available From dates in the Resource Availability table, and enter the Maximum Units available in the Units field. To Assign a Resource: Select a task and click the Assign Resources button, select the resource(s) and click Assign. To Enter Costs: Click the Information button in the Properties group and click the Costs tab. Enter amounts in the Standard Rate field, the Overtime Rate field, or the Per Use Cost fields. Then choose when you d like to begin accruing the resource cost in the Cost Accrual field.
8 Viewing the Project Applying a Split View: Select one of the options from the Timeline or Details list arrows in the Split View group on the VIEW tab. Applying Groups: Select one of the options from the Group By list arrow in the Data group on the VIEW tab. Applying Filters: Select one of the options from the Filter list arrow in the Data group on the VIEW tab. Sort the Information: Select one of the options from the Sort list arrow in the Data group on the VIEW tab. View the Critical Path: In the Gantt Chart View, select Critical from the options in the Highlight list arrow in the Data group on the VIEW tab.
9 Tracking Progress Always save a baseline plan before beginning to track progress. Update Tasks: Select the task you want to update and select the percentage complete in the Schedule group on the TASK tab. Update Resources: In Resource Usage or Task Usage view, select the resource you wish to update, click the Details button in the Properties group on the RESOURCE tab and update the Work value. Update Costs: Turn off automatic cost updating: click the File tab and select Options. Click the Schedule tab and select the Off option for Calculate Project after each edit at the bottom of the menu.
10 Check Project Variance: In a task or resource view, click the VIEW tab and click the Tables list arrow. Click More Tables and select Variance from the options. Balancing the Project To Identify an Overallocated Resource: In the Resource Usage View, select Overallocated Resources from the options in the Highlight list arrow on the VIEW tab. To Balance Overallocated Resources Automatically: Click the Leveling Options button in the Level group on the RESOURCE Tab. Select Automatic under Leveling Calculations. To Reassign Work: Open Gantt Chart view, select the overallocated resource and click the Assign Resources button in the Assignments group on the RESOURCE tab.