Transcription of Quick Start Guide Cisco 7940/7960 IP Telephone
1 Quick Start Guide Cisco 7940/7960 IP Telephone Contents: Cisco 7960 /7940 IP Phone Feature and Key Basic Installing the IP Phone and Connecting to the Adjusting the Height of the Placing a Answering a End a Soft Parking a Transferring a Forward All Cancel Forward All Transfer Directly into a Voice mail Account (Optional)..7 Place a Call on Placing Conference Conference Call INITIATING a Meet-Me Conference JOINING a Meet-Me Conference Call Redial the Last Number Information Accessing Online Call History LCD Display Setting up Voice Accessing Checking Voicemail from an Outside Making Calls from a Corporate Audio Ringing Adjusting the Ringer Volume (Review).
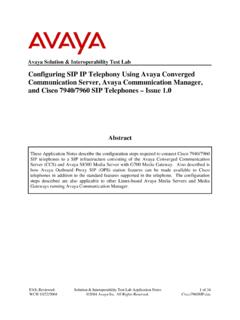
2 12 Adjusting the Handset, Speakerphone or Headset Volume (Review)..12 Muting a Call (Review)..12 2 Quick Start Guide : Cisco 7940/7960 IP Telephone UMR Information Technology UMR Information Technology Quick Start Guide : Cisco 7940/7960 IP Telephone 3 Cisco 7960 /7940 IP Phone Feature and Key Overview Handset with Indicator Light Functions like a traditional handset. The light strip at the top of the handset blinks when the phone rings and will be set to remain lit when you receive a voice mail message. LCD Screen Displays features such as time, date, your phone number, caller ID if available, line/call status and soft key tabs. Cisco IP Phone Model Type Indicates your Cisco IP phone model.
3 Line or Speed Dial Buttons Opens a new line, speed dials the number on the LCD screen, or ends a call. Cisco IP Phone 7960 has six lines or speed dial buttons and the 7940 has two. Soft Key Buttons Four interactive soft keys that provide available call features and functions. Example: Handset on Cradle: Redial NewCall CfwdAll more Hold EndCall Resume more Answer MeetMe Pickup more GpickUp Trnsfer Park more Confrn more (note dark vs. light shading) Example: Lift the Handset without Dialing anything: Redial EndCall CfwdAll more MeetMe PickUp GpickUp more (note EndCall instead of NewCall) Example: During a Call: Hold EndCall Trnsfer more Park Confrn more Footstand Adjustment Allows you to adjust the angle of the phone base.
4 Directories Button Provides access to Call Histories and Directories ? or i Button Displays help on your LCD screen for a phone button or function. Setting Button Provide access to phone settings such as Contrast and Ring Sound, Network Configuration and Status. 4 Quick Start Guide : Cisco 7940/7960 IP Telephone UMR Information Technology Speaker Button Toggles the Speaker On and Off. Mute Button Toggles the Mute On and Off. Press the MUTE button to prevent the party from hearing you although you can still hear them. The Mute button changes to red. To turn off mute, press the MUTE button again. Headset Button Toggles the Headset (if connected) On and Off. Volume Button Increases or decreases the volume for the handset, headset or speakerphone (depending on which is being used).
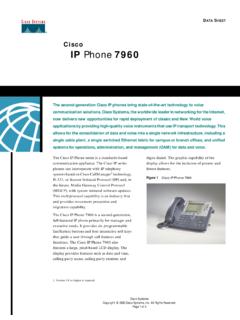
5 Press the 6 button to decrease the volume of the handset, speakerphone, or headset Press the 5 button to increase volume of the handset, speakerphone, or headset To save the volume setting, press the # key Messages Button Provides access to the Voicemail Messaging System. Navigation Button (Toggle UP/DOWN Key) or SCROLL Key Enables you to scroll through text and select features displayed on the LCD Screen Dial Pad Works exactly like the dial pad on a traditional phone. UMR Information Technology Quick Start Guide : Cisco 7940/7960 IP Telephone 5 Basic Features Installing the IP Phone and Connecting to the Network 1. Connect an Ethernet cable to the Network port (middle port) on the phone.
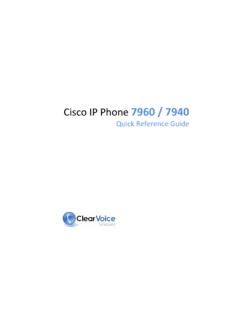
6 2. Connect the handset and headset (if applicable) to their respective ports. 3. Connect the Ethernet cable from your Desktop PC to the Access Port on the IP Phone (optional). 4. Connect the power plug to the DC48V AC Adapter port (optional). Note: Before successfully installing the phone, the system administrator must prepare the network for the phone. Adjusting the Height of the Footstand 1. Push the footstand adjustment knob on the right-hand side of the phone. 2. With the button depressed, adjust the footstand to the desired height. 3. Depress the footstand adjustment knob. Placing a Call There are six options for placing a new call. Lift the Handset and dial the number. Press a Line button and dial the number.
7 Press the Speaker button and dial the number. Press the Headset button and dial the number. Press the NewCall soft key and dial the number. Press a pre-configured Speed Dial button. Internal Extension: Dial the 4-digit extension External Local Call: Dial 3 + the entire 7-digit phone number Long Distance : Dial 3 + 1 the entire 10-digit phone number (area code + number) Notes: After you press the 3 (for an outside line) you will hear a dial tone again to let you know you are accessing an external line. Pick up the handset. If you do not hear a dial tone, press an available line button to begin making the call. Press the SPEAKER button. If you do not hear a dial tone, press an available line button to begin to make the call or press the NewCall soft key.
8 If you do not hear a dial tone, press an available line button to begin to make the call (the call will dial with the speakerphone on). Answering a Call There are four options for answering a call. Lift the Handset. Press the Answer soft key. Press the Speaker button. Press the Headset button. 6 Quick Start Guide : Cisco 7940/7960 IP Telephone UMR Information Technology Notes: If Line 1 is ringing, pick up the handset and you will be automatically connected to the call. If any other line is ringing, lift up the handset (or press the SPEAKER button) and press the Answer soft key, OR press the line button next to the ringing line End a Call There are three options for ending a call.
9 Hang up the Handset. Press the SPEAKER button. Press the EndCall soft key and hang up. UMR Information Technology Quick Start Guide : Cisco 7940/7960 IP Telephone 7 Soft Features Parking a Call Park a call when you want to store the call and then retrieve the call from another IP Phone. Call Park numbers are pre-configured by your system administrator. Follow the below steps to park a call: Step 1) During an active call, press the more soft key until you see the Park tab. Step 2) Press the Park tab soft key. The LCD screen displays a special call park number at which the call is stored. Step 3) Make a note of the call park number and then hang up. The call is parked at that number, allowing you to retrieve it from another phone.
10 Step 4) To retrieve the parked call from another phone, dial the call park number at which the call is parked. Note: You have a limited amount of time to retrieve the parked call before it reverts to ringing at its original destination. Transferring a Call Follow these steps to Transfer a call to another extension. Step 1) While on the call, press the Trnsfer soft key (this places the caller on hold). Step 2) Dial the office extension to which you want to transfer the call. Step 3) When it rings on the transferred to extension, press Trnsfer soft key again, or when the party answers the call, announce the call and press the Trnsfer soft key again. Step 4) Hang up the phone or end the call.