Transcription of QUICK TUTORIAL TO START USING WSPR - Amateur Radio
1 wspr TUTORIAL ZS6 SGM Page 1 of 8 QUICK TUTORIAL TO START USING wspr Written by Stewart Moss ZS6 SGM Version wspr TUTORIAL ZS6 SGM Page 2 of 8 Introduction If you are interested in the mysteries of propagation then wspr is the tool at your disposal. To experience this fascinating tool, all you need is an SSB transceiver, simple antenna, a sound card interface to connect the transceiver to your computer and internet access. wspr is short for Weak Signal Propagation Reporter and is pronounced Whisper . It is important to note right away that wspr is not a QSO mode. It is used to broadcast a position, call sign and power level and see who hears and decodes it. The receiving station can work out how far the signal travelled and how strong it is on the receiving end. The mode that wspr uses is called MEPT-JT.
2 MEPT means Manned Experimental Propagation Transmitter. The JT part is Joe Taylor's initials. Joe Taylor K1JT also developed the mode WSJT which is used for moon-bounce communication. In 1993 Joe Taylor shared a Nobel Prize in Physics with Russell Hulse, for some work they did in their field of Astrophysics. He obtained his license as an Amateur Radio operator as a teenager and as a result became interested in Radio -astronomy. This TUTORIAL covers the reception and decoding of wspr only. TX will be covered in later TUTORIAL . wspr TUTORIAL ZS6 SGM Page 3 of 8 Decide what you want to do This is important. Do you want to TX only, RX only or TX and RX? One of the joys of wspr is being able to receive, decode and report wspr signals on Amateur frequencies you might not be able to transmit on.
3 wspr can decode really faint signals; the author of wspr (K1JT) developed the protocols used in Moon Bounce , so who know what you hear. The ZS6 KTS beacon has been decoded on 5 MHz USING 20W with an inverted V antenna at more than 13000kms. Requirements The following is needed for the wspr software to work correctly. 1. Time: Accurate and synchronized time. (Normally by GPS or Internet but it is possible to get right by hand). In the next section there is a recommendation for software to use. The transmitting and receiving station need to be no more than 2 seconds apart. wspr starts transmitting on exactly the START of a randomly chosen even minute and will transmit for basically 2 minutes. The transmission ends at the START of the next even minute. The website will allow you to check your computer time USING a web browser.
4 2. Computer: A computer with a speaker and a microphone at the very least. Computer should have an internet connection running some time synchronization software. The receiving computer should be a reasonable spec and not an old clunker more than 5 years old. The TX computer can be an old clunker or even a cheap microprocessor with a GPS clock. Most of the computing power is in decoding the signal. 3. Radio Station and antenna: If you are RX only you can get really good results USING a wide band active loop antenna hanging in a tree with a cheap Software Defined Radio dongle or usb box. ZS6 KTS beacon is decoded in a number of locations in Europe on this configuration. For local RX a long wire lying on the floor does fine. TX requires the full setup including a Radio interface board to supply audio to the computer and trigger PTT.
5 4. Location: You need your current location as a grid locator. ZS6 KTS beacon is KG43cw. wspr transmits only 4 digits of the locator but does report 6 digits via the internet. 5. Callsign: As a convention, if the station is a listening station not an Amateur Radio station, they should still use an appropriate and identifiable call sign. Callsign out of your license region should have a suffix in the following format ZS6 KTS/ZS1 for ZS6 KTS operating at ZS1. What does it sounds like It sounds like a continuous tone for 2 minutes. The tone starts on exactly the even minute and will continue for 1 min 54 sec. Bandwidth The wspr signals are 6 Hz wide. The software will decode 100 Hz either side of the TX Frequency (see settings below), which gives a total receive bandwidth of only 200 Hz.
6 However this is plenty of space to play around in, even during narrow band QRM. wspr TUTORIAL ZS6 SGM Page 4 of 8 Let's get started! Firstly you need to download the wspr software. At the time of writing the latest version was wspr , but it was not easy to find. You download the wspr software from Please run version or higher ( on Linux). You need to be able to synchronize your time with the internet. A really good program to use is Meinberg. It is a collection of open source programs which automatically keeps your computer time in sync. Install the Meinberg software and select the Africa region when prompted. The recommended location to download Meinberg is as follows, but a Google search will also turn up the correct location. The name of the correct download at the time of writing this TUTORIAL is: ( MB) Connect to the internet and you are ready to go!
7 Let's Find Someone to Decode! Open the wspr website .. The Activity tab on the website will show all the reporting TX and RX stations. It will be grouped by band. The ZS6 KTS beacon runs on 60m, exact frequency of MHz. It is 40Hz up to move away from local and DX QRM. Most frequencies are commonly used by multiple stations and it is good practice, if given the choice, to use the same frequency as everyone else. wspr will randomly transmit so you won t always be transmitting on top of each other. If you are registered (which is not compulsory) then you can use the Chat functionality on the website. This will allow you to get help or to co-ordinate easily especially when signals are weak. You can keep track of your spots (both TX and RX) USING the Database functionality on the website.
8 There is also a useful Map on the website. Choose a frequency where there are stations you want to decode (you can ignore the 10Hz and 1Hz values; this is within the 100 Hz each side receiving limitation). Plug in your interface board if you are USING one, or get the computer's microphone as close as possible to the Radio speaker. wspr likes to use low power and low gains. Rather turn everything way down (to 1%) and you can turn it up as you test. wspr TUTORIAL ZS6 SGM Page 5 of 8 The Radio should be on USB. USB dial frequency is KHz lower than the actual transmitted frequency. So you need to take the frequency you want to decode and subtract KHz. For example ZS6 KTS is transmitting on MHz and the USB dial frequency is MHz ( KHz down). Tune your Radio to the calculated dial frequency.
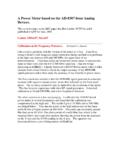
9 PLEASE NOTE: Turn off AGC and ALC on the Radio . You can use a noise blanker. Running the wspr software You can now open the wspr software. Enable the Idle check box immediately to prevent TXing. We need to configure everything correctly. Below is an example of how the ZS6 KTS beacon was configured at one stage. Choose Setup from the menu and choose Station Parameters Enter your Callsign and Grid location. If you are USING an interface board, choose the PTT port, and the PTT method. (RTS or DTR is normally standard). The Audio IN port and Audio Out port should be chosen automatically but if it is not then chose any setting that makes sense. This is where your sound card supplies the audio, either via microphone or Audio In port. The output audio can come from headphone or speaker port.
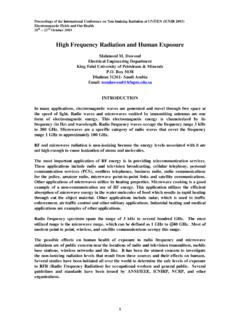
10 wspr TUTORIAL ZS6 SGM Page 6 of 8 This is a screen shot of the software after it has been running a while. When the software is first started the waterfall is black. The waterfall is only updated every two minutes The Waterfall runs from right to left. The fuzzy dots are the signals. Each segment on the waterfall represents a full two minutes. The time of the START of each segment is at the bottom of the display. Each segment is either divided by a black line or a yellow line. The black line represents the end of a two minute window; the yellow line represents the end of a two minute window and a two minute transmission (if TX is enabled). Time is displayed in UTC. The ZS6 KTS beacon runs on 60m, exact frequency of MHz. It is 40Hz up to move away from local and DX QRM.