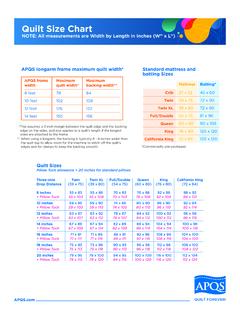
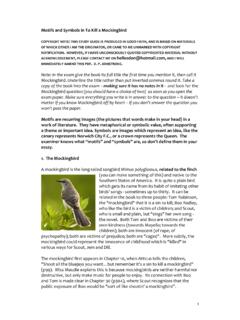
Transcription of Quilting theQuilt - APQS
1 2 Fons & Porter s Quilting the quilt of ContentsFreehand Quilting Designs 5 Flower Power 6 Quilting in Circles 8 Basic Feathering 11 When you ve finished piecing your quilt , it s time to decide how you will quilt it. This is a dilemma for many quilters, so we ve put together some design ideas to help you with your , decide if your quilt needs a simple allover de-sign or would look better with motifs in the blocks. The freehand designs we ve included are perfect for filling open areas or as allover Quilting . If you pre-fer something more detailed, try some of the floral, circle, or feather designs on pages 6 15. Use a copy machine with an enlargement feature to resize them to the perfect size for your designs included here are just a few of the end-less possibilities for Quilting your quilt .
2 We hope they will help you take your Quilting to the next & Porter s Quilting the quilt 3 Skill level: IntermediateSkill level: EasySkill level: EasySkill level: AdvancedSkill level: EasySkill level: AdvancedFreehand Quilting DesignsFreehand Quilting designs are great because you don t need to use templates or follow marked patterns. Here are some freehand designs for various levels of expertise. Begin stitching at the dot and continue in the direction of the Fons & Porter s Quilting the quilt PowerFreehand flowers are just right for some quilts. Photo A shows an allover flower design. In Photo B, a single flower is stitched in the center of a block and lines of echo Quilting fill the area around it.
3 If you prefer a large flower motif, use one of the block designs at level: IntermediateSkill level: AdvancedABFlower Block Designs 2010 Fons & Porter s Love of Quilting . Permission granted to copy for personal & Porter s Quilting the quilt 5 2010 Fons & Porter s Love of Quilting . Permission granted to copy for personal Border Design6 Fons & Porter s Quilting the quilt in CirclesDon t forget about circles when selecting Quilting designs for your quilt ! Combine them to fill a block; or, view the entire quilt as a single design space and fill it with circles. Use circles or circular Quilting designs in your machine Quilting .
4 The design possibilities are endless. When work-ing with circles, you need to understand two basic terms diameter and radius (Circle Diagrams). The diameter is the distance across a radius is the distance from the center of a circle to its outer edge, and is exactly half the length of the diameter. Using these measurements, you can easily create a variety of circular Quilting DiagramsBlock Designs The diagrams at right show several ideas for using circles or partial circles to fill a block. The simplest design is a series of concentric circles in graduated sizes (Diagram A). Make the diameter of the largest one 1" 2" smaller than the block size.
5 The next smaller circle will have a diameter 1" 2" smaller than the previous one. Continue making smaller circles until you reach the center of the block. You can adapt the concentric circle pattern by varying the dis-tance between the circles in the design (Diagram B).If the fabric in your block has a fussy-cut central motif (such as a large flower), use partial circles to frame the printed motif (Diagram C). Stitch concentric quarter circles from each corner of the block, leaving an open area in the middle. For this design, the radius of the largest circle would be slightly smaller than half the finished block two circles about " apart to form the vein of a feather design (Diagram D).
6 The diameter of the larger circle should be about two thirds the size of the finished block. Then, mark and stitch or freehand stitch feathers on each side of center vein (Diagram E).Add feathers freehandor mark and stitch afte rcircles are IdeasAdd feathers freehandor mark and stitch afte rcircles are IdeasAdd feathers freehandor mark and stitch afte rcircles are IdeasAdd feathers freehandor mark and stitch afte rcircles are IdeasAdd feathers freehandor mark and stitch afte rcircles are IdeasBDEACFons & Porter s Quilting the quilt 7As you become more proficient at stitching circles, try one of the medallion designs shown here.
7 Although they are a bit tedious to stitch, the results will be stunning. Allover Circle Designs Sometimes, the perfect Quilting solution is to think outside the block. Treat all (or most) of the quilt top as one design area by using an allover design. Allover circle designs work well with busy patchwork quilts that need to be calmed down. The Overlapping Circles Diagram shows a way to use circles as an allover Quilting pattern. The rows of circles overlap to form a secondary pattern. Note that circles are spaced so the stitched lines don t meet where they intersect. This is to allow a little room for error, as a slight variation won t be Circle Medallion 1.
8 Lightly mark horizontal, vertical, and diagonal registra-tion lines on your block as shown in Eight Circle Medal-lion Diagram Measure the distance from the center where these lines intersect to the top edge of the block. For this design, use a circle with a diameter about " smaller than this measurement. Mark the circle, centering it on the block (Diagram B).3. Mark dots at the points labeled 1 through 8 in Diagram B. These will be the centers of the eight circles in the design. 4. Stitch the circles to complete the medallion (Diagram C). Erase registration Circle Medallion 1. Lightly mark a vertical registration line on your block as shown in Six Circle Medallion Diagram A.
9 Mark the center of block. 2. Measure the distance from the center to the top edge of the block. For this design, use a circle with a diam-eter about " smaller than this measurement. Mark the circle, centering it on the block (Diagram B). Medallions12345678**Find the center of your the centers of the the the last 4 the center of your the first 2 the centers of remaining Jean Nolte 20058 Circles6 CirclesMedallions12345678**Find the center of your the centers of the the the last 4 the center of your the first 2 the centers of remaining Jean Nolte 20058 Circles6 CirclesMedallions12345678**Find the center of your the centers of the the the last 4 the center of your the first 2 the centers of remaining Jean Nolte 20058 Circles6 CirclesMedallions12345678**Find the center of your the centers of the the the last 4 the center of
10 Your the first 2 the centers of remaining Jean Nolte 20058 Circles6 CirclesMedallions12345678**Find the center of your the centers of the the the last 4 the center of your the first 2 the centers of remaining Jean Nolte 20058 Circles6 CirclesMedallions12345678**Find the center of your the centers of the the the last 4 the center of your the first 2 the centers of remaining Jean Nolte 20058 Circles6 CirclesAdd feathers freehandor mark and stitch afte rcircles are IdeasAdd feathers freehandor mark and stitch afte rcircles are IdeasAABBCC3. Mark dots at the points labeled 1 and 2 in Diagram B. Stitch the first two circles of the design, using the dots as the centers of the circles.