Transcription of Radio Controlled Weather Station Operating …
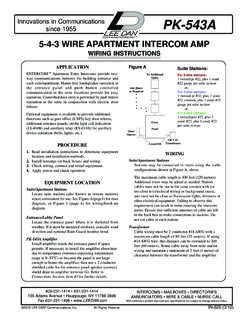
1 Radio Controlled Weather StationOperating instructionsAAir pressure indicator, Weather forecast,Battery level warning indicatorBAir pressure chart for the last 12 hoursCNumerical air pressure indicatorHour display when using the history functionDDate and weekdayETime and signal strength indicator,snooze icon, alarm icon,summer-time indicatorFTime of sunrise and sunset, tide indicator, location indicator,moon phase indicatorGCurrent outside sensor indicator (1, 2 or 3)outside temperature, displays temperature trend,outside humidity, displays humidity trendHInside temperature, displays temperature trend,inside humidity, displays humidity trendSet-upOpen the battery compartment at the back of the Weather Station . Place the batteries in the correct polarity and close the battery compartment the protective film for the Weather Station 's the Station and the sensor directly next to one another. Put the batteries within the next 2 minutes in the Weather Station now starts to receive the time signal and the Radio tower flashes in the display next to the time.
2 Whilst receiving none of the Weather Station 's other functions can be used. If signal reception is successful the Weather Station 's time and date are set there is no reception after 5 minutes, place the Weather Station in another location and quickly press RCC. Your Weather Station will start trying to receive reception is not possible at all at your location, please set the time the Weather Station tries to receive the time signal, it simultaneously searches for the signal for the outside sensor and the red light at the front of the sensor the transmission signal is received successfully the current outside temperature appears on the display of the Weather Station . Signal reception and exact synchronisation with the sensor can take up to 2 the batteries if the battery icon appears on the Hygrometer Your Weather Station measures the humidity in the range of 25-95% relative Hygrometer Your Weather Station measures the humidity in the range of 25-95% relative humidity from the outside set timePress and hold CLOCK.
3 On the display the indicator flashes for the 12/24 hour set press UP and DOWN and press CLOCK to confirm your the display the indicator flashes for the language for the set press UP and DOWN and press CLOCK to confirm your display icons correspond to the following languages: EN=English, GE=German, FR=French, IT=Italian, SP= indicator on the display flashes for time zone zone adjustment allows the Weather Station to be used in a time zone other than Central European Time (CET). Set the difference of your current time zone to CET using the time zone adjustment with UP and DOWN. An adjustment of -2 to +2 hours is the settings in the same way for hour, minute, second, year, month and the wake-up alarmPress and hold ALARM. On the display the hour indicator and AL appear set press UP and DOWN and to confirm your settings press the minutes in the same briefly pressing ALARM you can switch between the alarm time set and the normal time the wake-up alarm and the snooze functionPress ALM/SET to activate/deactivate the wake-up alarm and the snooze function.
4 The display shows * for activated wake-up function and # for activated snooze the set alarm time is reached the wake-up signal sounds for a period of 1 the snooze function is also activated the alarm signal can be interrupted by pressing LIGHT/SNZ. The alarm signal sounds again after 5 pressing ALM/SET the snooze function and the wake-up signal can be phase indicatorThe Weather Station has a moon phase indicator which automatically displays the current moon forecastThe Weather icons show the Weather movements (sunny, slightly cloudy, cloudy, rain, stormy) for the next 8 hours and not the current Weather forecast is calculated by evaluating the fluctuations in air pressure and can deviate from actual Weather Barometer chart shows the air pressure for the last 12 hours. Press PRESSURE to display the air pressure in mb/hPa or in pressing HISTORY you can display the air pressure values for the last 12 hours. Each time you press HISTORY the display moves back one hour. After Hour 12 the current air pressure appears again (Hour 0).
5 Initialising the barometer and the Weather forecastYou can set the Weather Station to your location and altitude above sea level. This provides a more accurate indication of the air pressure and can improve the Weather forecast. Press and hold PRESSURE until the air pressure unit indicator flashes. Press +/ C/ F to select the desired air pressure unit. Press PRESSURE to confirm your the display the air pressure indicator flashes. If necessary set the air pressure by pressing +/ C/ F and . Press PRESSURE to confirm your the display the Weather forecast indicator flashes. Set the Weather by pressing +/ C/ F and so that it corresponds with the current Weather for your PRESSURE to confirm your and minimum maximum and minimum values for temperature, hygrometer and air pressure are automatically MEMORY continually to display the maximum and minimum and hold MEMORY to delete the maximum and minimum of your location (selection of city)Press CITY, the city display flashes and longitude and latitude are displayed.
6 Press UP and DOWN to select your location. Press CITY to confirm your selection. If the abbreviation for your city does not appear, you can manually enter a user-defined location (Manually set your location).After a short calculation time the Weather Station displays the times for sunrise and sunset and the moon phase as well as low tide (TIDE LO), mean water level (TIDE MID) or high tide (TIDE HI).Manually set your locationPress and hold CITY. The cities display shows "-- -- --". Press UP and DOWN to select the first letters of your location. Press CITY to confirm your selection. Set letters 2 and 3 of your location in the same the display GMT appears and the time zone indicator flashes. Set the difference of your time zone to GMT (Greenwich Mean Time) by pressing UP and DOWN (For Germany set 1:00).Press CITY to confirm your selection. Now set the longitude and latitude of your location in the same table with the longitudes and latitudes for some cities can be found at the end of these Operating a short calculation time the Weather Station displays the times for sunrise and sunset and the moon phase as well as low tide (TIDE LO), mean water level (TIDE MID) or high tide (TIDE HI).
7 Additional information for the outside sensorPlease position your sensor in a covered location and make sure that the sensor does not get wet and is not exposed to direct sunlight. To guarantee optimal Radio transmission, position the Station and sensor so that as few obstacles as possible (walls, metallic components) interfere with of electrical interference can also be detrimental to reception. SUN RISE SUN SET (AAA) (AAA) (AAA)DisposalThis electrical appliance may not be disposed of with normal household waste. Please hand it in at an appropriate local collection dispose of your batteries properly in containers especially set up at retailers. Batteries do not belong in household provide a 5-year warranty for this item. The warranty period starts from the date of sale (receipt, proof of purchase). Within this period we rectify all faults which are attributable to material and manufacturing defects at no cost. For damage which is attributable to improper treatment, dropping, knocking, or water damage, there is no warranty Service Hotline: 00800 5515 , Valterweg 27A, D-65817 EppsteinIf used as intended this product conforms to the basic standards of 3 and the other relevant provisions of the FTEG (Section 3 of the R&TTE directive).
8 You can request the declaration of conformity here: serviceYou can add up to 3 outside sensors to your temperature Station . One sensor is included in the outside sensors can be ordered by fax +49(0)6198-5770-99 or online at price for one sensor is EUR and for 2 sensors EUR including Operating instructions and packaging, excluding VAT and despatch.