Transcription of REAPER and AlphaTrack - Frontier Design
1 REAPER by Cockos and AlphaTrack Page 1 of 4 REAPER by Cockos and AlphaTrack This document assumes you have already installed the AlphaTrack Windows driver and have the AlphaTrack remote ready for operation. (If not, see the AlphaTrack Users Guide, or Quick Start Guide for installation details.) It is based on using AlphaTrack drivers with REAPER or later. REAPER Set-up Make sure the AlphaTrack is connected and the control mode is set to AlphaTrack Native before starting REAPER . This will configure the AlphaTrack to send and receive the correct set of MIDI messages for use with REAPER . For more information on Control Modes see the AlphaTrack Users Start REAPER and open the Options\Preferences window. Click on the Control Surfaces tab and select Add to access the Control Surface Settings panel.
2 Set the mode to AlphaTrack as well as the MIDI Input and output settings. The default values for Offset (tracks) and Size (tracks) are ok as well. Click OK to close the Preferences panel. REAPER by Cockos and AlphaTrack Page 2 of 4 Overview The AlphaTrack features a high-resolution, 100mm, touch-sensitive, motorized fader, 3 touch-sensitive encoders, 5 modes select buttons, 8 general function buttons, channel dependent backlit Rec, Solo, and Mute buttons, 5-button transport controls, SHIFT key, a touch-sensitive strip, and a 32-character LCD display. There are also 17 LED indicators. Silk-screened labels clearly indicate the basic function of many of the buttons, however detailed instructions for all functions follow. On the back, next to the USB jack, is a jack for a standard momentary foot-switch.
3 Pressing play will cause the project to begin playback just as if you had clicked the play button on the screen. Likewise most of the basic controls function just like their on-screen equivalents. While the AlphaTrack employs many advanced features, it is designed for ease of use right out of the box. SHIFT and STICKY SHIFT The SHIFT key allows other buttons to perform more then one function, expanding the range of control that AlphaTrack has over Audition. Press and hold SHIFT, then press another function button to access its expanded feature. Note that SHIFT has a sticky feature to simplify one-handed operation. Pressing SHIFT alone will lock it in the enabled position. The SHIFT LED will blink steadily. Now multiple shifted functions can be preformed without holding the SHIFT key. Press SHIFT again to exit sticky mode.
4 Encoders and Mode buttons In many applications the encoders can be switched between up to 5 different function modes including Pan, Send, EQ, Plug-In, and Automation control. However, all of these modes are not currently exposed to external control in REAPER . Encoder 1 will control track PAN. If FLIP is pressed then PAN is moved to the fader and track volume is controlled by encoder 1. Whenever either the fader or encoder is touched the AlphaTrack s LCD display will automatically replace the timeline location with the current volume or pan value. Encoders 2 and 3 are used to control any available FX Insert parameters for the currently selected track. Encoder 2 will select each individual parameter in the order that they appear. Encoder 3 adjusts the value of the selected parameter. If more than 1 FX Insert exists on the selected track then Press+Turn Encoder 2 as a shortcut to quickly jump to the first parameter of each plug-in.
5 Press+Turn Encoder 3 for finer value adjustment. Note - In some cases, such as the ReaEQ, parameter names may be too long to display fully. In this case you may have multiple clicks of Encoder 2 where the parameter does not appear to change, when in fact it is selecting between frequency, gain, and Q of a given EQ band. If in doubt, open the selected FZ Insert window and turn Encoder 3 to see which is selected. The Scroll Strip At the very bottom of AlphaTrack is located an innovative feature called the scroll strip. This behaves similar to a ribbon controller and is another touch-sensitive surface that can be used in several ways: 1. Move one fingertip along the strip in either direction to zoom the display horizontally. 2. Move 2 fingers along the strip to scroll through the project timeline in the either direction.
6 REAPER by Cockos and AlphaTrack Page 3 of 4 Track Control Pressing the Track and Track buttons will let you move from one track to the next, including the Master bus. The LCD display will show the currently selected track name and track number. Likewise, LED s for record arm, mute, and solo status will update to reflect the state of the selected track. Use the REC, MUTE, and SOLO to change or edit the settings for the current track. The Loop Button Pressing the LOOP button enables and disables REAPER s Loop mode. The Loop LED will light to indicate that loop mode is active. Follow normal REAPER procedures to define a loop region, or use Shift+In/Out on AlphaTrack . If the LOOP LED is lit, and the timeline is located before the end of the selected loop region, then pressing PLAY will cause that region to play repeatedly.
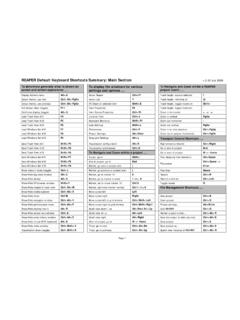
7 Fast-Forward and Rewind 1. Pressing either button once will result move the timeline 1 beat in the selected direction. 2. Holding either button down will emulate the left and right arrow keys causing the timeline to shuttle left or right in 1 beat resolution. 3. Holding Shift while pressing either REW or FFWD will immediately move the timeline to the beginning or end of the project. Below is a chart that summarizes the normal and shifted functions of each function button. You will also find REAPER on the CD-ROM, or website which serves as a quick visual guide for the AlphaTrack functions. You may want to print this document for quick reference. AlphaTrack Button Functions Button Name Normal Function SHIFT + Function REW Rewind Go to Beginning FFWD Fast forward Go to End STOP Stop ( AlphaTrack local settings)
8 PLAY Play/Pause Not used RECORD Record Not used TRACK Previous sequencer track Set Loop In TRACK Next sequencer track Set Loop Out LOOP Toggle Loop on/off Not used FLIP Flip Not used F1 User Programmable User Programmable F2 User Programmable User Programmable F3 User Programmable User Programmable F4 User Programmable User Programmable MUTE Toggle track s mute on/off Clear all mutes SOLO Toggle track s solo on/off Clear all solos REC Arm Track on/off All Safe Footswitch Not used Not used REAPER by Cockos and AlphaTrack Page 4 of 4 The Footswitch Input The footswitch jack located on the back of the AlphaTrack is not currently functional in REAPER . User Programmable F-Keys AlphaTrack has 8 user-programmable function buttons labeled F1-F4, and with the Shift included key, F5 F8.
9 Each of these can be easily programmed to any of the available functions using REAPER s Keyboard Shortcuts panel. Use the following steps to edit an existing shortcut, to add a new one. 1. Go to REAPER Preferences and open the Keyboard/Control panel. 2. Click on New at the bottom to create a new shortcut, or select an existing shortcut on the right and click Edit to change it. (you can have more than one shortcut for the same function) 3. On the New, or Edit, Keyboard Shortcut panel select or highlight the desired function in the Actions line. 4. Click in the Shortcut box at the top and press the AlphaTrack button/s (F1-F4, or Shift+F1-F4) that you want to control that function. 5. Click OK to accept and close the window, or repeat steps 2-4 for as many buttons as you want to program.
10