Transcription of Rear Differential Fluid - American Honda Motor Company
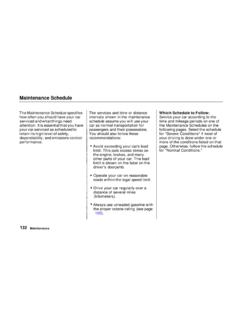
1 rear Differential FluidCheck the Fluid level with the reardifferential at normal operatingtemperature and the vehicle sittingon level ground. Remove thedifferential Fluid filler bolt andwasher and carefully feel inside thebolt hole with your finger. The fluidlevel should be up to the edge of thebolt hole. If it is not, slowly addGenuine Honda CVT Fluid until itstarts to run out of the hole. Reinstallthe filler bolt and tighten it CVT Fluid is not available, youmay use Honda Premium FormulaAutomatic Transmission Fluid (ATF) or a quality DEXRON IIIATF as a temporary , continued use can causenoise, vibration and performanceproblems. Have the differentialdrained and refilled with Honda CVTF luid as soon as it is rear Differential should bedrained and refilled with new fluidaccording to the time and distancerecommendations in themaintenance BOLTC orrectlevelBrake FluidCheck the Fluid level in the brakefluid reservoir brake Fluid in the brake systemshould be replaced according to thetime and distance recommendationsin the maintenance use Genuine Honda DOT 3brake Fluid .
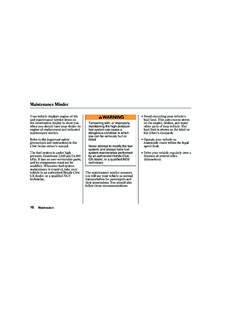
2 If it is not available, youshould use only DOT 3 or DOT 4fluid, from a sealed container, as atemporary replacement. However,the use of any non- Honda brake fluidcan cause corrosion and decreasethe life of the system. Have thebrake system flushed and refilledwith Honda DOT 3 brake Fluid assoon as Fluid marked DOT 5 is notcompatible with your car's brakingsystem and can cause SystemThe Fluid level should be betweenthe MIN and MAX marks on the sideof the reservoir. If the level is at orbelow the MIN mark, your brakesystem needs attention. Have thebrake system inspected for leaks orworn brake Steering, Air Cleaner ElementPower SteeringCheck the level when the engine iscold. Look at the side of thereservoir. The Fluid should bebetween the UPPER LEVEL andLOWER LEVEL. If it is below theLOWER LEVEL, add power steeringfluid to the UPPER use Genuine Honda PowerSteering Fluid .
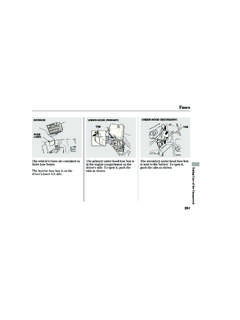
3 If it is not available,you may use another power steeringfluid as an emergency , continued use can causeincreased wear and poor steering incold weather. Have the powersteering system flushed and refilledwith Honda PSF as soon as low power steering Fluid level canindicate a leak in the system. Checkthe Fluid level frequently and havethe system inspected as soon the steering wheel to full leftor right lock and holding it there candamage the power steering Cleaner ElementThe air cleaner element should bereplaced according to the time anddistance recommendations in themaintenance LEVELLOWER LEVELNOTICEAir Cleaner ElementReplacementThe air cleaner element is inside theair cleaner housing on the right sideof the engine replace it:1. Unsnap the two clips and removethe air cleaner housing Remove the old air the inside of the air cleanerhousing with a damp Place the new air cleaner elementin the air cleaner Align the tabs and reinstall the aircleaner housing cover, snap thetwo clips back into CLEANERELEMENTS park PlugsThe spark plugs in your car need tobe replaced every 2 years or 30,000miles (48,000 km), whichever Clean up any dirt and oil aroundthe spark plug Remove the spark plug cap bypulling it straight Remove the spark plug witha five-eighths inch (16 mm) sparkplug Put the new spark plug into thesocket; then screw it into the it in by hand so you do notcrossthread PLUG CAPS park Plugs5.
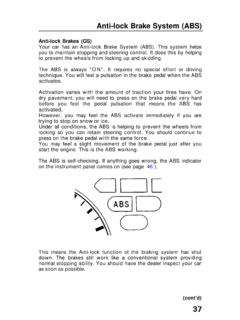
4 Torque the spark plug. (If you donot have a torque wrench, tightenthe spark plug two-thirds of a turnafter it contacts the cylinder head.)Tightening torque:13 (18 , )Tighten the spark plugs carefully. Aspark plug that is too loose canoverheat and damage the can cause damage tothe threads in the cylinder Install the spark plug Repeat this procedure for theother three spark :NGK:DENSO:ZFR5F-11KJ16CR-L11 Spark Plug in ( mm )MaintenanceNOTICEB atteryCheck the condition of your car'sbattery monthly. You should checkthe color of the test indicator window,and for corrosion on the the battery condition bylooking at the test indicator windowon the label on the battery explains thetest indicator's the battery terminals forcorrosion (a white or yellowishpowder). To remove it, cover theterminals with a solution of bakingsoda and water.
5 It will bubble up andturn brown. When this stops, wash itoff with plain water. Dry off thebattery with a cloth or paper the terminals with grease tohelp prevent future INDICATOR WINDOWB atteryIf the terminals are severely cor-roded, clean them with baking sodaand water. Then use a wrench toloosen and remove the cables fromthe terminals. Always disconnect thenegative ( ) cable first and recon-nect it last. Clean the battery termi-nals with a terminal cleaning tool orwire brush. Reconnect and tightenthe cables, then coat the terminalswith you need to connect the battery toa charger, disconnect both cables toprevent damage to the car's electri-cal the battery with the cablesconnected can seriously damage yourcar's electronic controls. Detach thebattery cables before connecting thebattery to a battery gives off explosivehydrogen gas during spark or flame can cause thebattery to explode with enoughforce to kill or seriously hurt protective clothing and aface shield, or have a skilledmechanic do the WipersCheck the condition of the wind-shield wiper blades at least every sixmonths.
6 Look for signs of crackingin the rubber, or areas that aregetting hard. Replace the blades ifyou find these signs, or they leavestreaks and unwiped areas replace the blade:1. Raise the wiper arm off Disconnect the blade assemblyfrom the wiper arm by pushing inthe lock tab. Hold it in while youpush the blade assembly towardthe base of the ARMSLOCK TABW indshield Wipers3. Remove the blade from its holderby grasping the tabbed end of theblade. Pull firmly until the tabscome out of the Examine the new wiper blades. Ifthey have no plastic or metal rein-forcement along the back edge,remove the metal reinforcementstrips from the old wiper blade andinstall them in the slots along theedge of the new Slide the new wiper blade into theholder until the tabs Slide the wiper blade assemblyonto the wiper arm. Make sure itlocks in Lower the wiper arm down againstthe Conditioning SystemYour car's air conditioning is a sealedsystem.
7 Any major maintenance,such as recharging, should be doneby a qualified technician. You can doa couple of things to make sure theair conditioning works check the engine'sradiator and air conditioningcondenser for leaves, insects, anddirt stuck to the front surface. Theseblock the air flow and reduce coolingefficiency. Use a light spray from ahose or a soft brush to remove condenser and radiator fins bendeasily. Only use a low-pressure sprayor soft-bristle brush to clean CONDITIONING CONDENSERRun the air conditioning at least oncea week during the cold weathermonths. Run it for at least tenminutes while you are driving at asteady speed with the engine atnormal operating temperature. Thiscirculates the lubricating oil con-tained in the the air conditioning does not get ascold as before, have your dealercheck the system. Recharge thesystem with Refrigerant HFC-134a(R-134a).
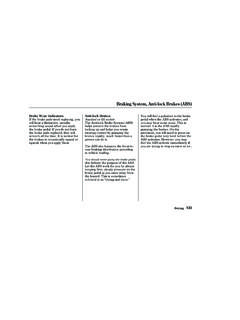
8 (See Specifications on page217.)Whenever you have the air conditioningsystem serviced, make sure the servicefacility uses a refrigerant recyclingsystem. This system captures therefrigerant for reuse. Releasingrefrigerant into the atmosphere candamage the Conditioning Filter, Drive BeltsAir Conditioning FilterThe air conditioning filter removespollen and dust from the outside airthe heating and cooling systembrings into the filter should be replaced every30,000 miles (48,000 km) undernormal conditions. It should bereplaced every 15,000 miles (24,000km) if you drive primarily in urbanareas that have high concentrationsof soot in the air from industry anddiesel-powered vehicles. Replace itmore often if air flow from theclimate control system becomes lessthan usual. Have the air conditioningfilter replaced by your Honda BeltsCheck the condition of the threedrive belts.
9 Examine the edges ofeach belt for cracks or the tension of each belt bypushing on it with your thumbmidway between the belts should have the following"play" or in ( mm)Compressor in ( mm)Power steering in ( mm)If you see signs of wear or looseness,have your dealer adjust or replacethe BELTPOWER STEERING BELTCOMPRESSORBELT