Transcription of REMstar Auto A-Flex PROVIDER GUIDE
1 - 1 -IMPORTANT! Remove this GUIDE before giving the device to the patient. Only medical professionals should adjust pressure GUIDE provides you with instructions on how to access and navigate the PROVIDER screens used to modify device settings. Refer to the User Manual for more information. Note: The screens shown throughout this GUIDE are examples only. Actual screens may vary the PROVIDER Mode ScreensAccessing PROVIDER mode unlocks settings that cannot be modified by the user. To access PROVIDER mode:1. Supply power to the device. First, plug the socket end of the AC power cord into the power supply. Then plug the pronged end of the AC power cord into an electrical outlet that is not controlled by a wall switch.
2 Finally, plug the power supply cord s connector into the power inlet on the back of the Once the device is powered, the Home screen appears, shown below. Turn the control wheel to toggle between the four options and highlight Setup . TherapyInf oFlexSetup Home Screen Note: flex shown above will display as the current flex Once Setup is highlighted, press and hold both the control wheel and the Ramp button on the device for at least 5 You will hear a quick double beep and the PROVIDER mode screen will appear, shown below. You are now in PROVIDER mode. EXITInf oReminderSetup PROVIDER ScreenREMstar auto A-FlexPROVIDER GUIDE - 2 -Navigating the PROVIDER Mode ScreensTo navigate these display screens:Turn the control wheel to toggle between options and settings on the screen.
3 Press the control wheel to choose an option or setting that is highlighted. If you choose Back on any screen, it will take you back to the previous screen. Note: Choosing EXIT from the PROVIDER screen will exit PROVIDER mode and the device will return to the Home screen in the patient mode. Note: PROVIDER mode will time out after 1 minute of inactivity and automatically exit the PROVIDER mode and return to the Home screen in the patient Mode Screen DescriptionsThe following sections will describe the options available under the 3 choices from the PROVIDER screen (Reminder, Setup, and Info).Reminder ScreenFrom the PROVIDER screen, highlight Reminder and press the control wheel.
4 The following Reminder screen will appear. BackReminder off 30 90 180 270 365 Reminder Reminder Screen Reminder - You can set a reminder on this screen that will let patients know when it is time to perform a certain task, such as replacing the mask. You can select one of the following settings: Off (no reminder is set), or you can set the device to display a reminder after 90, 180, 270, or 365 days. Note: You can set a specific patient reminder message using the EncorePro software, and put this message on the SD card or send it to the patient s device via a modem. Setup ScreenFrom the PROVIDER screen, highlight Setup and press the control wheel. The following Setup screen will appear.
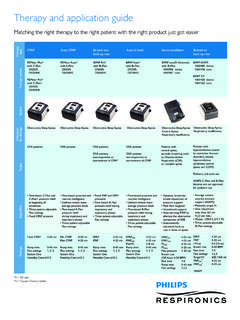
5 BackMode auto CPAPAu to max ( auto min) - to min - ( auto max)CPAP pres - ex type C- flex (C- flex +)or( A-Flex ) NoneFl ex 1 2 3 Ramp time 0:00 - 0:45 Ramp start - ( auto min)or(CPAP pres)Tubing type lock on offTubing type 15 22 15 HSYSTEM ONE resistance 0 X1 X2 X3 X4 X5Lo ck SYSTEM ONE on offHeated Tu be humidification on offSYSTEM ONE humidification on offHumidifier 0 1 2 3 4 5 Humidity level 1 2 3Tu be temperature 0 1 2 3 4 5Au to on on offAu to off on offMask alert on offMask fit check on offHumidifier LED Backlight on offShow AHI/leak/PB on offSplit night on offSplit night startSilent mode on offLanguage EN ESBackSetu p Setup Screen Note: The screen will only show a few lines at a time.
6 As you rotate the control wheel to toggle over different options the screen will slide up and down accordingly. If the text is too long to completely fit on the screen, it will scroll horizontally across the screen when 3 - Mode - This screen displays the therapy mode setting. You can select CPAP therapy or auto -CPAP therapy. CPAP therapy provides one level of output pressure for both the inspiratory and expiratory breathing phases. auto -CPAP therapy provides CPAP therapy while automatically adjusting the pressure level when apnea, hypopnea, flow limitation, or snoring events are detected. Note: The menu options will vary between CPAP mode and auto -CPAP mode. auto max - This screen allows you to modify the auto Maximum pressure setting.
7 The setting you specify here will be the maximum pressure for the device. auto therapy will adjust the CPAP pressure between the auto Maximum and the auto Minimum pressure settings. Note: This screen only displays if auto -CPAP therapy is enabled. auto min - This screen allows you to modify the auto Minimum pressure setting. The setting specified here will be the minimum pressure for the device. auto therapy will adjust the CPAP pressure between the auto Maximum and the auto Minimum pressure settings. Note: This screen only displays if auto -CPAP therapy is enabled. CPAP pres - This screen displays the current CPAP pressure setting. You can adjust the setting from 4 cm H2O to 20 cm H2O.
8 Note: This screen only displays if CPAP therapy is enabled. flex type - This screen displays the comfort mode setting. You can select None, C- flex , or C- flex + (if in CPAP mode). You can select None, C- flex , or A-Flex (if in auto -CPAP mode). flex - You can modify the flex setting (1, 2 or 3) on this screen if you enabled flex . The setting of 1 provides a small amount of pressure relief, with higher numbers providing additional relief. Note: The patient also has access to this setting, if flex is enabled. Ramp time - When you set the Ramp time, the device increases the CPAP pressure from the value set on the Ramp start screen to either the CPAP pressure setting (if in CPAP mode) or the auto Minimum pressure setting (if in auto -CPAP mode) over the length of time specified here.
9 Note: If the CPAP pressure (if in CPAP mode) or auto Minimum pressure (if in auto -CPAP mode) is set to 4 (the minimum setting), this screen will not display. Note: If the Ramp time is set to 0, Ramp start will not display. Ramp start - This displays the Ramp starting pressure. You can increase or decrease the Ramp starting pressure in cm H2O increments. This is only available if Ramp time has been set to >0 and auto min or CPAP pressure >4 cm H2O. This will not display if Split night is enabled. Tubing type lock - This enables you to lock the Tubing type setting for either the 15 mm or the 22 mm tubing if you do not want the patient to change it. Note: If locked, the patient will still see this setting with a lock symbol ( ) next to it, but they will not be able to change it.
10 Note: This will not prevent the user from using Heated Tubing at a later date. Tubing type - This setting allows you to select the correct size diameter tubing that you are using with the device. You can choose either (22) for the Philips Respironics 22 mm tubing, or (15) for the optional Philips Respironics 15 mm tubing. When using Heated Tubing, the device will automatically change this setting to the appropriate tubing type (15H). Note: If the Heated Tubing is removed, the device will default back to the previous tubing type setting. SYSTEM ONE resistance ( ) - This setting allows you to adjust the level of air pressure relief based on the specific Philips Respironics mask.