Transcription of Repairing 240Z combination - kamikazeracing.org
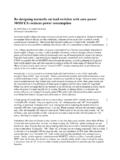
1 Repairing 240Z combination (headlight) switch If yours is like mine was, the headlight switch is a bit flaky. Sometime I had to turn the switch on and off several times in order to actually get the headlights or the parking lights to come on. The problem is inside the switch itself but fortunately can be repaired easily. Tools needed: Small Phillips screwdriver Small flat blade screwdriver or chisel Sandpaper (I used 600 grit wet/dry) Multimeter (ohm-meter) The headlight/parking light portion of the switch is contained within the box that has the thick wires (red and white/red). The red/white wires are for the headlights and the green wires control the parking lights.
2 I first took off this entire box by removing the 3 screws that hold it on. This step might not be necessary but it probably makes it easier. Be careful not to lose the small plastic washer that fits in one of the 3 screw holes. Also, note that the shorter of the 3 screws goes on the side where the wires come from. Next, using the flat blade or chisel, carefully pry up the four tabs the hold the circuit board to the box and remove the box. You ll notice two rocker contacts plates that actually close the circuit. Others have mentioned needing to repair/build up the two small spring loaded nubs that actuate the switch .
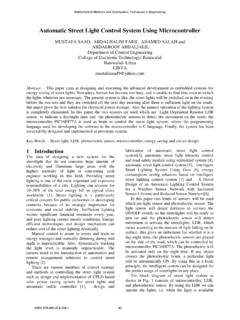
3 These not only push on the plates to close the circuit but also provide the detents that you feel when twisting the switch . In my case these were not the problem but rather the plates themselves. Carefully pop these two plates out. They are the reason your switch is intermittent and need to be cleaned up. Notice the carbon build-up where contact is made Using the sandpaper thoroughly clean the carbon deposits from both the plates and the contact points that the wires are soldered to. Note that the bump on the plates is in constant contact with one side of the circuit but the other end is what opens and closes.
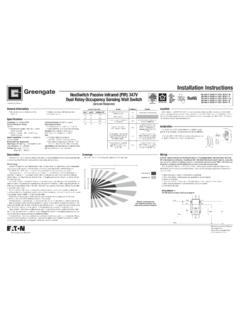
4 With a high-amperage DC circuit like this all of the arcing every time the switch is activated cause the switch to deteriorate over time. Even after cleaning all of the deposits off there are still pits in the metal caused by the arcing. Fortunately, the plates are identical but installed differently. One of them makes contact on the long end and one of them makes contact on the short end. When re-installing them simply swap them. This moves the pit to the unused end and puts fresh clean metal where it s needed. Re-assembly is the opposite of disassembly. Use your ohm meter to verify that the switch is now as good as new.
5