Transcription of replacement procedure for Hyundai ix35- 4 …
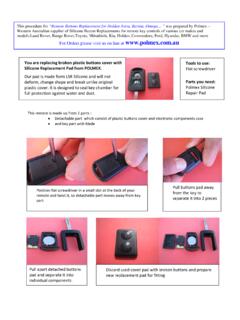
1 This procedure for Hyundai i20, i30, ix35 Sonata, Tuscon , SantaFe replacement button pad instructions prepared by Polmex Western Australian manufacturer of Silicone Button Replacements for remote key controls of various car makes and models: Land Rover, Range Rover,Toyota, Mitsubishi, Kia, Holden, Commodore, Ford, Hyundai , BMW, Nissan, Hyundai and more For Orders please visit us on line at You are replacing worn buttons cover in Hyundai flip key with Silicone Repair Pad from POLMEX.
2 Our pads are made form high purity LSR Silicone and will not: deform, change shape, become brittle and break unlike original cover. It is a great fix at a fraction of the price of Pad plastic stiffener is still attached to remote If after removing old pad your remote looks like in the picture above than you need to remove, plastic stiffener still attached to your remote . Use small flat screwdriver to lift it up and detach it from remote . It will not be used as new Silicone buttons does not need extra support.
3 Do Not open remote . Gently remove an old rubber pad from your remote using flat screw driver. plastic stiffener detached from remote ( will not be used) metal frame ( will not be used) New Pad Your remote needs to look like the one on the left, before you start installing new keypad. Please check if grooves are free of any old rubber pieces. You may use small flat screwdriver or toothpick to remove any remnants from grooves. DO NOT USE any sharp objects. Ready for Fitting Place a new silicone pad over top part of your remote .
4 Use rolling motion when positioning pad in grooves and press firmly till pad engages with hard shell all around edges. DO NOT USE any lubricants or detergents for cleaning grooves as it will affect firm seating of a pad. No re-programming is required.