Transcription of Restraints Control Module Diagnostic Trouble Codes
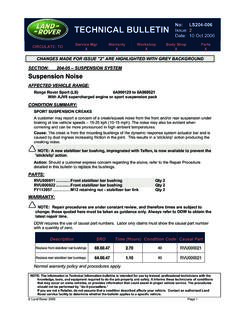
1 TECHNICAL BULLETIN NO: LTB00321 (ISSUE 1) 07 DEC 2010 SERVICE PARTS WARRANTY BODY SHOP CIRCULATE TO: 9 9 9 9 NOTE: The information in Technical Bulletins is intended for use by trained, professional Technicians with the knowledge, tools, and equipment required to do the job properly and safely. It informs these Technicians of conditions that may occur on some vehicles, or provides information that could assist in proper vehicle service. The procedures should not be performed by 'do-it-yourselfers'. If you are not a Retailer, do not assume that a condition described affects your vehicle. Contact an authorized land rover service facility to determine whether this bulletin applies to a specific vehicle. 2010 Jaguar land rover North America LLC Page 1 THIS BULLETIN SUPERSEDES LA501-021 AND LS501-019; UPDATES ARE HIGHLIGHTED IN GRAY SECTION: 501 Restraints Control Module Diagnostic Trouble Codes AFFECTED VEHICLE RANGE: LR3 (LA) VIN: 5A000360 - 9A513325 Model Year: 2005 - 2009 Range rover Sport (LS) VIN: 6A900129 - 9A215620 Model Year: 2006 - 2009 CONDITION SUMMARY: Situation: The Restraints Control Module (RCM) may be found to have one or more of the following Diagnostic Trouble Codes (DTC): B0070-1B: Driver seatbelt pretensioner deployment Control resistance too high.
2 B0072-1B: Passenger seatbelt pretensioner deployment Control resistance too high. B1212-1B: Driver Seatbelt Buckle Pretensioner Deployment Control - circuit resistance above threshold o Driver seatbelt buckle pretensioner deployment Control circuit open circuit, high resistance. B1213-1B: Passenger Seatbelt Buckle Pretensioner Deployment Control - circuit resistance above threshold o Passenger seatbelt buckle pretensioner deployment Control circuit open circuit, high resistance. This may be caused by improper routing of the under-seat wiring harness of the seatbelt buckle pretensioner, causing a strain on the harness connectors at the extremes of seat adjustment. The subsequent harness strain can lead to the DTC logs. Action: Should any of the above DTCs be present in the RCM or a new harness is being installed, refer to the Repair Procedures detailed in this bulletin to correctly route and secure the wiring harness. PARTS: EYC500270 ..Cable tie/edge clip assembly Qty: 4 per seat harness repair Locally sourced: Black fabric-backed tape Qty: as required (shop supply) NOTE: Black fabric tape is a workshop consumable and is not claimable under warranty.
3 WARRANTY: NOTE: Repair procedures are under constant review, and therefore times are subject to change; those quoted here must be taken as guidance only. Always refer to DDW to obtain the latest repair time. The labor times listed below are for rectification of the DTCs noted above and are not to be used for instances of harness replacement. DDW requires the use of causal part numbers. Labor only claims must show the causal part number with a quantity of zero. NO: LTB00321 (ISSUE 1) 07 DEC 2010 TECHNICAL BULLETIN Page 2 of 6 DESCRIPTION SRO TIME (HOURS) CONDITION code CAUSAL PART Attach harness to seat frame manual seats Attach harness to seat frame power seat - LH Attach harness to seat frame power seat - RH 42 EVB500670 PMAN ormal Warranty policies and procedures apply. REPAIR PROCEDURE ROUTE AND SECURE PRETENSIONER HARNESS FOR MANUAL ADJUSTING SEAT WARNING: The safety precautions detailed in the Workshop Manual relating to Supplementary Restraint Systems (SRS) must be adhered to.
4 NOTE: Where a procedure refers to a 'cable tie' only, the edge-clip is to be removed from the cable tie/edge clip assembly and discarded. Where a procedure refers to installing an 'edge clip' the clip provides a 'mount' for the cable tie. 1. Refer to Workshop Manual 501-10: Front Seat > Removal and Installation > Front Seat, and remove the affected front seat. 2. Release the pretensioner wiring harness and disconnect the connector from the seat frame. CAUTION: Care must be taken to avoid damage to the pretensioner wires. The wires must face away from the inboard side of the seat when secured by the cable ties. The cable ties must not be over-tightened. (Figure 1) 3. Route the pretensioner wiring along the side of the pretensioner tube so that the wiring is facing away from the inboard side of the seat. (Figure 1) 4. Secure the wiring with a cable tie at point A, ensuring not to over-tighten the cable tie. (Figure 1) 5. Using black fabric tape, secure the wiring to the pretensioner tube, ensuring the tape does not extend beyond the end of the tube.
5 (Arrowed in Figure 1) 6. Secure the wiring with a cable tie at point B, ensuring not to over-tighten the cable tie. (Figure 1) CAUTION: The under-seat connector must not be under any strain. 7. Connect the under-seat connector, ensuring the connector is not under any strain. 8. Secure the pretensioner wiring to the seat frame using cable ties in two places where shown. (Figure 2) CAUTION: The body-side connector must be clipped to the seat base to avoid strain. Figure 2 Figure 1 NO: LTB00321 (ISSUE 1) 07 DEC 2010 TECHNICAL BULLETIN Page 3 of 6 9. Clip the body-side connector to the seat base, ensuring the wiring is not under any strain. 10. Refer to Workshop Manual 501-10: Front Seat > Removal and Installation > Front Seat, and install the affected front seat. ROUTE AND SECURE PRETENSIONER HARNESS FOR LEFT-HAND ELECTRIC ADJUSTING SEAT WARNING: The safety precautions detailed in the Workshop Manual relating to Supplementary Restraint Systems (SRS) must be adhered to.
6 NOTE: Where a procedure refers to a 'cable tie' only, the edge-clip is to be removed from the cable tie/edge clip assembly and discarded. Where a procedure refers to installing an 'edge clip' the clip provides a 'mount' for the cable tie. 1. Adjust the affected seat to the mid-height position. 2. Refer to Workshop Manual 501-10: Front Seat > Removal and Installation > Front Seat, and remove the affected front seat. 3. Release the pretensioner wiring harness and disconnect the connector from the seat frame. CAUTION: Care must be taken to avoid damage to the pretensioner wires. The wires must face away from the inboard side of the seat when secured by the cable ties. The cable ties must not be over-tightened. (Figure 3) 4. Route the pretensioner wiring along the side of the pretensioner tube so that the wiring is facing away from the inboard side of the seat. (Figure 3) 5. Secure the wiring with a cable tie at point A, ensuring not to over-tighten the cable tie. (Figure 3) 6.
7 Using black fabric tape, secure the wiring to the pretensioner tube, ensuring the tape does not extend beyond the end of the tube. (Arrowed in Figure 3) 7. Secure the wiring with a cable tie at point B, ensuring not to over-tighten the cable tie. (Figure 3) 8. Straighten the wiring harness. 9. Measure 500mm (19 5/8 inches) along the wiring harness, from the point of the pretensioner body where the wiring emerges, and install an edge clip. (Figure 4) Figure 3 Figure 4 NO: LTB00321 (ISSUE 1) 07 DEC 2010 TECHNICAL BULLETIN Page 4 of 6 10. Route the pretensioner wiring around and along the front of the seat frame as shown. (Figure 5) 11. Install the under-seat connector. CAUTION: Ensure the wiring cannot become entangled with the seat height adjustment mechanism. 12. Secure the electrical connector bracket with a cable tie where shown. (Figure 6) 13. Attach the edge clip to the electrical connector bracket. (Arrowed in Figure 7) CAUTION: The body-side harness connector must be clipped to the seat base to avoid strain.
8 14. Clip the body-side harness to the seat base, ensuring there is no strain to the connector or wiring. 15. Refer to Workshop Manual 501-10: Front Seat > Removal and Installation > Front Seat, and install the affected front seat. Figure 5 Figure 6 Figure 7 NO: LTB00321 (ISSUE 1) 07 DEC 2010 TECHNICAL BULLETIN Page 5 of 6 ROUTE AND SECURE PRETENSIONER HARNESS FOR RIGHT-HAND ELECTRIC ADJUSTING SEAT WARNING: The safety precautions detailed in the Workshop Manual relating to Supplementary Restraint Systems (SRS) must be adhered to. NOTE: Where a procedure refers to a 'cable tie' only, the edge-clip is to be removed from the cable tie/edge clip assembly and discarded. Where a procedure refers to installing an 'edge clip' the clip provides a 'mount' for the cable tie. 1. Adjust the affected seat to the mid-height position. 2. Refer to Workshop Manual 501-10: Front Seat > Removal and Installation > Front Seat, and remove the affected front seat. 3. Release the pretensioner wiring harness and disconnect the connector from the seat frame.
9 CAUTION: Care must be taken to avoid damage to the pretensioner wires. The wires must face away from the inboard side of the seat when secured by the cable ties. The cable ties must not be over-tightened. (Figure 8) 4. Route the wiring of the new pretensioner along the side of the pretensioner tube so that the wiring is facing away from the inboard side of the seat. (Figure 8) 5. Secure the wiring with a cable tie at point A, ensuring not to over-tighten the cable tie. (Figure 8) 6. Using black fabric tape, secure the wiring to the pretensioner tube, ensuring the tape does not extend beyond the end of the tube. (Arrowed in Figure 8) 7. Secure the wiring with a cable tie at point B, ensuring not to over-tighten the cable tie. (Figure 8) 8. Straighten the wiring harness. 9. Measure 500mm (19 5/8 inches) along the wiring harness, from the point of the pretensioner body where the wiring emerges, and install an edge clip. (Figure 9) 10. Measure 305mm (12 inches) along the wiring harness, from the point of the pretensioner body where the wiring emerges, and install an edge clip.
10 (Figure 9) Figure 8 Figure 9 NO: LTB00321 (ISSUE 1) 07 DEC 2010 TECHNICAL BULLETIN Page 6 of 6 11. Attach one edge clip to fore/aft motor bracket as shown. (Figure 10) 12. Connect the under-seat connector. 13. Attach the second edge clip to the electrical connector bracket as shown. (Figure 11) CAUTION: The body-side harness connector must be clipped to the seat base to avoid strain. 14. Clip the body-side harness to the seat base, ensuring there is no strain to the connector or wiring. 15. Refer to Workshop Manual 501-10: Front Seat > Removal and Installation > Front Seat, and install the affected front seat. Figure 11 Figure 10