Transcription of Rigging Basics 101 - Doug Vahrenberg
1 Rigging Basics 101. By: Doug Vahrenberg Just as critical as Rigging up you best fishing rod and reel with the correct line and lure. Rigging and maintaining your boat can be a necessary and rewarding experience. Most new boat owners leave this job to the boat dealer which are the true professionals, but you should still take the time to learn about your boat. Every year when my new Skeeter arrives I enjoy the next few days Rigging and learning about my new boat. There's some dos and don'ts that you should perform when Rigging your boat. This can also be a maintenance guide for off-season check out or that rainy day. I highly recommend at the minimum an annual inspection of your boat and by taking the time to review these Rigging steps you can perform a boat inspection on any aged boat. Trailer, Tires and Wheels Trailer: The first thing I do when I start to properly prepare and check the trailer.
2 Install the liscense plate and make sure it hasn't expired. Next is to check out the driving and safety lights on the trailer to make sure they are properly working. While performing this I like to view any potential concerns like low hanging wires and double checking tightness of added trailer features like fenders, rollers and bunks making sure they are tight and secure. Next I like tidy up the trailer connections apply a thin layer of petroleum jelly or Vaseline to the trailer connector will make it easier to hook up to the tow ball plus petroleum jelly will stain clothing if you accidentally rub your clothing against the hitch when not connected. Next it's onto the wheels and hubs. Using a good quality floor jack raise the trailer and check to make sure the wheel bearings are adjusted correctly.
3 By grabbing the outer circumference at opposite points try to feel for excessive loosen. Also spin the tire to make sure it rotates freely. It is correct to have just a little play but too much or not enough can create future bearing and hub problems. Adjust according to the trailer operator's manual. Next make sure grease seals and the bearing lubrication system are working properly and they are not leaking any grease or allowing moisture in. The next step is checking your tires and wheels. Often overlooked but highly important is the valvestems . check to make sure no cracks or weathering has occurred and that the valve is seated tight. This can cause great distress if they leak air and can cause a flat and even ruin a good tire and fishing trip. Check air pressure according to tire and trailer manufacturer guidelines.
4 Next is to grab your torque wrench and check the lug nuts for proper torque. This is highly important on today's aluminum wheels as they need to be torqued often if changed or in new condition to make sure they seat properly. Most warranties do not cover operator neglect if the wheels are not properly torqued and checked often. Electronics: The next step for me is to install my new electronics: Trolling Motor, Graphs, Battery Chargers, etc This is where the fun begins. First I like to start at the bow and work back. The first thing is to mount the trolling motor. Even if you boat came with a trolling motor or your boat is pre-owned there are several checks that need to be routinely. The first thing is to remove the bow panel and access the nuts making sure they are tight. I. highly recommend thru bolting the trolling motor and installing oversized washers to protect and reduce any damage to the boat from the added weight of today's trolling motors.
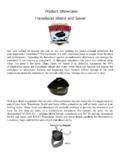
5 I choose the MinnKota MaxPro 101 for this years boat. This features a great lift assist device that reduces fatigue when raising and lowering the motor but it also reduces stress to the boat by accidental dropping. This motor is a brute but the added weight adds to additional life and demands I require when fishing. The electronics I have selected for the bow is the new Humminbird 797c2 with side imaging. This requires an externally mounted transducer to be installed on the trolling motor, since not only does it shoot traditional downlooking sonar but has two side imaging or side shooting beams. When installing the transducer make sure the transducer is horizontal to the bottom of the trolling motor head so you get good detailed readings. Next it's time to route the cable up the shaft. I like to alternate direction of cable ties on the cable with one tightening to me and the next away.
6 This helps maintain proper tension on the cable. Next is to build slack cable or a loop where the motor pivots. To test this turn the motor maximum to the left and right to make sure te cable does not bottom out. The next step is to locate the power source for the graph. Most boat manufacturers provide pigtail leads for a 12 volt power supply. Skeeter has even provided an in-line fuse and labeled added power supplies to the bow making it easier to rig. If you do not have a power supply you can run a set of wires to the front, make sure these come from the starting battery as any graph or fishing system needs to be isolated from the trolling motor batteries to reduce any interference issues. The next step is to install the graph either in-bow panel or free standing mount. Then connect all accessories on this boat I have gone with a two transducer set-up as added protection and convenience, the trolling motor has universal sonar so I have installed a transducer switch which allows me to quickly switch between transducers in the trolling motor head or the external transducer.
7 This is a great idea as transducers are subject to many underwater obstructions and the loss of a transducer while fishing can create added stresses to the fisherman. Installing aback-up now can make it easy with a transducer switch to quickly and easily flip the switch and continue fishing. Next it's time to re-install bow panel I like to notch the boat to reduce any added stress or sharp bends in the cables to prevent any chances of damage during normal boating activities. Next it's back to the console and install the added accessories for navigation. First I installed a new Humminbird 997c with side imaging on a RAM mount next to the console. It requires similar mounting to the bow electronics. On this unit I installed on a RAM mount to give me unlimited viewing angles and the rubber mounting balls on the mount help provide shock absorption for added protection.
8 I prefer to thru bolt anything I. can to make as durable as possible and reduce any chances of the threads backing out on a screw. The next step after getting the graph, switch and wires hooked up was to install the hot foot. My first step I perform is to find a good home for my throw cushion under the dash. In many states the throw cushion is only legal if not in a compartment and accessible at all times. I like to find a position under the console and then use the hot foot to add enough tension to hold in place while running down the lake or road. It's always in the same place just in case! After getting the hot foot installed the next step was to mount the fire extinguisher under the console and easily accessible. While working under the console installing all my new goodies it makes a great time to tidy up the wiring and to learn how the boat is built and assembled.
9 I double check all the factory installed accessories and see how they are wired. This can reduce the time if an on the water failure would occur to quickly and easily resolve any issues. This is a good place for cable ties to tidy up the network of wires that provide the vital link to you components. Next it's time to start Rigging the battery charger and installing the heart of the boat the batteries. The first step is to install a quality battery tray that holds you batteries securely. I personally prefer the aluminum trays with heavy duty straps that securely haold the batteries in the worst conditions. The next thing is to install the on-board charging sytem, for this boat I've chosen the MinnKota MK460, a three stage charger with temperature controlled charging. It's a four bank charger that allows me to charge all batteries at once- the three trolling motor batteries and the starting battery.
10 This insures trouble free starts and plenty of battery life for a full day of fishing. The Rigging compartment in this boat has provisions for installing the charger but if adding a charger you need to find a secure location that you can firmly mount to insure good screw or bolt retention. Next I start sorting the wires to routing to reduce any clutter in the Rigging compartment. Once routed and sorted start hooking up each battery. This is another place for cable ties to retain wires in desired position and to provide a clean Rigging in the rear. Outboard: Most all major Rigging components are pre-rigged at the factory or by your local marine dealer. But there are still areas you need to look at. First take the operators manual and go over the maintenance schedule find all lubrication points and make sure thay are properly lubricated.