Transcription of Roketa Quick Start Guide
1 Roketa Quick Start / Maintenance Guide This Guide is to help with the assembly and maintenance of your Roketa brand scooter. Should you have any additional questions or recommendations for this manual, please contact us at: Step #1 Unbox your scooter. Your scooter will arrive in a metal crate inside of a card board box. You will need just standard tools to remove the bolts from the metal crate. You will also need to unwrap or cut the metal wires holding the bike to the bottom of the crate. IMPORTANT: On scooters that have the front tire removed, make sure when you remove the front axle from the crate that you do not loose the front wheel spacer.
2 Some models also have a steering collar pressure fit into the handle bar post, if the collar is not on the post, check the bottom of your crate or the bottom of the inside of your scooter. You will notice a 1 inch hole in your steering post if your collar is missing. Step #2 Assemble your scooter. Depending on the model, you may have more or less assembly than we list here. You should have assembly instructions included, these are just some additional pointers to help. If you are missing any parts, please email our support department requesting these items. 1. Front wheel a. Typically all that needs to be done is the axle bolt slid through the front fork and rim, make sure the speedo gear is on one side and the axle spacer on the other.
3 We recommend removing the brake caliper from the front forks before attaching the tire. Then put the caliper back on sliding the opening of the two disk pads around the brake disk. The front brake caliper typically has a plastic spacer between the two brake pads, when you remove this spacer, be careful not to bump the caliper or pads otherwise they will squeeze together, if this happens just re-insert the plastic spacer or use a flat head screw driver to pry the pads back open. 2. Handle bars a. Self explanatory, use nut and bolt provided. If you are missing the nut and bolt, you can purchase one locally, size is 10mm with a 1 1/2 inch length.
4 Some models have a collar used where the bolt goes through the handle bar post, sometimes these fall out onto the bottom of the crate or inside the scooter. 3. Mirrors a. Most mirrors just screw in and tighten with a nut. For models like the Fiji / Tahiti, sometimes the spacers on the mirrors are not the correct height or size, we recommend using multiple lock washers to raise the mirror to the correct height so that it doesn t squeeze down the plastic ferring. 4. Battery a. Make sure you allow the acid to sit in the battery for 20 minutes before installing the top cap. b. Make sure to charge the battery fully before using in the scooter.
5 Failure to fully charge will result in short battery life. c. Both red wires connect to the positive terminal. The black or green wire goes to the negative terminal. Step #3 Inspect your scooter. These scooters are factory sealed from the Chinese factory and shipped directly to your door. After assembled in China, they do go through quality control before leaving to the United States, but defects and shipping damage can occur. Normally motorized vehicles are assembled and looked over by local dealers before being put on the show room floor for sale, called Dealer Prep. This step is bypassed and the reason you can purchase these items at such a low price.
6 We recommend that you look over the bike very well before riding, or find a local dealer or mechanic who can do it for you. Very rarely do we have any issues with these bikes, but we do hear of nuts and bolts rattling loose from time to time. So it s a good idea to check over the entire bike before riding. 1. Check over all major nuts and bolts on the scooter for tightness. 2. Replace engine oil with a brand oil, we recommend 10w40 or synthetic 5w30. The oil in the bike is shipping oil and should not be left in the bike. We have test drove these bikes with the shipping oil left in up to 500 miles and no problems occurred, however we do not recommend this.
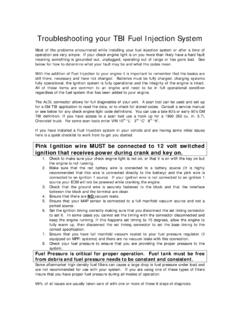
7 Step #4 Starting your scooter. 1. Make sure you have gas in the scooter. 2. Turn the key to the on position. Check to make sure the kill switch is in the starting position. Some models have a kill switch on the kick stand, make sure both stands are up when starting. 3. Hold down either the left or right brake lever and hit the electric starter button. You must hold a brake lever as a safety or the electric Start button will not work. The very first time you Start your scooter, it will take 5 to 15 minutes to get fired up. This is because these bikes use a gravity feed fuel system and it takes a while for the gas to get to the carb. To avoid burning out the starter motor, only hold the electric starter button for 5 seconds at a time with a 10 second cool down period between starts.
8 We also recommend turning the throttle back and forth while trying to Start to help get the gas into the carb quicker. Step #5 Riding your scooter. 1. The Manufacture recommends riding no more than 2/3 throttle for the first 500 miles. This is to properly break in the engine. The main rule of thumb is to avoid constant high rpm engine speeds for extended periods of time. Scooter Maintenance: Engine Oil: We recommend 10w40 or synthetic 5w30. Most scooters hold .9 liters of oil, when checking the oil level, do not screw in the dipstick. 1. The oil should be changed before riding the scooter for the first time. 2. Change the oil after the first 180 miles.
9 3. Change the oil every 600 miles. Gear Oil: We recommend 75w90 gear oil. Most scooters hold 110cc ( oz) of gear oil. You will need a measuring cup and pistol grip oil gun to fill the gear box with oil. 1. The gear oil should be changed before riding the scooter for the first time. 2. Change the gear oil after the first 180 miles. 3. Change the gear oil every 3000 miles. Air Filter: The air filter will either be located under your seat or on the left back side of the scooter. The air filter should be checked regularly and cleaned to avoid poor performance and fuel economy. 1. Clean the filter in kerosene or mineral spirits. 2. Squeeze out the excess solvent, do not twist or tear the filter, let dry.
10 3. Apply air filter oil and squeeze out excess. Filter should be damp but not wet. Spark Plug: The spark plug should be checked regularly and cleaned. 1. Clean spark plug end with a wire brush. 2. Check spark plug gap (.7 to .8 mm) or (.028 to .032 ) Engine Idle Speed: The engine idle speed should be adjusted to 1400 rpm for the 150cc engine and 1900 rpm for the 50cc engine. When your scooter is new, it may need to be adjusted a bit higher until the engine is broken in. If you don t have a tachometer you can adjust by ear. The idle should be adjusted just high enough so that when set on the center stand with the rear wheel elevated, the wheel turns very slow.