Transcription of SAGO PALM Cycas revoluta GROWING FROM SEED
1 ~~~~~~~~~~~~~~~~~~~~~~~~~~~~~~~~~~~~~~~~ ~~~~~~~~~ Onalee s Home-Grown Seeds Email: sago PALM Cycas revoluta GROWING FROM seed Cycads have long germination periods, up to several months. To speed germination, it is best to have warm air and soil temperatures (about 80 degrees F or warmer) and well drained, sandy, soil. Seeds should be started out of direct sunlight, but in a bright, warm area, as their new leaves are tender and may be damaged by direct sun. Once you are ready to germinate your seeds, remove most, or all, of the orange outer layer ( Fruit ) from the seed . Soak the cleaned seeds for two days in warm water. Change the water at least twice daily.
2 This really seems to help them get started. Cycad seeds are very capable of absorbing moisture, and there is absolutely no need to scarify or crack the seeds. A seed that has a full sized embryo will readily germinate once there is enough moisture, and the temperature in the GROWING area is high enough. Once I soak the seeds, I will usually dip them in a fungicide before I plant them. I prefer to use Daconil, but there are other fungicides that will work just as well. There are many techniques that people use to germinate their seeds. The most important things to remember are that you want your medium to be as sterile as possible, you want your seeds to be moist but not wet, and you want your GROWING area to be warm enough to stimulate germination.
3 Fill flats or soil benches (they need to be about 4 -6" deep) with well drained soil - you want the water to "perk" through fairly fast. Water the soil in well until water drains from the bottom. Press the seeds 2/3 of the way into the soil so that only the top flat side can be seen. You can use course builders or river sand OR a mix of 50% perlite or vermiculite and 50% peat moss. I ve been using about 2-3 of builders sand on top of 2-3 of vermiculite. Water the area a couple of times a week. When you water, you should do it twice, once to get the sand (or peat) so it will accept the water and the second time to keep the sand (or peat) and seeds damp. Make sure to use a light SPRAY or watering can with many small holes in it as to not disturb the seeds in their sand bed by washing them up with a hard blast of water.
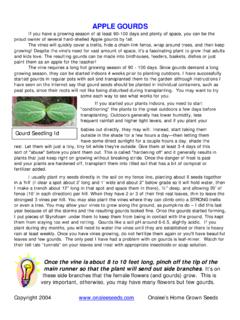
4 Don t let the seeds stay too wet, that may promote fungus growth or rotting of the seed . ~~~~~~~~~~~~~~~~~~~~~~~~~~~~~~~~~~~~~~~~ ~~~~~~~~~ Onalee s Home-Grown Seeds Email: Seeds usually put down a tap root and then the first leaf rises upwards from the same point. The illustration shows how a "bulb" starts GROWING between the root and leaf. This will continue to become larger as it becomes older. Germination may take 3 months or longer. If you don t have a warm enough area to plant your seeds in a sand bed, you may want to try the bag method. The "bag" method is very popular, especially for people who need to germinate their seeds indoors, or when the temperatures are too cold outside to stimulate germination.
5 Seeds are placed in a plastic bag filled with a sterile medium like perlite or vermiculite. The medium should be slightly moist but not wet. The bag is then placed near a heat source. The temperature should not exceed 100 F just to make sure the seeds don't get damaged. The seeds should be checked every few days to make sure that they don't get fungus, and to remove any seeds that have sprouted. STORAGE OF SEEDS If you are not going to plant your seeds right away, proper storage of seeds is VITAL. This is the point where most good seeds can become bad seeds. Cycad seeds need a certain amount of moisture at this time to continue developing properly. If a seed does not get this moisture in some way, the soft inside can separate from the hard outside shell.
6 Most of us by now have heard about rattlers and floaters. When the inside of the seed starts to dry up, it gets smaller which forms an air pocket and this is why a seed will float in water or rattle when shaken. If a seed has just started to rattle it is still possible to save the seed by soaking it in water for a day or two and it may still germinate even if it is rattling. If the seed has been kept for a long period of time without any hydration it can be too late to save it. I always store my seeds in a cool place. I never store them in a closed container or plastic bag because this seems to give fungus a good chance to attack the seeds. I keep my seeds in open containers, or when I have very large amounts of a certain type of seed , I use nylon mesh bags.
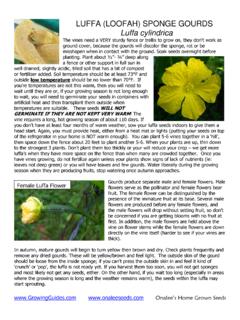
7 I soak the seeds every 3 days for about 15 minutes and then let them dry again. If you are not planting your seeds immediately, you need to do the same to keep the seeds viable. Of course, plant your seeds as soon as possible for best results. sago Palm seed just beginning to sprout above ground ~~~~~~~~~~~~~~~~~~~~~~~~~~~~~~~~~~~~~~~~ ~~~~~~~~~ Onalee s Home-Grown Seeds Email: GENERAL INFORMATION ABOUT GROWING sago PALMS When planting or transplanting sagos, you may plant them in containers or directly in the ground. Plant at original soil line; don t plant too deep or cover the stem of the leaves. The crown that the leaves emerge from should be about half in ground and half above the soil line.
8 TEMPERATURE RANGE is from 15 to 110 degrees F (-11 to 42 C). Temperatures in the high teens may frost-damage leaves which may turn yellow or brown. Remove these to reduce stress on the plant and encourage new leaves in the spring. If temperatures fall below 15, the sago may die, however, as long as the trunk and leaf crown is hard wood, it should recover. If the trunk turns soft, your sago may be damaged beyond recovery. HUMIDITY range is from dry to wet. LIGHT: Sagos grow in full sun, partial shade or an indoor area which receives bright light or a few hours of morning or afternoon sun. RATE OF GROWTH is extremely slow. LONGEVITY: Cycas revoluta are extremely long lived. FERTILIZER / WATER: It is best to UNDER WATER and UNDER FERTILIZE your sago palms.
9 I fertilize LIGHTLY in the spring with a 6-2-0 (millorganite) fertilizer. FERTILIZER is generally applied during spring and late summer. Sagos GROWING in partial sun should receive an average rate as listed on the container, those in low light should receive only 1/4 rate. Too little plant food is far better than too much. If organic or slow release fertilizer is used, do not allow any to fall into the plant crown which is protecting the formation of future leaves. OLD LEAVES MAY TURN YELLOW from over watering or too much fertilizer. NEW LEAVES MAY TURN YELLOW from excess fertilizer or poor soil conditions. Note: Once leaves turn yellow or brown, they should be removed from the plant. If GROWING in a pot, allow soil to dry before watering again.
10