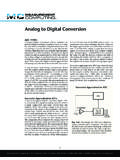
Transcription of Saving DASYLab data to an ASCII (text) readable file
1 DASYLab Techniques Saving D ASY Lab d ata to an ASC II ( te xt) readable f ile Updated to reflect changes in DASYLab 2020 ( ) The DASYLab getting started guide ( is included on the CD and in the Windows Start menu) provides examples for storing data using the DASYLab binary data format. Many applications require data to be stored to files that will be used by programs that do not understand the DASYLab format. Or, you simply wish to store in a file that can be read by a text editing application, such as Notepad or WordPad. This short tutorial will create a worksheet to store data as ASCII readable text, optimized for Microsoft Excel.
2 See the Notes on working with Excel at the end of this document. A Basic ASCII data Logger The example uses the Measurement Computing driver. If you are using other hardware, the method for creating the Analog Input will vary. Start DASYLab to create a simple data logger application. This data logger will read data from one channel, display the data in a strip chart type display, and then store the data in readable ASCII format on the hard drive. You will accomplish these tasks using three DASYLab modules. Start DASYLab . First bring the data into DASYLab ; to do this, use an ANALOG INPUT module.
3 The ANALOG INPUT module is located in the Module browser: MCC-DRV Driver Analog Input. 1 Once selected, your pointer should change to the place pointer, click anywhere on the worksheet to place the Analog Input Icon. After placing the icon, the worksheet should look like this: 1 Choose the appropriate hardware Analog Input, depending on your driver. For example, for Measurement Computing devices, use the Module Browser, Input/Output MCC-DRV Analog Input and select your channels from the selection dialog box. DASYLab Techniques Saving DASYLab data to an ASCII (text) readable file Page 2 of 8 Now connect the analog input to the display.
4 For this example, display the data on a strip chart type display. Select the Chart Recorder, found under Modules Display Chart Recorder. Put the module on the worksheet to the right of the Analog input. The two modules can now be connected together. To accomplish this, click and drag the Chart Recorder module next to the analog input module so that the 0 on the analog input touches the 0 on the Chart Recorder icon, then release. If done properly, a wire will now connect the two modules. A feature of many modules is the ability to allow data to pass through.
5 This allows you to connect many modules in a daisy chain and keep the worksheet neat and uncluttered. To enable this pass through, double click on the Chart Recorder module and click the Copy inputs in the lower right hand corner. Click OK to save the settings. Next, configure the worksheet to save the data to the hard drive. The module required to save data to the hard drive is found under Modules Files Write data . Place this module on the worksheet next to the Chart Recorder. Now connect the Chart Recorder to the Write data module. Use the method discussed earlier to DASYLab Techniques Saving DASYLab data to an ASCII (text) readable file Page 3 of 8 bump the two modules together, or click on the output of the Chart Recorder, which should change the pointer into the wiring control, and then click the input of the Write data module to connect the wire.
6 When completed the worksheet should look as follows: Double click on the Write data module to access the module s properties. You can change the file format, file name and path. The property dialog looks as follows: Choose the ASCII (CSV) File Format from the drop down menu on the left of the dialog box. When you do this, the default file name changes from to DASYLab Techniques Saving DASYLab data to an ASCII (text) readable file Page 4 of 8 The Write data module will prompt you. Click Yes to accept these settings. There are several options for the ASCII (Excel CSV Preset) File Format.
7 Click on the Options button. You can see that DASYLab offers Tab, Semicolon or Comma separator characters. The Excel CSV preset has configured the Comma as the separator. Decide how you want the first column, the Time column, to appear. Change the Time Format to Date+Time [hh:mm:ss] to put the full date and actual time in the first column. This will look like: 9/12/2016,13:30:20, DASYLab Techniques Saving DASYLab data to an ASCII (text) readable file Page 5 of 8 None of the other options need to be adjusted at this time. Click OK to close the dialog box.
8 You will return to the main dialog box. Click File Name and enter a file name for the stored data . Click OK. For data security, you may want to select the Append to Existing File or Write Protection options to ensure that the data file is not accidentally overwritten. You can click the Multifile button configure a multi-file series. Click OK to close the Write data properties. Bring the display window up to visibility. There are four buttons designed to show and hide displays. The first set hides (makes invisible) and unhides (makes visible) all display windows.
9 The second set of buttons function minimizes the display windows to small windows at the bottom of the display and restores the display windows to their previous size and location. To bring the Chart Recorder display up and make it visible; click the Restore All Windows button (Up arrow). Click the start Worksheet button to start the worksheet. The Chart Recorder display will graph the data . You may need to adjust the Y-axis, as show below. The default is -5 to 5, but the USB-TC is reading temperature in the 50 to 80 F range. To change it, click on the Axes menu, and select the Y-axis.
10 Change it to reflect the range of your data . DASYLab Techniques Saving DASYLab data to an ASCII (text) readable file Page 6 of 8 Stop the Measurement. Save this worksheet so that you can use it later. Click on File, then Save As. Select a location and name for the file. DASYLab Techniques Saving DASYLab data to an ASCII (text) readable file Page 7 of 8 A final note on this technique If you will always be Saving data to an ASCII file, you can configure DASYLab to use the current Write data module settings as the default settings. Right-click over the Write data module on the work area and select the Default Module Settings selection.