Transcription of Sayl Chairs adjustment guide - Herman Miller
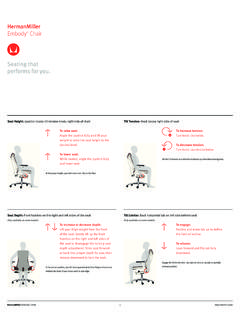
1 hermanmiller Sayl ChairAdjustment Guide1 HermanMillerSayl ChairTo raise seat: Take your weight off chair , lift tab up. To lower seat: While seated, lift tab the proper height, your feet should rest flat on the Height: Lever next to tilt tension knob, right side of chairTo increase depth: Pull lever out, slide thighs forward to adjust seat; release lever. To decrease depth: Pull lever out, push seat back and release the proper position, you will have approximately three-fingers of clearance between the back of your knees and the seat Depth: Lever under left side of seatOnly available on some increase tension: Turn knob decrease tension: Turn knob the tilt tension to control the resistance you feel when leaning Tension: Knob below right side of seatTo position chair forward: Recline and flip lever resume horizontal position: Recline and flip lever forward tilt to support the thighs declined posture when performing intensive tasks such as Tilt: Front horizontal tab on left side of seatOnly available on some Guide2 hermanmiller Sayl ChairTo engage: Recline and move tab up to define the limit of recline.
2 To release: Lean forward and flip tab fully the tilt limiter when you want to sit in an upright or partially reclined Limiter: Back horizontal tab on left side of seatTo raise or lower: Move back lever or pad behind Y-Tower up or down as the lumbar height so that it comfortably supports the natural curve of your spine. In upholstered Chairs the lumbar lever is located behind the Height: Back lever or pad, depending on work chair , behind available on some adjust arm height: Squeeze lever on arm stem while pulling arm up to raise arm to desired height. To lower arm, squeeze lever on arm stem while pushing arm down on maximum comfort, your arms should make contact with the armpad without any lift at your shoulders. Arm Height:Only available on some adjust arm angle: Grasp armpad and pivot in or arm angle inward when using a keyboard; adjust arm angle outward when using a mouse. To adjust arm width: Grasp armpad to pull in or push out.
3 Armpad width is properly adjusted when your elbows are in line with your shoulders while seated. Arm Angle & Width: Only available on some Depth:Only available on some adjust arm depth: Grasp armpad and slide forward or for comfort. Avoid any pressure on wrists and elbows. To adjust footring height: Hold base with one hand, grasp footring spoke and turn counterclockwise (-) to loosen. Once loose, raise or lower footring to desired height. Hold collar with one hand, grasp footring and turn clockwise (+) to tighten. To secure, finish turning footring while holding base. Footring Height: Only available on some models.


