Transcription of Scaling and Measurements Online page 6 Adobe …
1 WMDC Planning Services 1 M e a s u r i n g a n d S c a l i n g f r o m E l e c t r o n i c P l a n s To use the measuring tools on applications after October 2012 you will need to use Scaling and Measurements Online user guide on page 6. Applications before October 2012 need to use the PDF user guide below. To use the measuring tools you need the Adobe PDF Reader. This guide is written for version 9. These measuring tools were different in version 7 and 8. To get the latest version of the FREE Adobe Reader software go to PLEASE NOTE: Not all our plans have the measuring tools enabled. Use the measuring tools to measure distances and areas of objects in PDF documents. When you use a measuring tool, the measurement Info panel shows information about the measurement , such as current measurement , delta values, and scale ratio. A B C Measuring toolbar Object being measured measurement Info panel WMDC Planning Services 2 M e a s u r i n g a n d S c a l i n g f r o m E l e c t r o n i c P l a n s MEASURING TOOLBAR 1.
2 If you save the file and open it in Adobe reader you need to do the following: Choose Tools > Analysis > Measuring Tool. If you open the file in your browser from Public Access then you need to do the following: WMDC Planning Services 3 M e a s u r i n g a n d S c a l i n g f r o m E l e c t r o n i c P l a n s Right click on a blank part of the Adobe toolbar and select 'Analysis' to show the Analysis Toolbar, now click the to show the Measuring Toolbar WMDC Planning Services 4 M e a s u r i n g a n d S c a l i n g f r o m E l e c t r o n i c P l a n s 2. To measure areas of your PDF document, select any of the following measurement types: The tools are as follows: is the distance measuring tool. eg. for measuring the length of walls. Click the first point, move the pointer to the second point, and then click again. The Measurements appear in the measurement Info panel (C).
3 Is the perimeter measuring tool. eg. for measuring the distance around a building. Click each point you want to measure. Then, double-click the last point, or hold the pointer over the last point and click. The Measurements appear in the measurement Info panel (C) is the area measuring tool. eg. for measuring the area of a building. Click each point you want to measure. After you have clicked at least two points, click the first point to complete the area measurement . The Measurements appear in the measurement Info panel (C) 3. When you have the tool selected (distance, perimeter or area), you need to enter the scale ratio. The most commonly used scales on our plans are as follows: 1:50 set the scale to 1cm = 1:100 set the scale to 1cm = 1m 1:200 set the scale to 1cm = 2m 1:500 set the scale to 1cm = 5m 1:1000 set the scale to 1cm = 10m 1:1250 set the scale to 1cm = 1:2500 set the scale to 1cm = 25m When the above ratios are used, measuring your selected line or area and WMDC Planning Services 5 M e a s u r i n g a n d S c a l i n g f r o m E l e c t r o n i c P l a n s the distance/area will be displayed in metres.
4 All plans should have the scale clearly marked on them. 4. While measuring objects, do any of the following: As most of our documents are scanned, the snapping will not work, so you can ignore that part of the Measuring Toolbar (A). To constrain the measurement lines to increments of 45 , hold down the Shift key. To discontinue a measurement , right-click and choose Cancel measurement . To delete a measurement markup, click it with the measurement Tool and press Delete. MEASURING TOOL OPTIONS Use the right-click menu to set measuring tool options. Change Scale Ratio Change the Scaling ratio (such as 3:2) and unit of measurement on the drawing areas. Change Markup Label Add or change text that appears with the measurement . Disable/Enable measurement Markup When enabled, the measurement lines you draw are added to the PDF. When disabled, the measurement lines disappear when you measure another object or select another tool. Turn Ortho On/Off When enabled, measurement lines are orthographic only.
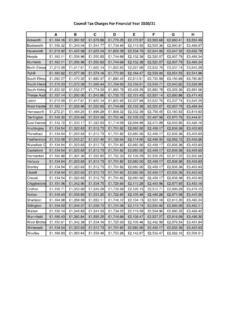
5 Show/Hide Rulers Show or hide vertical and horizontal rulers on the page. (Has the same effect as choosing View > Rulers.) Snap To Page Content/Don t Snap To Page Content Turn all Snap Enables on or off. Export measurement Markup To Excel Save the information for all the Measurements in your PDF to a CSV file. WMDC Planning Services 6 M e a s u r i n g a n d S c a l i n g f r o m E l e c t r o n i c P l a n s Scaling and Measurements Online Measurements can be added by toggling the set square icon on or off. Measurements are calculated relative to the resolution data supplied on the original image (which will have been generated by the scanner). The scale input box is available to enter a known scale or the scale ruler can be used to click to select two points on the image and specify a known measurement (for images which supply visual scale information). Measurements can be calculated in conjunction with all the zooming and rotation functionality to allow users to zoom in to select more accurate measurement points.
6 The accuracy of the Measurements will relate to the error of each pixel (+ - pixel), the accuracy of the scanning hardware and the accuracy of the original image. For display the Measurements are given to a precision dictated by the minimum error of the original image (+- pixel rounded to the nearest decimal precision). Areas are calculated by closing the last point to the first point. If lines intersect then the area calculation cannot be meaningful. Example of marking a measurement / area ( Measurements are denoted with red lines): Using the scale tool Select scale tool icon. When the mouse is then moved over the image, a note Choose start point will remain with the pointer. Clicking the left mouse button will define the start point which will be marked with a red cross. The note will then change to read Choose end point and clicking an area on the image will create the end point, which will join to the start point via a red line.
7 A pop-up dialog will then appear requesting the real distance between the two points: WMDC Planning Services 7 M e a s u r i n g a n d S c a l i n g f r o m E l e c t r o n i c P l a n s Enter a distance and the image scale will be altered accordingly so that subsequent Measurements will be accurate.