Transcription of Service Bulletin Bulletin No.: PI1354I Date: February, 2019
1 Bulletin No.: PI1354I . Service Bulletin date : february , 2019. PRELIMINARY INFORMATION. Subject: Information on Vibration Analysis and Diagnostic Models: 2014 Chevrolet Silverado 1500. 2015-2018 Chevrolet Silverado 1500. 2019 Chevrolet Silverado LD *. 2014 GMC Sierra 1500. 2015-2018 GMC Sierra 1500. 2019 GMC Sierra Limited *. EXCLUDES HD Trucks *Built at Oshawa Assembly Plant (11th VIN position 1 ) Attention:This PI also applies to any of the above models that may be North America Export to Middle East, Israel, Chile, Peru and Thailand vehicles. This PI has been revised to add the 2019 Model Year, and include Vibration Diagnostic Worksheet instructions. Please discard PI1354H. Training Available US Courseware Course Delivery Platform Course Description Length Noise, Vibration and Harshness (NVH) hrs Virtual Classroom Training (VCT). 1. Virtual Classroom Training (VCT) Noise, Vibration and Harshness (NVH) hrs Hands-On Training (est.)
2 Avl. December 2014) Noise, Vibration and Harshness (NVH) hrs Web-Based Training Noise, Vibration and Harshness (NVH) hrs PicoScope Noise, Vibration, and 15:05. Video On Demand (VOD) Harshness Diagnostics Overview minutes GMCC Courseware Web-Based Training Noise, Vibration and Harness . Virtual Classroom Training (VCT) Noise Vibration & Harshness - Session 1 . Virtual Classroom Training (VCT) Noise Vibration & Harshness - Session 2 . Vibration Diagnosis (2 day classroom Hands-On Training . training). PicoScope Noise, Vibration, and Video On Demand (VOD) . Harshness Diagnostics Overview - VOD. Condition/Concern Some customers may comment about a vibration at speeds of 56-72 km/h (35-45 mph) or 96-120 km/h (60-70 mph), which can be felt in either the seat or steering wheel. The purpose of this Bulletin is to outline the recommendations and procedures for diagnosing and repairing vibrations caused by wheel and tire, axle components and/or propeller shafts.
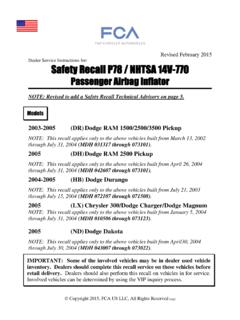
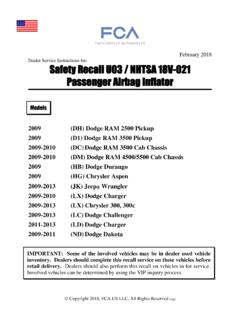
3 Recommendation/Instructions Important: The first step in determining the cause of the vibration is a test drive with the appropriate diagnostic equipment installed on the vehicle. If the correct tools and procedures are not followed, an incorrect diagnosis will result. Full Size Truck Vibration Analysis: 4002193. 1. Inspect the truck for any aftermarket equipment installations. For example: non factory tires, wheels and/or lift kits or leveling kits shims (1) installed as shown above. Aftermarket equipment does include running boards, bug deflectors, and window shades, etc. Remove any aftermarket that might cause vibration transmission paths. 2. Mark each tire valve stems location on the tire. This will be utilized to check for tire slippage on the rim. 4002206. 3. Using a Pico Oscilloscope Diagnostic Kit, mount the PicoScope vibration sensor on one of the two locations shown above.
4 Note: Only the use of the Pico Oscilloscope Diagnostic Kit with NVH should be utilized, available from GM Dealer equipment (P/N 733 CH-51450). Previous vibrations tools are NOT recommended due to the types and frequencies producing these vibrations. Seat Vibration mount the sensor to the front right corner of the driver's seat bracket (1). Steering Wheel Vibration mount the sensor to the steering wheel bracket (2) under dash. Note: In some cases, moving the sensor from a vertical position to a horizontal position may indicate higher amplitude and may be beneficial to help in diagnosis. 4002212. 4. This step should be only be used if the vibration can be felt while running the vehicle on the rack. Mount the sensor on the steering shaft (1), under the hood as illustrated above. 5. Measure the vibration. Typically trucks should be driven in M5 for 6 speed applications and M7 for 8 speed applications to keep the engine from switching in and out of active fuel management (AFM).
5 Note: At the bottom of this Bulletin is a required Vibration Diagnostic Worksheet that MUST be completed and is required for the claim payment. Vibration Diagnostic must be retained by the dealership. This worksheet is required to be filled out before calling TAC. 6. After the road test, verify that the tires have not slipped on the rim (step #2). If slippage has been found, correct the condition prior to any other repair. Refer to the latest version of Corporate Bulletin Number 12-03-10-001: Vibration Shortly After Tires are Mounted/Preventing Vibration from Wheel Slip (Tire Sliding on Wheel). 7. Once the condition has been duplicated on a test drive and the vibration readings have been recorded, bring the vehicle back into the shop and test the vehicle on four jack stands or a suitable hoist. The hoist must support the suspension at the same trim heights as the vehicle would normally sit on the road.
6 8. With the vehicle properly supported, bring the speed up to the complaint speed and verify that the previously recorded vibration data matches current vibration data being displayed. 9. The test should be performed in both 2 wheel drive and 4 wheel drive, if equipped. If vibration can be duplicated on the rack, the test should be performed a second time with the wheels and tire assemblies removed from the vehicle and the wheel nuts installed to retain the brake discs and/or brake drums. If the vibration has been eliminated with the wheel and tire assemblies removed, focus on the wheel and tire assemblies as the source of the vibration. If the vibration is still present, focus on the vehicle driveline as the source of the vibration. Additional Notes for Testing Phasing is typical on these trucks. Test drives should include many turns that can prevent phasing. Same test should be conducted after dealer correction to ensure vibration is eliminated throughout the entire test repair phase.
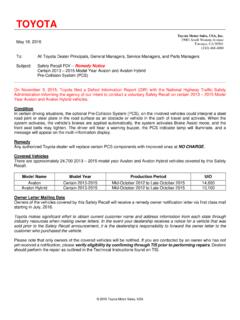
7 Use the chart below to determine which type of vibration the truck has and what repair procedure should be utilized. Type of Vibration Go to Condition 1st Order Tire 1. 1st Order Prop Shaft 2. 2nd Order Prop Shaft 3. 3rd Order Tire Combined with 1st Order Prop 4. Vibration Felt in 4 cylinder mode (AFM) . 5. V6 Engine Only Vibration Felt at Idle Only 6*. *For rough idle and/or vibration at idle in gear 17 NA-166: Rough Idle. *For vibration related to AFM in 4 cylinder mode refer to PIP5228: Vibration During Active Fuel Management V4 Mode Operation 1200 1400 Engine RPM. Important: Prior to any Road Force Balancing done with the Hunter 9700, please make sure that the wheel assemblies pass the centering test, which is performed using the Hunter 9700 machine. Condition 1: 1st Order Tire Suggestions (Freq 11-14 hz at 60 mph or 97 km/h). Measurements Refer to Bulletin Number 17-NA-170: Information on Hunter Road Force Balancer.
8 1. Remove the tire and wheel assemblies from the vehicle and perform the Road Force Variation (RFV). measurement. Important: Prior to taking any measurements, the assemblies MUST all pass a center check. 2. Document the before and after Road Force Variation (RFV) numbers on the vibration worksheet located at the end of this Bulletin . Road Force Specifications P-Metric tires on passenger cars 15 lbs ( kg) or less P-Metric tires on light trucks 15 lbs ( kg) or less LT - tires on light trucks 15 lbs ( kg) or less Note: These numbers are lower than what is currently published in Service information as some vehicles react to parts that are near the high limit. These numbers SHOULD NOT be used if you do not have a tire speed related disturbance. Repair: For any assembly that has an out of balance condition (greater than oz), remove the weights and correct the condition utilizing normal balancing techniques.
9 For any assembly having Radial Force Variation (RFV) measurements beyond the specification above, should be corrected utilizing the Hunter 180 Match Mount Process (See Hunter 180 Match Mount process below) prior to tire replacement. If this does not bring the assembly within specification, the tire should be replaced. The existing vectoring process cannot be utilized on Full size truck rims (except steel wheels) due to the removal of the out-board flange on the wheel which was utilized for the outboard rim runout measurement. Without this surface, an inaccurate rim runout measurement would exist and negatively affect the vectoring calculation. Additional Notes on Balancing: Always perform a centering check. The Hunter Balancer/Road Force Balancer should not be set to Smart Weight.. All tires need to be balanced under oz (both static and dynamic). In many cases, it may be helpful to add weight to only one plane at a time.
10 When using the Hunter Balancer/Road Force Balancer, removal and remounting to the tire balancer should be performed to re-check balance and verify that results are repeatable to oz or less. Anytime a tire is removed from the wheel, the bare wheel should be mounted back on the vehicle and a runout check be performed on-vehicle. This process not only checks the wheel but also all mounting surfaces and suspension components that may effect runout. Important: When replacing tires, the road force should be checked before a test drive and after a test drive (min of 10-15 miles or 16-24 km). Road force on new tires will change dramatically after being warmed up (as much as a 20 lb reduction). After the test drive, the tire's road force should be checked. If acceptable RFV cannot be achieved, first try vectoring the tire on the rim before an alternate tire is utilized. Also refer to the Information in the latest version of Corporate Bulletin Number 13-03-10-002: Diagnostic Tips for Difficult to Resolve Tire/Wheel Vibration Concerns.