Transcription of Steam Sterilization per ANSI/AAMI ST79 Standard …
1 Cleaning and Sterilization of the Implant Removal Kitand InstrumentsSurgical instruments and instrument cases are susceptible to damage for a variety of reasons, including prolonged use, misuse, and rough or improper handling. Care must be taken to avoid compromising their performance. To maintain the quality of surgical instruments, a standardized cleaning and Sterilization protocol should be recommended cleaning and Sterilization procedures in this document apply to the Implant Removal Kit and the instruments housed and Precautions DO NOT place used instruments back into the tray prior to proper cleaning per the following procedure (Steps 1-7). Unless otherwise indicated, instrument kits are NOT sterile and must be thoroughly cleaned and sterilized prior to use.
2 Instruments should NOT be flash-autoclaved inside the instrument case. Flash-autoclaving of individual instruments should be avoided. Unwrapped instrument cases DO NOT maintain sterility. The following procedures DO NOT apply to powered instrumentation. For the Torque (TW80400 and FRCHT) Indicating Ratchet Wrench, disassembly is Procedures for Cleaning and Sterilization of Implant Removal Instruments and KitMaterials Required For ProceduresSolutions Neutral-pH detergent, or specialized cleaning solution Proteolytic enzyme detergent Ethyl alcohol (Ethanol); do not use rubbing alcohol (isopropyl alcohol) Tap water Distilled water Tools PPE: Personal Protective Equipment (gloves, goggles, apron, etc.) Glass beakers Soft bristled brushes of various sizes Thin wire brush Autoclave-approved paper or bagsEquipment Ultrasonic cleaning unit Steam autoclave Step-By-Step InstructionsCleaning of Instruments Note: Individuals who clean surgical instruments need to wear appropriate personal protective equipment.
3 1. Following completion of a clinical surgical procedure, gather all instruments, prepare a solution for soaking using tap water (tepid or lukewarm) and a neutral-pH detergent at a dilution recommended by the detergent manufacturer. Place instruments in a single layer at the bottom of a glass beaker containing the dilute solution. Soak the instruments for at least ten (10) minutes. Note: It is important to clean instruments as soon as possible; if immediate cleaning is not possible, continue to soak the instruments to prevent blood from drying on the Rinse with running tap water for a minimum of two (2) minutes while brushing exteriors of items individually with a soft bristled brush to remove visible debris; clean interior lumens of specified instruments with small Using a clean beaker, prepare a solution for ultrasonic cleaning using distilled water with a specialized enzymatic detergent per the detergent manufacturer s Place all instruments in a single layer into the beaker of solution.
4 Place the beaker containing the instruments into the ultrasonic bath and turn on for five (5) Remove each instrument and repeat the scrubbing procedure; ream lumens of instruments having interior canals. 6. Rinse by flushing instruments for one (1) minute with a steady stream of running tap water. Note: This step is important to prevent spotting. 7. Inspect each instrument visually and check for cleanliness, any remaining bone fragments, visible soil or residual debris, and for visible damage and/or wear. Repeat the scrubbing procedure as necessary. Set aside the instruments specific to the Implant Removal Kit for of Implant Removal Kit8. Detach the insert from the Implant Removal Tray. Scrub all surfaces of the tray and the insert with mild soap using a soft bristled brush.
5 9. Rinse both pieces with running tap water for a minimum of two (2) minutes and inspect surfaces for Re-assemble the kit by placing the insert back into the tray and replacing the cleansed instruments into specified Kit for Sterilizer11. Pour ethyl alcohol over the Implant Removal Tray, the lid, and onto the instruments to rinse and remove residual soap and water minerals. Allow the instruments to dry before Close the surgical kit and wrap it with autoclave paper twice, or place it within two (2) autoclave-approved bags. Distributed by:IMPLANTREMOVAL KITI nstructions for Use Branemark System, NobelActive, NobelReplace and NobelSpeedy are registered trademarks of Nobel Biocare. Nobel Biocare is a registered trademark of Nobel Biocare Services AG. Straumann is a registered trademark of Straumann Holding AG.
6 Astra Tech and Osseospeed are trademarks of is a tradmark of NEOBIOTECH CO., is a registered trademark and Providing Solutions - One Patient At A Time and design are trademarks of BIOMET 3i LLC. BIOMET 3i and design are trademarks of BIOMET, Inc. 2014 BIOMET 3i LLC. All rights instruments and toolsto remove an implant 4555 Riverside DrivePalm Beach Gardens, FL 334101-800-342-5454 Outside The : +1-561-776-6700 Fax: + e-space # 103, 104-1, 104-2, 105, 106, 205, 212, 312, 509, 510, 511,10F, 36, 27 Gil, Digital-ro, Guro-gu,SEOUL,152-789 Rep. of KoreaTel.: 82-2-582-2885 Fax: Made in Korea Distributed by:Manufactured by: USER GUIDES team Sterilization per ANSI/AAMI st79 Standard *13. GRAVITY DISPLACEMENT STERILIZER (FULL CYCLE)The exposure time is a minimum of fifteen (15) minutes at a temperature of 270 275 F (132-135 C).
7 Or PRE-VACUUMED STERILIZER (HI-VAC)The exposure time is a minimum of four (4) minutes, four (4) pulses at a temperature of 270 275 F (132-135 C).14. Post- Sterilization drying time is a minimum of thirty (30) Instruments should be dried completely and stored in a moisture-free environment. Failure to do so may result in stainless steel corrosion or Prior to use, the exterior of each sterilized package should be inspected for integrity. If a package is suspect, it should not be used and should be reprocessed as per the above Sterilization Shelf life and sterility of wrapped instrument cases are dependent on storage in a manner to avoid extreme temperature, moisture and/or other contamination. Care must be exercised in the handling of wrapped cases to prevent damage to the sterile barrier.
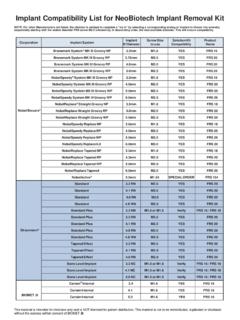
8 The probability of an occurrence of contamination increases over time, with handling, and based on the packaging method.* The recommended Sterilization procedures have been validated with the Implant Removal 3i cannot control individual clinic handling procedures, cleaning methods, bioburden levels and other conditions, and therefore assumes no responsibility for Sterilization of product by the user, even when the recommended guidelines above are material is intended for clinicians and the BIOMET 3i Sales Force only. The distribution to any other recipient is prohibited. This publication must not be used, copied or reproduced in whole or in part without the express written consent of BIOMET 3i or its authorized representatives. Implant system Recommended FRS screw sizeManufacturer: NOBEL BIOCARE Branemark System MK lll Groovy NP System MK lll Groovy RP System MK lll Groovy RP System MK lll Groovy WP System MK lll Groovy NP System MK lll Groovy RP System MK lll Groovy WP System MK lll Groovy WP Straight Groovy NP Straight Groovy RP Straight Groovy WP Replace NP Replace RP Replace WP Replace Tapered NP Tapered RP Tapered WP Tapered.
9 STRAUMANN Standard RN RN RN WN Standard Plus NN or TRY INStandard Plus RN Plus RN Plus RN Plus WN Effect RN Effect RN Effect RN Level Implant NC or TRY IN Bone Level Implant NC or TRY IN Bone Level Implant NC or TRY IN Implant system Recommended FRS screw sizeCompatibility List for IMPLANT REMOVAL KITM anufacturer: BIOMET 3iCertain Internal or TRY IN Certain Internal or TRY INCertain Internal or TRY IN Certain Internal or TRY IN External : ASTRA TECH OsseoSpeed OsseoSpeed : For other Manufacturers not listed, the clinician is advised to complete a "try in" by selecting a corresponding analog or implant to thread into whereby sequentially starting with the widest diameter FRS screw followed by, in descending order, the next available diameter.
10 This will ensure more information,please visit contact your local BIOMET 3iSales additional languages, please visit (IRK: REV. 21 / 02-14)SymbolsUsed forCatalog numberBatch codeDate of manufactureConsult Instructions for UseNon-SterileManufacturerCaution: Law prohibits dispensing without prescriptionRx OnlyCleaning and Sterilization of the Implant Removal Kitand InstrumentsSurgical instruments and instrument cases are susceptible to damage for a variety of reasons, including prolonged use, misuse, and rough or improper handling. Care must be taken to avoid compromising their performance. To maintain the quality of surgical instruments, a standardized cleaning and Sterilization protocol should be recommended cleaning and Sterilization procedures in this document apply to the Implant Removal Kit and the instruments housed and Precautions DO NOT place used instruments back into the tray prior to proper cleaning per the following procedure (Steps 1-7).