Transcription of STEP BY STEP ILLUSTRATED INSTRUCTIONS
1 STEP BY STEP ILLUSTRATED INSTRUCTIONSREAD COMPLETE INSTRUCTIONS BEFORE INSTALLING YOUR SINGLE HANDLE WASHERLESS TUB/SHOWER VALVEMODEL 85110 SBS: Knob HandleMODEL 85410 SBS: Lever HandleLeave this instruction sheet with installed faucet and writepurchased model number here for future reference!277872778727787277872778727787 2778727787277872778727787277871 Limited WarrantyAll parts of this Delta SBS product are warranted to the original consumer purchaser to be free from defects in material and workmanship for a periodof five (5) years from date of purchase as shown on purchasers receipt. MASCO PLUMBING PRODUCTS DIVISION will replace, FREE OF CHARGE, during the warranty period, any part which proves defective in materialand/or workmanship under normal installation, use, and service.
2 Replacement parts can be obtained from your dealer or by returning the part to ourfactory. TRANSPORTATION CHARGES PREPAID, at the address listed on back. THIS WARRANTY IS THE EXCLUSIVE WARRANTY GRANTED BY MASCO PLUMBING PRODUCTS DIVISIONAND IS IN LIEU OF ALL OTHER WARRANTIES INCLUDING THE IMPLIED WARRANTIES OF MERCHANTABILITY AND FITNESS FOR A PARTICULAR PURPOSE AND IS FURTHER LIMITED TO DEFECTIVE PARTS REPLACEMENT ONLY. LABORCHARGES AND/OR DAMAGE INCURRED IN INSTALLATION, REPAIR, OR REPLACEMENT AS WELL AS INCIDENTAL AND CONSEQUENTIAL DAMAGESCONNECTED THEREWITH ARE EXCLUDED AND WILL NOT BE PAID BYMASCO PLUMBING PRODUCTS DIVISION. Some states do not allow the exclusion or limitation of incidental or consequential damages, so the above limitation or exclusion may not apply to damage to this faucet as a result of misuse, abuse, neglect, accident, improper installation, any use violative of INSTRUCTIONS furnished by us, or anyuse of replacement parts other than genuine Deltaparts WILL VOID THE WARRANTY.
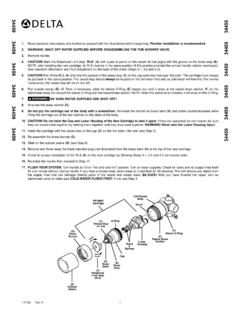
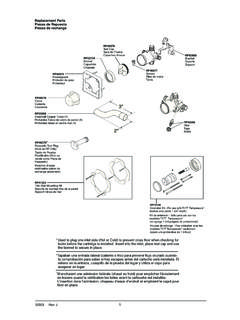
3 The Delta SBS products shown here are protected by one or more of the following Patents: 4,043,359, 3,786,995,4,562,960, 4,593,430, 4,089,347, 4,218,785, 4,696,322, 4,765,365. More patents are pending. 4/23 & SpringsRP212 Ball Assembly (Knob Handle)RP188 Cam & Packing(Knob Handle)RP50 Cap w/Adjusting RingRP250 Adjusting RingRP16919 Handle w/Button and ScrewRP16920 ButtonRP6369 ScrewRP50 Cap w/Adjusting RingRP250 Adjusting RingRP5883 EscutcheonRP90 Handle w/Set ScrewRP152 Set ScrewRP196 ScrewsRP5893 SleeveRP61 Cam & Packing (Lever Handle)RP70 Ball Assembly(Lever Handle)RP76 Pipe PlugRP4993 Seats & SpringsRP1974 Wrench (Accessory Order Only)Plasterguard UPCUL Listed to US and CanadianSafety Standards21 PLINSTALLATION STEPSIMPORTANT:USE TEFLON TAPE ON ALL THREADED CONNECTIONSB efore you start, study the recommended valve configurations on stringers or framing.
4 (A) Tub and Shower, (B) Tub Only, (C) Shower threaded parts in the valve body are 1/2" ( ) iron pipe size. With proper adapters, you can connect to valve. See options on page 3. If you are making tub installation only, plug top outlet of valve (refer to illustration B). If you are makingshower installation only, plug bottom outlet of valve (refer to illustration C). Connect hot and cold supply lines to left and right inlets in valve body. Left inlet is hot and right inletis cold. (Iron pipe connections are shown; copper pipe may be used with adapters.) : After connections have been made (remove showerhead on shower only models), placehandle on valve stem and turn handle to full on mixed position. Turn on water supplies, check forleaks and let lines flush for one minute without moving valve handle.
5 This will remove debris from linewhich can damage internal parts of valve and create leaks. After flushing shut off water at handle and attach escutcheon with screws provided. Replace handle. Attach showerhead toshower you are installing a model with showerhead, connect top outlet to shower arm with proper fittings. Toprevent damage to finish on shower arm, insert wall end of shower arm into shower arm flange beforescrewing arm into riser connection. Adjust you are installing a model with tub spout, piping between valve body and tub spout must be a minimum of 5/8" copper pipe or 1/2" iron pipe in a straight drop no more than 18" long with onlyone iron pipe or copper 90 degree elbow to the spout nipple. Pipe PlugWall FlangeShower ArmRiser " ( ) Min.
6 DiameterValve AssemblyValve SleeveDiverter SleeveScrewScrewValve SleeveDiverter SleeveMounting BracketValve AssemblyScrewsValve AssemblyAccess HoleEscutcheonEnclosureFingers UpMounting BracketValve AssemblyDiverter SleevePlasterguardMounting : MOUNTING BRACKET CAN BE REMOVEDFOR CUTTING SMALLER HOLE IN FINISHED hold of the mounting bracket by placing bothhands at the sides as shown above. Gently pull themounting bracket from the plasterguard, snaps will disengage the two parts. Discard mounting bracket. or cut diverter sleeve from plasterguard and discard. Finished wall can be cut to a 3" ( )minimum Break or cut valve sleeve and diverter sleeve from mounting bracket. Remove screw that attaches the mounting bracket to valve and mounting bracket for valve roughing valve rough in has been completed, slide mount-ing bracket over valve with the two protruding fingerson the top section of the mounting bracket as shownand leave in place.
7 Cut access hole in enclosure (5"maximum diameter), and install enclosure. Mountescutcheon by securing finished screws throughescutcheon, access hole, and adapter to CONVENTIONALINSTALLATIONINSTRUCTIONSMOUN TING BRACKET INSTRUCTIONS FOR FIBERGLASS, METALAND PLASTICENCLOSURES 1/8" TO 7/8" THICKV alve AssemblyPlasterguardDiverter SleeveROUTINE MAINTENANCEIMPORTANT: AFTER ANY MAINTENANCE BE SURE TO REMOVE AERATOR AND FLUSH BOTH HOT AND COLD LINES FOR ONE MINUTE. Your new Delta SBS faucet is designed and engineered in accordance with the highest quality and performance standards. With proper care, it will give youyears of trouble-free service. Care should be given to the cleaning of this product. Although its finish is extremely durable, it can be damaged by harsh abrasives or polish.
8 To clean, simply wipe gently with a damp cloth and blot dry with a soft towel. WARNING:DOW BATHROOM CLEANER WITH SCRUBBING BUBBLES AND lysol FOAMINGBASIN TUB AND TILE CLEANERMUST NOT BE USED ON THE CLEAR KNOB HANDLES ANDLEVERS. USE OF THESE CLEANERS CAN RESULT IN CRACKED OR SEVERELY DAMAGEDHANDLES. IF OVERSPRAY GETS ONTO THE HANDLES, IMMEDIATELY WIPE THEM DRYWITH A SOFT COTTON :55 E. 111th Box 40980 Indianapolis, Indiana 46280317/848-18124IF FAUCET LEAKS FROM UNDER NOT SHUT OFF WATER wrench (Accessory Order Only), tighten adjusting ring until water no longer leaks around stem of ball when faucet is on and pressure is exerted to force ball into FAUCET LEAKS FROM TUB SPOUT/SHOWERHEAD Replace Seats andSprings, Repair Kit OFF WATER cap assembly and lift out ball and cam assembly by pulling up on old seats and springs.
9 NOTE:Refer to insert for proper seat and springinstallation. Reassemble faucet in reverse LEAK PERSISTS Replace Ball Assembly, Repair Kit RP70 or OFF WATER cap assembly and lift out ball and cam assembly by pulling up on packing then cam on new ball and insert into socket. Reinstall cap and HINT:1. Using wrench (Accessory Order Only), partially unscrew adjusting ring beforeattempting to remove cap assembly. Always install cap assembly HAND TIGHT,then tighten adjusting HINTS:1. Never tighten cap assembly to stop a leak; always tighten adjusting AND Delta SBS washerless faucet will give you years of trouble-free perfor-mance. When maintenance is eventually called for it s a quick clean job with oneof the inexpensive Delta repair kits available where you bought your faucet.
10 Thereplacement parts in these kits will restore your faucet to the same condition asthe day you bought it. The Delta SBS 5 year limited warranty on valve mechanism and chrome platedparts is made possible by superior design, quality parts and careful workmanshipin manufacturing. Should you ever need replacement parts that are not includedin the regular parts kits that are available where you purchased your faucet, simply write to: MASCO PLUMBING PRODUCTS DIVISIONC ustomer Service, 55 Street, Indianapolis Indiana 46280.