Transcription of SUBARU OF AMERICA initial - techinfo.subaru.com
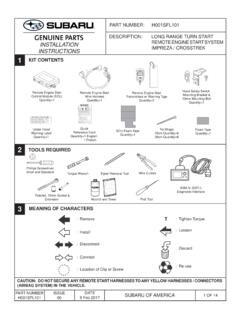
1 PART NUMBER: F501 SXC000A. Sunshade Assembly - Drivers SideB. Sunshade Assembly - Passeneger SideIMPORTANT:1. The installation should be carried out by an authorized SUBARU Pay special attention not to damage vehicle components when removing/installing Route the wiring so that it does not rub against any sharp screwdriverTrim Removal ToolMeaning of Characters:3/27/20181 / 6 Second Row Sunshade- 2019 AscentKit Contents:Tools Required:VERSIONDATESUBARU OF AMERICAPAGE initialPART NUMBER: Second Row Sunshade3: Use your fingers to pry on the top side of this plastic panel and pull it off (Note the clip locations)2: Remove the cover and screw that is located in the handle of the door1.
2 Disconnect Battery. To remove the door panel start by using the trim removal tool to pop open the plastic cover and remove the screw that is behind the door OF AMERICAPAGE initial3/27/20182/64: Pull on door trim by grabbing recess area along inside of door. PART NUMBER: Second Row Sunshade6: First remove the door latch and door lock cables5: Grab the panel and pull out and lift up gently to release the door panel from the doorVERSIONDATESUBARU OF AMERICAPAGE initial3/27/20183/63/27/20184/68: Unplug the connector located on the door panel9: Place the door panel on a soft flat working surfaceVERSIONDATESUBARU OF AMERICAPAGE initialPART NUMBER: Second Row Sunshade7: Unplug the connector that plugs into the doorand NUMBER: Second Row Sunshade3/27/20185/610: Remove the 7 screws holding the trim piece on11.
3 Undo the 7 clips holding the trim panel on by gently releasing the clip and pulling up on the : Completely remove the trim VERSIONDATESUBARU OF AMERICAPAGE initialPART NUMBER: Second Row Sunshade3/27/20186/613: Place sunshade assembly in the door panel. Re-install the previously removed 7 screws. (Note the pull tab needs to be placed over the door panel, as shown)Torque screws to 5 in-lbs. 14: Follow same steps in reverse order to reinstall door trim back on to door. Repeat install for opposite OF AMERICAPAGE initialNUM RO DE PI CE : F501 SXC000A. cran solaire C t conducteurB. cran solaire C t passagerIMPORTANT :1.
4 L'installation doit tre effectu e par un concessionnaire SUBARU autoris .2. Prenez grand soin de ne pas endommager les composants du v hicule lors de la d pose et de la Acheminez le c blage de fa on vous assurer qu'il ne frotte pas contre des rebords PhillipsOutil de finitionSignification des symboles : cran solaire de la deuxi me rang e Ascent 2019 Contenu de la trousse :Outils requis :VERSIONDATESUBARU OF AMERICAPAGEI nitiale3/27/20187 de 122 : Retirer le couvercle et la vis situ e dans la poign e de la RO DE PI CE : cran solaire de la deuxi me rang e1 : D connectez la batterie. Pour retirer le panneau de porte, utilisez un outil de d pose de garniture pour ouvrir le couvercle en plastique et retirez la vis derri re le verrou de la : Utilisez vos doigts pour soulever la partie sup rieure du panneau en plastique et le retirer (prenez note des emplacements des attaches).
5 VERSIONDATESUBARU OF AMERICAPAGEI nitiale3/27/20188/125 : Prenez le panneau et tirez-le vers l'avant et vers le haut d licatement pour d gager le panneau de la RO DE PI CE : cran solaire de la deuxi me rang e4 : Tirez sur la garniture de porte en agrippant les renfoncements le long de la porte. 6 : Retirez d'abord le verrou de porte ainsi que les c bles du m canisme de verrouillage de la OF AMERICAPAGEI nitiale3/27/20189/12 NUM RO DE PI CE : cran solaire de la deuxi me rang e7 : D branchez le connecteur branch la : D branchez le connecteur situ sur le panneau de la : Placez le panneau de la porte plat sur une surface de travail OF AMERICAPAGEI nitiale11 : D tachez les sept attaches maintenant le panneau de garniture en place en d gageant d licatement les attaches et tirant sur la RO DE PI CE : cran solaire de la deuxi me rang e10.
6 Retirez les sept vis tenant la garniture en : Retirez compl tement la garniture et mettez-la au OF AMERICAPAGEI nitiale3/27/201811/12 NUM RO DE PI CE : cran solaire de la deuxi me rang e13 : Placez l' cran solaire dans le panneau de porte. Reposez les sept vis retir es pr c demment. (Prenez note que les languettes de tirage doivent tre plac es sur le panneau de porte, comme illustr ) Serrez les vis 5 po-lb. 14 : Suivez les tapes dans l'ordre inverse pour r installer la garniture de la porte. R p tez l'installation pour le c t oppos .VERSIONDATESUBARU OF AMERICAPAGEI nitiale3/27/201812/12