Transcription of Sublimation Instructions and Tips
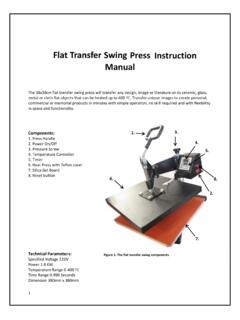
1 - 1 - DDDyyyeee SSSuuubbbllliiimmmaaatttiiiooonnn Transfer Instructions Revised date 26 April 2004 These are revised Instructions created after talking to many people including customers, suppliers and industry dye- Sublimation professionals. Normal copyright protection applies. These Instructions cannot be copied or reproduced in any way whatsoever without the express permission of Power Digital Sign Systems. Please see end of document for different time suggestions for the new PowerLife Asian inks and the Sawgrass XL and IQ inks as these Instructions are based on the standard Sawgrass SubliJet ink. Table of Contents Description Page Number General Instruction 2 Tips and Techniques 2 & 3 UltraCoat Metal 4 FR Plastic Bag Tags, Name Badges, etc. 4 Unisub wood- Hardboard 4 Ready Signs MDF 4 SubliMates Adhesive plastic film 5 MagMates 5 Beer Steins 5 Coffee Mugs 5 Ceramic Tiles 6 Sublimation T Shirts 6 Polyester Fabric 6 Mouse Mats 6 Stubby Coolers 6 Pocket Patches 6 Sublimation Banners 6 Table/Counter mats 7 Sublimation Jewellery 7 Ceramic Plates with Plate Puck 7 Sublimation Jigsaw Puzzles 7 PowerLife ink times and temperatures 8 Sawgrass XL ink times and temperatures 8 Sawgrass IQ ink times and temperatures 8 Temperature conversion Table General Instructions 1.
2 Print the transfer using the PowerDriver Pro settings listed. 2. Set the correct Time, Temperature and Pressure. 3. Cover the press with protective paper, preferably a Teflon heat mat. 4. Remove the plastic coating from substrate. 5. Tape (if necessary) transfer paper to substrate using heat Tape. 6. Place in press face up. 7. Press with Temp/Time/Pressure settings. Level 4, 193 Clarence Street PO Box 655, QVB Post Shop Sydney NSW 1230 Australia Ph: +61 2 9299 4870 Fax: +61 2 9290 3218 Web site: e-mail: - 2 -General Instructions and Tips All images should be printed onto the transfer paper in mirror image either using the appropriate driver with application software such as Corel Draw, Illustrator or PhotoShop. The printed transfer paper is taped to the job using heatproof tape. When taping the job down try to ensure that the heatproof tape does not encroach over the print area as this could cause a lighter patch where the tape is on the image.
3 In a flat press the job should be placed on the Teflon mat with the transfer paper facing up towards the heated press platen. The job is then pressed at the recommended temperature, time and pressure. The press should be opened gently so as not to cause a vacuum and lift the paper causing ghosting and streaking. The following is a guide and times and temperatures may vary depending on your press and inks and size of substrate. For tips on getting the best results and trying different variations please refer to Tips and Techniques below. Tips and Techniques Transfer Paper: We recommend Accuplot Sublimation paper. If you look closely, you will notice that one side of the paper is brighter than the other. Print your transfer on the brighter white side. Store the transfer paper in its original black packaging. If the transfer paper is exposed to light for an extended period of time it can fade and damage the paper, affecting the quality of the transfer.
4 Printing the Transfer: No matter which Epson printer you use, it is always best to do a nozzle check each time you turn the printer on. Use a piece of normal copying paper (not Sublimation paper). Place it in your printer and using the PowerDriver program perform a nozzle check. If you experience a bad nozzle check then you may need to proceed with a clean (select Nozzle Clean on your PowerDriver program). Print the nozzle check again. If you are still experiencing a bad nozzle check then repeat the process until you achieve good results. If a colour is missing after several cleans and nozzle checks, you may need to replace the cartridge. Protecting Your Press: To make the alignment of the substrate to a full-bleed transfer easier, it is recommended that you make the transfer slightly larger than the substrate. For example, if you are pressing a 76 x 25mm name plate, make your transfer 78 x 27mm.
5 This will create a border to which you can align your substrate. While this makes the alignment easier and allows for full colour coverage, it also poses a problem. When pressed, the ink that does not touch the substrate will still heat up, and must go somewhere. If you don t use some type of protection, it will go directly into the pad of your press. Everytime you press, thereafter, the ink will heat up and transfer onto whatever is above it. To avoid this we recommend you use a Teflon heat mat. Teflon Mats: It is recommended that a Teflon mat be used under the job, on the base of the press. This protects the rubber mat on the press and makes it a lot easier to clean up any residue from ink or adhesives. This is especially important when sublimating double sided FR plastic. Double-sided Substrates: It is essential that you use a Teflon mat. Sublimate one side as normal.
6 Let it cool. To do the other side, line up the substrate with the transfer. Cut a strip of paper and tape to either side of the transfer making sure you do not tape the substrate. Do not tape over the transfer image otherwise you may experience fading where the tape is placed. - 3 -Moisture: Moisture in the paper will usually cause a milky colour in the solid colour areas and blurring. Absorbent backing paper is recommended when sublimating some products to reduce the problems associated with moisture. This can be light cloth or non-ribbed paper towel. It absorbs moisture that might be in the paper. This is placed on top of the job after it is placed on the press. Another suggestion is to place the transfer on the warmed base of the press for 20 seconds to remove any excess moisture. Note you should always wait for the ink to dry properly before transferring to the substrate. Larger areas: For large areas such as an A4 size Ultracoat metal plaque or Unisub wood clipboard you must ensure that the transfer paper is secured tightly with tape.
7 While with most jobs it is advisable to get the transfer paper off the job fairly quickly but we have found that with the two items mentioned above, that letting it cool for about 20 seconds prior to removing the paper helps greatly. While this could change colours very slightly it ensures the Sublimation dyes are not still in a gaseous state while the paper is being removed thus preventing flaring of solid colours. With wetsuit-rubber type products it is essential to get the paper transfer off as quickly as possible. As rubber expands with heat , when the press is raised the expansion can cause ghosting of images and text. Times and Temperature variations: A temperature of 2000C is recommended for most products. Generally use moderate to heavy pressure - it should require some effort to close your heat press. Time and temperature may vary depending on your heat press and the thickness of the blank material.
8 Dwell times can be increased or reduced in 5-15 second increments until you find the duration that results in the clearest image. Temperature variations should be made in 5 to 10 degree increments. It is most unlikely that the temperature would need to be increase above 200O C. All times shown for face-up Sublimation transfer on top of the substrate. When testing different times and temperatures open the press and lift a corner of the transfer ensuring that you do not move the transfer, if the results are not what is expected the press can be closed again for the desired time. Colour Information: Most Sublimation takes place at around 200O C. One of the issues with Sublimation is the different coloured inks start and stop sublimating at different temperatures. We have seen customers, well experienced in dye- Sublimation of fabric, being able to adjust precise colours by varying the pressing heat and time.
9 These Instructions are a guide for the standard Sawgrass SubliJet inks. For the Power Life or Sawgrass XL range of inks see extended transfer times above. Storing finished products: Special care must be taken when storing or packaging finished sublimated products. If sublimated pieces are placed in direct contact with other sublimatable materials or with any type of synthetic material, the inks will migrate from the sublimated piece to the synthetic material over time. Do not stack finished pieces face-to-face, either when hot or cold. Do not wrap finished pieces in shrink wrap or place them in plastic bags for shipping. We recommend that you use a paper sheet between stacked items, or wrap pieces in paper for shipping. Outdoor Durability: While many of these sublimatable products feature UV absorbers to extend outdoor life, they are not generally intended for permanent outdoor use. Fading will occur over time depending on the brand of Sublimation ink used and outdoor environment.
10 Laboratory research has shown that using a longer dwell time can extend out door life. This allows the Sublimation inks to penetrate the sublimatable coating to the maximum extent possible. However, some fine image detail may be lost as a result of the longer dwell time. UV durability is increasing as ink and substrate development continues. Contact us for the latest information. - 4 -UltraCoat Metal Substrate PowerDriver PRO Temp Time Pressure Metal Metal (Colour) 200 C 35-45 seconds Low/Medium** Additional information ** We have found that on the white and mirror metal, the pressure should be kept to an absolute minimum to stop any paper background residue appearing on the job. Use absorbent backing behind. Ensure that the protective plastic coating is removed prior to taping down the job.