Transcription of Surface Finish Charts - Ken Otzel
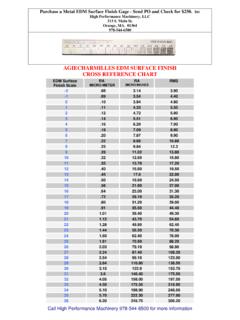
1 AGIECHARMILLES EDM Surface Finish CROSS REFERENCE chart AGIE CHARMILLES EDM Finish Scale RA - MICRO-METER RA -MICRO INCHES RMS -2 .08 -1 .09 0 .10 1 .11 2 .12 3 .14 4 .16 5 .18 6 .20 7 .22 8 .25 9 .28 10 .32 11 .35 12 .40 13 .45 14 .50 15 .56 16 .64 17 .72 18 .80 19 .91 20 21 22 23 24 25 26 27 28 29 30 31 32 33 34 35 36 Call High Performance Machinery 978-544-6500 for more information Surface Finishes Measurement of Surface finishes is done with instruments called profilometers. Experience proves that measurement of Surface finishes by comparison using a Surface Finish gauge does not give an error above 2 CH classes. The criteria of roughness are the Ra (Europe) CLA (UK) AA (USA) To obtain a grading of roughness, Charmilles has defined a CH scale, which is however cross referenced with the standards that are in common use.
2 VDI 3400 Ra = CLA = AA class AGIE CHARMILLES m inch ISO 1302 0 0,10 4,0 N3 1 0,11 4,4 2 0,12 4,8 3 0,14 5,0 4 0,16 6,4 5 0,18 7,2 6 0,20 8,0 N4 7 0,22 8,8 8 0,25 10,0 9 0,28 11,2 10 0,32 12,8 11 0,35 14,0 12 0,40 16,0 N5 13 0,45 18,0 14 0,50 20,0 15 0,56 22,4 16 0,63 25,2 17 0,70 28,0 18 0,80 32,0 19 0,90 36,0 N6 20 1,00 40,0 21 1,12 44,8 22 1,26 50,4 23 1,40 56 24 1,62 63 25 1,80 72 N7 26 2,00 80 27 2,20 88 28 2,50 100 29 2,80 112 30 3,20 125 N8 31 3,50 140 32 4,00 160 33 4,50 180 34 5,00 200 35 5,60 224 36 6,30 250 N9 37 7,00 280 38 8,00 320 39 9,00 360 40 10,00 400 41 11,20 448 42 12,60 500 N10 43 14,00 560 44 16,00 640 45 18,00 760 Definition of Roughness criteria No CH = 20 log (10 Ra) ( m) Some significant rules and figures 1 m Ra = CH20 10 m Ra = CH40 If Ra = Ra x 2 CH = CH+6 ex: 1 m Ra = CH20 2 m Ra = CH26 3 m Ra = CH32 The ratio between 2 successive CH units is The difference between 2 successive CH units is The MAX Rt: roughly equal to 8 x Ra The mean Rt: is the arithmetic mean of the 5 Max Rt recorded on the 5 sample lengths selected.
3 (For establishing the technology: ) Mean Rt = 5 x the Ra value Note: In Surface Finish measurements a tolerance of + 2 CH units is accepted. Further note: The American and English standards admit the following relationship between the values V(RMS) and V(Ra): V(RMS) = V(Ra) The French standard NF 05051 is tied in with the ISO 1302 standard concerning classes of Surface Finish . Call High Performance Machinery for more information or to arrange a test cut. John Griffiths at: 978-544-6500 or Ken Otzel at: 508-958-5565
