Transcription of Surface Tension Measurements Using the Drop …
1 Surface Tension Measurements Using the Drop Shape Method By Roger P. Woodward, First Ten Angstroms, 465 Dinwiddie Street, Portsmouth, VA 23704 Tel: Fax: email: Drop shape analysis is a convenient way to measure Surface Tension . The principal assump-tions are The drop is symmetric about a central vertical axis: this means it is irrelevant from which direction the drop is viewed. The drop is not in motion in the sense that viscosity or inertia are playing a role in determining its shape: this means that Surface (or interfacial) Tension and gravity are the only forces shaping the drop. The two principal practical advantages of the technique are Calibration is straightforward in that only optical magnification is needed.
2 This can be measured with high accuracy and is easy to trace to national standards. (Density must be known by this and all methods.) Solid surfaces of the apparatus involved need not have any special cleanliness because their wettability, per se, does not affect the result. This is a significant advantage over such techniques as the Wilhelmy plate where cleanliness is required. Surface Tension is determined by fitting the shape of the drop (in a captured video image) to the Young-Laplace equation which relates inter-facial Tension to drop shape. The software does this automatically. We will now lead the reader through the process of making real Measurements . While we will use the term Surface Tension as a convenience, we recognize all of these Measurements can be made on a liquid-liquid interface as well as on a liquid-vapor interface.
3 Step 1. Determine Geometry. There are actually four combinations from which to choose: Pendant drop hanging down. The pendant drop is the familiar tear-drop shape. In this mode, the drop is the heavier of the two media when forming a liquid-liquid interface. Pendant bubble floating up. The dispense tip is now below the bubble and the bubble (drop) is the lighter of the two phases. Sessile drop. This is a sitting drop, as in a drop of water resting on a table. The drop is the heavier phase. Sessile bubble. The bubble (drop) is floating up against the top of the container and is the lighter phase. FT instruments can make all four kinds of Measurements when equipped with the appro-priate chambers or cuvets.
4 The pendant drop mode is always more accurate than the sessile drop because the assumption of axial symmetry is easier to satisfy. Sessile drop Measurements are used when it is not convenient to form a pendant drop. The primary area where this is true is molten materials such as glasses, metals and polymers. The choice of drop-down or bubble-up is a matter of convenience in liquid-liquid interfacial work if both fluids transmit light, otherwise the outside media must be transparent. In liquid-vapor work, the drop-down mode is always used. An interesting facet of the Young-Laplace equation is that it requires the drop to be distorted by gravity, as it balances this distortion against the restoring force of Surface Tension .
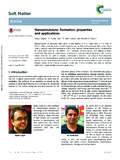
5 Surface Tension can not be determined for a spherical drop, , 2one unaffected by gravity. Therefore the height of the drop must be enough for the pressure difference between the top and bottom to distort the drop. This is ensured by Using a dispense tip large enough to support the needed drop size. This may take some trial and error. Lower Surface tensions require even larger tips to support the required volume. A 20 gauge needle with an outside diameter of is a good starting place for liquid-vapor work. Step 2. Setup Instrument. We must next load the liquid in the syringe (or cuvet) and obtain a good video image. Figure 1 shows some choices. Figure 1. Syringe, cuvet and needles. This particular syringe is a Hamilton 250 l, but you can choose from 25 to 500 l capacity in this style.
6 The larger syringes offer the convenience of providing many drops, yet still offer good volumetric resolution. You must tell the software the syringe internal diameter so the pump will be calibrated. This is done on the Pump tab. For the syringe in the figure, the capacity is and the scale s linear length is 60mm, for which the calculator on the tab provides a diameter of The round collar at the upper end of the syringe is an adapter for to the pump holder. Different adapters let you use syringes up to 10ml in size. A disposable cuvet is shown below the syringe. A dispense needle passes through the cuvet top. This allows the cuvet to be used with the needle entering from the top for pendant drop-down Measurements , or upside down with the needle entering from the bottom for pendant bubble-up Measurements .
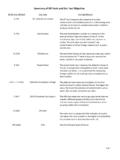
7 The total volume inside the cuvet is Cuvets are a convenient way of protecting pendant drops from air currents and for controlling evaporation. They are a necessity for liquid-liquid work. Optional temperature control stages are available for these cuvets. The needles shown in Figure 1 are 22 gauge with an outside diameter of Figure 2 shows a range of choices in disposable needles, including an all-plastic beveled tip (at the bottom) which is useful for low Surface Tension liquid-vapor Measurements when a cuvet is not used. A Luer adapter extension tube is also shown in Figure 1. It is used in the inverted mode bubble up mode to connect the syringe to the dispense tip, since the tip is no longer directly under the syringe.
8 Figure 2. Example needles. The Help/Reference section in the software contains a listing of needle diameters. Most of the time we will load fluid in the syringe (but not always, because you can perform a liquid-vapor measurement in a bubble-up mode with the syringe controlling the vapor bubble). If you wish to fill a small syringe, the best way is to use a second syringe. Fill it in the normal way by drawing fluid up through its attached needle. Then dispense this into the first syringe with its needle removed and the syringe held upside down. In this fashion fluid flows down into the syringe and, if one is careful, will displace all of the air. Once the small syringe is absolutely full, attach the needle.
9 Now you may turn the syringe over if you wish. Dispense enough fluid to displace the 3air in the needle. This is one reason to use a larger capacity syringe, because the needle body will hold 25 l or so and this will use up most of a, say, 50 l syringe. If you wish to use only a very small amount of fluid sample, you will not want to fill the syringe. Instead, you may leave air in the syringe and draw only a small amount of fluid up into the needle body. It is practical to make Measurements with at little as 20 l total fluid in this fashion. (You need to keep some fluid in the needle while the drop is formed, so, for example, 20 l would support a 10 l drop.) A more sophisticated alternative to this is to fill the syringe with a working fluid, but keep an airgap between it and the fluid being tested.
10 Fill the syringe as before, but expel air from only the visible part of the Luer hub (generally you can see into the plastic hub on these needles). Then draw test fluid up into the needle portion. Use the syringe scale to precisely draw, say, 20 l. Experi-ment to see how much you can pick up without the test fluid infringing on the area previously wetted by the working fluid. Mount the syringe and, if used, the cuvet and obtain a video image of the needle tip. Align the camera so its line-of-sight is exactly horizontal and the dispense tip is in focus. Step 3. Magnification Calibration. This is an iterative process, because we must know how large the drop is going to be before setting magnification, and we can t calibrate until magnification is set.