Transcription of Tech Tips 003 Proper Installation of Ribbed Waterstop Profiles
1 J P SPECIALTIES, Jefferson Avenue Murrieta, CA 92562 T 19517637077 F 19517637074 Tips 003 Proper Installation of RibbedWaterstop ProfilesBy David R. Poole, CSI, ACIE mbedded, Ribbed profile, polymer waterstops rarely (if ever) fail from catastrophic failures, such as bursting under high hydrostatic stress. Furthermore, if properly installed, the centerbulb and tear web varieties can even accommodate fairly substantial joint move-ments. Unfortunately, there are far too few resources for the con-tractor in the field, and waterstops are frequently installed improper-ly. The goal of this document is to provide a simple job site guide, that can be utilized as a quick and easy reference for the Proper Installation of Ribbed centerbulb profiles as manufactured by J P Specialties, Waterstop 24 hours prior to Installation for ease of han-dling and fabrication. (Plastics have a memory, and this will re-move the curl from the Waterstop .)
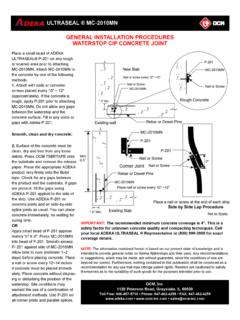
2 Waterstop to ensure Proper distance (See Installation step C.) Waterstop from damage during progress of work. concrete joint after first pour to remove debris and dirt. Examination/Inspection to placement of concrete notify engineer for field inspection approval. Waterstop and field splices for defects. inspection of Waterstop Installation , replace any damaged or unacceptable Waterstop and dispose of defective material. Installation Waterstop in joint as indicated on drawings. Waterstop on joint, with approximately one-half of water-stop width to be embedded in concrete on each side of the joint. (If expansion joint, see step D.) Use split form Installation method. do not bend or fold Waterstop flat against forms (See Figure 3). Earth Shield Tech Tip #003 (all material copyright 2009) publication date: 07/16/09J P SPECIALTIES, Jefferson Avenue Murrieta, CA 92562 T 19517637077 F 19517637074 clearance between Waterstop and reinforcing steel of a minimum of times the largest aggregate size.
3 Prevent rock pockets and air voids caused by aggregate bridging. centerbulb is not embedded at expansion joints. Use the specified brand of expansion joint filler above and beneath the Waterstop bulb. Waterstop in correct position using optional factory-in-stalled brass eyelets (See Figure 1, or JPS hog rings crimped between last two ribs on 12 inch maximum centers), and wire tie to adjacent reinforcing steel (See Figure 2). place concrete without displacing Waterstop from prop-er position. (If Installation step E is followed, this will not be a problem.) and systematically vibrate concrete in the vicinity of the joint, and to maximized intimate contact between concrete and Waterstop . (Pay particular attention to the area beneath the Waterstop leg.) first pour, clean unembedded Waterstop leg to ensure full contact of second concrete pour. Remove laitance, spillage, form oil and dirt.
4 All steps for the second pour. Earth Shield Tech Tip #003 (all material copyright 2009) publication date: 07/16/09J P SPECIALTIES, Jefferson Avenue Murrieta, CA 92562 T 19517637077 F 19517637074 1 Factory Installed Brass Eyelets (to facilitate attachment to reinforcing steel) Figure 2 Typical Starter Wall Detail Earth Shield Tech Tip #003 (all material copyright 2009) publication date: 07/16/09J P SPECIALTIES, Jefferson Avenue Murrieta, CA 92562 T 19517637077 F 19517637074 3 Typical Split Form DrawingEarth Shield Tech Tip #003 (all material copyright 2009) publication date: 07/16/09